
1. Introduction
This manual provides detailed instructions for the installation, operation, and maintenance of your Rohent R7 Wireless RV Backup Camera System. Please read this manual thoroughly before using the product to ensure proper function and safety. Keep this manual for future reference.
2. Product Features
- Enhanced Wireless Connectivity: Features strong digital signal transmission, capable of reaching up to 984ft in open areas and 320ft in vehicles.
- Versatile Display Modes: Supports single, split, and quad-screen viewing options with up to 4 channels for additional cameras.
- 7-Inch DVR Monitor with Touch Keys: Records video footage and features capacitive touch buttons for durability and ease of use.
- Durable and Weatherproof Design: IP69 waterproof camera with 18 infrared lights for 1080P HD night vision, suitable for various weather conditions.
- High-Definition Imaging: Provides clear 1080P HD images for improved visibility.

Figure 2.1: Rohent R7 System Overview with Key Features

Figure 2.2: Split and Quad Screen Functionality

Figure 2.3: Day and Night Vision Performance
3. Package Contents
Verify that all items listed below are included in your package. If any items are missing or damaged, please contact customer support.

Figure 3.1: Rohent R7 Package Contents
- 7-inch DVR Monitor
- Wireless Camera
- Monitor Sun Visor
- Monitor Mounting Bracket
- Antennas (for monitor and camera)
- Cigarette Lighter Power Adapter
- Test Wire
- Power Cords
- Furrion Pre-Wired Adapter Bracket
- Other Installation Accessories (screws, cable ties, etc.)
4. Setup and Installation
4.1 Camera Installation
- Mounting Location: Choose a suitable location on the rear of your RV, trailer, or vehicle for optimal viewing. Ensure the camera has a clear line of sight.
- Secure Mounting: Use the provided bracket and screws to securely attach the camera. If your RV is Furrion pre-wired, use the specialized Furrion adapter bracket.
- Power Connection: Connect the camera's power cable to a 12V DC power source. This can typically be the vehicle's reverse light circuit for automatic activation when reversing, or a constant power source if continuous monitoring is desired.
- Antenna Attachment: Screw the antenna firmly onto the camera.
4.2 Monitor Installation
- Mounting Location: Select a dashboard or windshield location that provides a clear view without obstructing your driving.
- Secure Mounting: Use the provided mounting bracket (dashboard mount) or an optional suction cup mount (if acquired) to secure the monitor.
- Power Connection: Plug the monitor's power cable into the vehicle's 12V cigarette lighter socket.
- Antenna Attachment: Screw the antenna firmly onto the monitor.
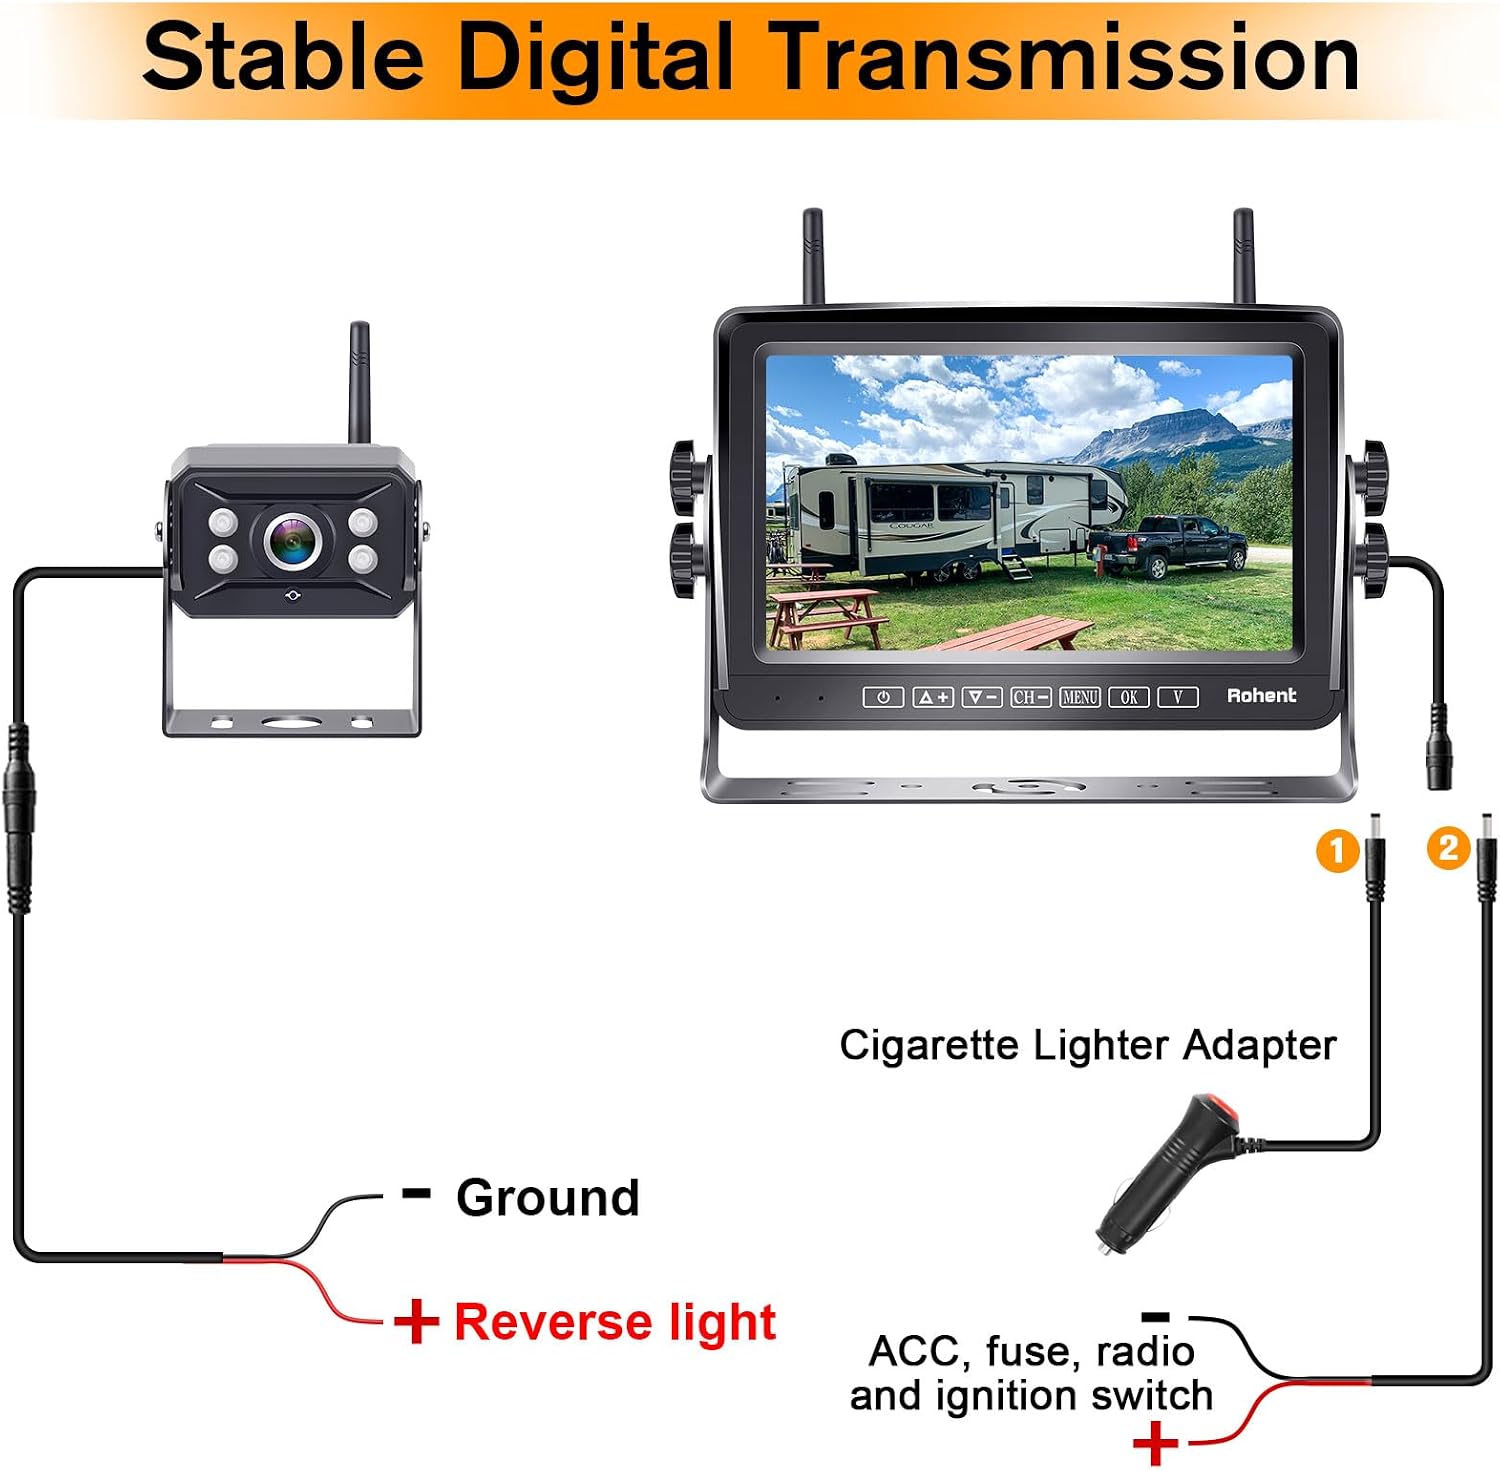
Figure 4.1: Power Connection Diagram

Figure 4.2: Monitor Mounting Options
5. Operating Instructions
5.1 Powering On/Off
Press the 'POWER' button on the monitor to turn the system on or off. The monitor will automatically power on when the camera receives power (e.g., when the vehicle is put into reverse if wired to the reverse lights).
5.2 Screen Modes
The monitor supports single, split, and quad-screen views. Use the 'CH' button to cycle through available camera channels and screen layouts. The system can support up to four cameras simultaneously.
5.3 Video Recording (DVR Function)
The R7 monitor includes a DVR function to record footage. Insert a compatible SD card (up to 32GB, often included) into the monitor's SD card slot. Refer to the on-screen menu for recording options, playback, and file management.

Figure 5.1: Video Recording Feature
5.4 Menu Navigation
Use the 'MENU' button to access system settings. Navigate through options using the arrow buttons and confirm selections with the 'OK' button. Settings include image flip, parking lines, brightness, contrast, and more.

Figure 5.2: Image Flip Functionality
5.5 Parking Lines
The monitor can display adjustable parking lines to assist with reversing. These can be enabled or disabled via the menu settings.
6. Maintenance
- Cleaning: Regularly clean the camera lens and monitor screen with a soft, damp cloth. Avoid abrasive cleaners.
- Waterproofing: The camera is IP69 waterproof. Ensure all connections are secure and sealed to maintain water resistance.
- Cable Management: Periodically check all cables for wear or damage. Secure loose cables to prevent interference or accidental disconnection.
- Software Updates: Check the manufacturer's website for any available firmware updates for optimal performance.
7. Troubleshooting
- No Signal:
- Ensure both the camera and monitor are powered on.
- Check all power connections for proper contact.
- Verify antennas are securely attached to both units.
- Reduce distance or obstacles between the camera and monitor.
- Flickering/Intermittent Signal:
- This may indicate signal interference. Try repositioning antennas or moving the monitor slightly.
- Ensure no large metal objects are blocking the signal path.
- Poor Image Quality:
- Clean the camera lens.
- Adjust brightness and contrast settings on the monitor.
- Ensure the camera is securely mounted and not vibrating.
- DVR Not Recording:
- Check if the SD card is inserted correctly and is not full.
- Format the SD card through the monitor's menu (this will erase all data).
- Ensure the SD card is compatible (Class 10 or higher recommended).
Video 7.1: Rohent R7 RV Backup Camera Wireless System Overview. This video demonstrates the system's features and functionality, including signal strength and display modes.
Video 7.2: Rohent RV Backup Camera Wireless System with 7 Inch Monitor. This video provides a closer look at the 7-inch monitor and its interface.
8. Specifications
| Brand | Rohent |
| Model Number | R7 |
| Screen Size | 7 Inches |
| Video Capture Resolution | 1080p |
| Optical Sensor Technology | CMOS |
| Real Angle of View | 150 Degrees |
| Connector Type | Wireless |
| Installation Type | Dashboard Mount, Surface Mount |
| Voltage | 12 Volts |
| Display Technology | LCD |
| UPC | 751940327749 |
9. Warranty and Support
Rohent provides a Two-Year Replacement Warranty for the R7 Wireless RV Backup Camera System. Additionally, customers receive Lifetime Technical Support and online customer service. For any inquiries, technical assistance, or warranty claims, please contact Rohent customer service through the official website or your purchase platform.
