Introduction
Thank you for purchasing the Nedis CLAR005BK Digital LED Projection Alarm Clock Radio. This manual provides detailed instructions for the safe and efficient use of your new device. Please read this manual thoroughly before use and keep it for future reference.
Safety Instructions
- Read all instructions carefully before operating the device.
- Do not expose the device to dripping or splashing water.
- Do not place objects filled with liquids, such as vases, on the device.
- Ensure proper ventilation. Do not block any ventilation openings.
- Place the device on a stable, flat surface.
- Use only the power adapter supplied with the device.
- Do not attempt to repair or modify the device yourself. Refer all servicing to qualified personnel.
- Keep the device away from direct sunlight, heat sources, and strong magnetic fields.
Package Contents
Please check the package contents to ensure all items are present and in good condition:
- Nedis CLAR005BK Projection Alarm Clock Radio
- Power Adapter (if included, otherwise integrated cable)
- User Manual (this document)
Product Overview
Familiarize yourself with the various parts and controls of your alarm clock radio.

Figure 1: Front View. This image displays the front of the alarm clock radio, featuring a prominent red LED display showing "8:00". The "Nedis" brand logo is visible above the display, and text "ALARM CLOCK RADIO / TIME PROJECTION" is below. Buttons are visible on the top surface.

Figure 2: Top Controls. This image shows the top panel of the alarm clock radio, highlighting the various control buttons for setting time, alarms, radio functions, and snooze.
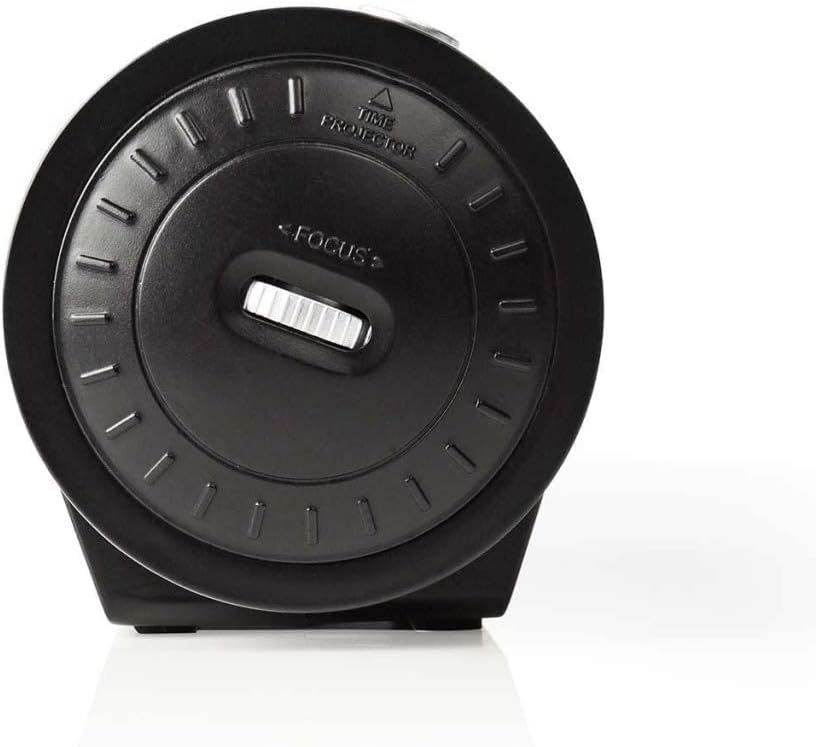
Figure 3: Projector Side. This image focuses on the side of the alarm clock radio where the time projector lens is located. A "FOCUS" wheel is clearly visible for adjusting the clarity of the projected time, along with an indicator for "TIME PROJECTOR".
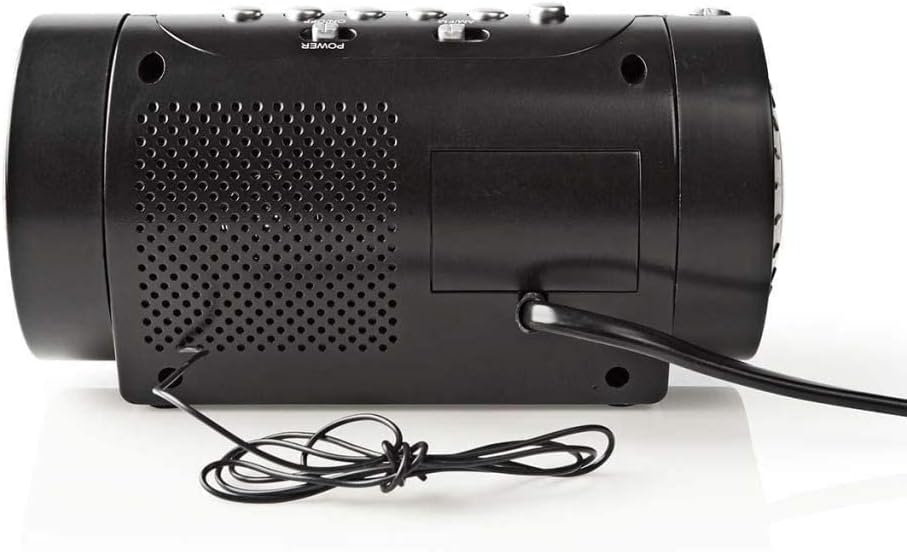
Figure 4: Rear Panel. This image shows the back of the alarm clock radio, featuring the integrated power cable, a speaker grille for audio output, and a battery compartment cover (if applicable).
Control Buttons (Refer to Figure 2)
- TIME SET: Press to enter time setting mode.
- HOUR / MIN: Use to adjust hour and minute during time/alarm setting.
- ALARM 1 / ALARM 2: Press to set Alarm 1 or Alarm 2.
- SNOOZE / SLEEP / DIMMER: Press to activate snooze, set sleep timer, or adjust display brightness.
- RADIO ON/OFF / BAND: Power on/off the radio or switch between AM/FM bands.
- TUNE +/-: Adjust radio frequency.
- VOLUME +/-: Adjust radio volume.
- PROJECTION ON/OFF: Turn the time projection on or off.
- PROJECTION ROTATION: Rotate the projected time display.
- FOCUS (Figure 3): Adjust the clarity of the projected time.
Setup
1. Power Connection
- Uncoil the power cable from the rear of the unit (Figure 4).
- Plug the power cable into a standard wall outlet. The LED display will light up.
- (Optional) For battery backup, open the battery compartment (usually at the bottom or rear) and insert 2x AAA batteries (not included). This will preserve time settings during a power outage.
2. Setting the Time
- Press and hold the TIME SET button until the hour digits start flashing.
- Use the HOUR button to adjust the hour. Pay attention to AM/PM indicators if present.
- Press the TIME SET button again, and the minute digits will flash.
- Use the MIN button to adjust the minutes.
- Press TIME SET once more to confirm and exit time setting mode.
3. Adjusting the Projection
- Locate the projector lens on the side of the unit (Figure 3).
- Press the PROJECTION ON/OFF button to activate the time projection.
- Rotate the PROJECTION ROTATION button/dial to adjust the angle of the projected time on your wall or ceiling.
- Turn the FOCUS wheel (Figure 3) until the projected time is clear and sharp.
Operating
1. Radio Operation
- Press the RADIO ON/OFF button to turn on the radio.
- Press the BAND button (often the same as RADIO ON/OFF) to switch between AM and FM bands.
- Use the TUNE +/- buttons to manually tune to your desired station.
- Adjust the volume using the VOLUME +/- buttons.
- To save a preset station: Tune to the desired station, then press and hold a preset button (if available, usually numbered 1-10 or M1-M5) until you hear a confirmation beep.
- To recall a preset station: Briefly press the corresponding preset button.
- To turn off the radio, press the RADIO ON/OFF button again.
2. Alarm Settings
This device features two independent alarms (Alarm 1 and Alarm 2).
- Setting Alarm Time:
- Press and hold the ALARM 1 or ALARM 2 button until the alarm hour digits flash.
- Use the HOUR button to set the desired alarm hour.
- Press the ALARM 1 or ALARM 2 button again, and the minute digits will flash.
- Use the MIN button to set the desired alarm minutes.
- Press the ALARM 1 or ALARM 2 button once more to confirm the alarm time.
- Selecting Alarm Source (Buzzer/Radio):
- After setting the alarm time, press the ALARM 1 or ALARM 2 button repeatedly to cycle through alarm modes: Buzzer, Radio, or Off. An indicator icon will show the selected mode.
- Snooze Function: When the alarm sounds, press the SNOOZE button to temporarily silence the alarm for approximately 9 minutes. The alarm will sound again after this period.
- Stopping the Alarm: To turn off the alarm for the day, press any button other than SNOOZE. The alarm will reset for the next day.
- Disabling Alarm Permanently: Cycle through the alarm source options until "OFF" or no alarm icon is displayed.
3. Sleep Timer
The sleep timer allows the radio to play for a set duration before automatically turning off.
- While the radio is playing, press the SLEEP button (often combined with SNOOZE/DIMMER) repeatedly to cycle through sleep timer options (e.g., 90, 60, 30, 15 minutes, OFF).
- The radio will automatically turn off after the selected time.
4. Display Dimmer
Adjust the brightness of the LED display.
- Press the DIMMER button (often combined with SNOOZE/SLEEP) repeatedly to cycle through different brightness levels (e.g., High, Medium, Low, Off).
Maintenance
Cleaning
- Always unplug the device from the power outlet before cleaning.
- Use a soft, dry cloth to wipe the exterior surfaces.
- Do not use abrasive cleaners, waxes, or solvents as they may damage the finish.
- For the projector lens, use a soft, lint-free cloth specifically designed for optics.
Battery Replacement (for backup)
- If the time display is incorrect after a power outage, the backup batteries may need replacement.
- Open the battery compartment cover (refer to Figure 4 for general location).
- Remove the old batteries and dispose of them properly according to local regulations.
- Insert new 2x AAA batteries, ensuring correct polarity (+/-).
- Close the battery compartment cover.
Troubleshooting
| Problem | Possible Cause | Solution |
|---|---|---|
| No power/Display off | Power cable not connected; Power outage. | Ensure power cable is securely plugged into a working outlet. Check household circuit breaker. |
| Projected time is blurry | Focus not adjusted. | Adjust the FOCUS wheel on the projector side until the image is clear. |
| Projected time is upside down or sideways | Projection rotation needs adjustment. | Use the PROJECTION ROTATION button/dial to orient the time correctly. |
| Alarm does not sound | Alarm not set; Alarm volume too low; Alarm mode set to OFF. | Verify alarm time and ensure alarm is activated (Buzzer or Radio mode). Increase radio volume if alarm source is radio. |
| Poor radio reception | Antenna not extended/positioned correctly; Interference. | Extend the wire antenna fully and reposition it for better reception. Move the unit away from other electronic devices. |
Specifications
- Brand: NEDIS
- Model: CLAR005BK
- Color: Black
- Display Type: Digital LED
- Special Features: Alarm, Snooze, Time Projection
- Power Source: Electric (AC), Battery Backup (2x AAA, not included)
- Connectivity: Jack 3,5 mm (likely for antenna or headphone output)
- Weight: 364.9 Grams
- Material: Plastic
- Usage: Indoor
- Manufacturer Part Number: CLAR005BK
- GTIN: 05412810274116
Warranty
This product is covered by a manufacturer's warranty. Please refer to the warranty card included in your package or contact your retailer for specific terms and conditions. Keep your proof of purchase for warranty claims.
Support
For technical support, troubleshooting assistance, or to inquire about spare parts, please contact Nedis customer service. Contact details can typically be found on the Nedis website or on the product packaging.
You can also visit the Nedis Store on Amazon for more product information.


