1. Safety Information
Read all instructions carefully before installation and operation. Failure to follow these instructions may result in property damage, injury, or improper device function. Keep this manual for future reference.
- Always wear appropriate personal protective equipment (PPE) during installation, including safety glasses and gloves.
- Ensure the door and frame are structurally sound and capable of supporting the device.
- Verify all components are present and undamaged before beginning installation.
- This device is designed for emergency exit applications. Do not modify the device or use it for purposes other than its intended function.
- Regularly inspect the device for signs of wear or damage and ensure proper operation.
2. Package Contents
Verify that all items listed below are included in your package:

Figure 2.1: All components included in the FORTSTRONG FS-950 kit.
- Panic Bar (Main Device)
- Roller Strike and Shim
- End Cap
- Locking Lever (External Handle)
- Mounting Plate
- Three Security Keys
- Retractable Dogging Key
- Fixing Screws and Thru Bolts
- Fitting Template (Paper)
3. Installation Instructions
This section provides a general guide for installing the FORTSTRONG FS-950 panic exit device. For detailed visual instructions, refer to the official installation video and the included fitting template.

Figure 3.1: The FORTSTRONG FS-950 includes a detailed assembly guide and fitting template for easy installation.
3.1 Pre-Installation Checks
- Door Compatibility: This device is suitable for door widths from 31" to 47" and can be installed on wood, metal, or composite doors.
- Handing: The device is reversible for left or right-handed door applications. Determine the door's handing before installation.
- Tools Required: Basic tools such as a drill, measuring tape, screwdriver, and pencil will be needed.

Figure 3.2: The FS-950 is adjustable for various door materials and can be installed on either the left or right side of the door.
3.2 Step-by-Step Installation
- Prepare the Door: Use the provided fitting template to mark the drilling locations on the door for the panic bar and external locking lever. Ensure accurate measurements.
- Install the Panic Bar: Secure the main panic bar assembly to the interior side of the door using the fixing screws and thru bolts. Ensure it is level and operates smoothly.
- Install the External Locking Lever: Mount the external locking lever (if included) to the exterior side of the door, aligning it with the panic bar mechanism. Test the key operation.
- Install the Roller Strike: Position the roller strike on the door frame, aligning it with the latch bolt of the panic bar. Use the shim if necessary to achieve proper engagement.
- Attach the End Cap: Secure the end cap to the exposed end of the panic bar.
- Final Adjustments and Testing: Close the door and test the panic bar operation. Ensure the latch retracts fully when the bar is pushed and the door opens freely. Test the external locking lever and key functionality.
Video 3.1: Official installation guide for the FORTSTRONG FH-950 Push Bar Exit Device with Door Lever. This video demonstrates the step-by-step process for mounting the panic bar and external handle, ensuring correct alignment and functionality.
4. Operating Instructions
The FORTSTRONG FS-950 panic exit device is designed for intuitive and reliable emergency egress.

Figure 4.1: The panic bar allows for quick and easy exit with a simple push.
- Emergency Exit: To exit, simply push the horizontal bar firmly. The latch bolt will retract, allowing the door to open.
- External Entry (with Lever): If an external locking lever is installed, use the provided key to unlock the mechanism and turn the lever to open the door from the outside.
- Dogging Feature: The retractable dogging key can be used to hold the panic bar in the retracted (unlocked) position, allowing the door to be opened freely from both sides without using the bar. This is typically used during business hours or for maintenance. Insert the dogging key into the designated slot, turn it to retract the latch, and remove the key. To re-engage the latch, turn the key in the opposite direction or simply push the panic bar.
5. Maintenance
Regular maintenance ensures the longevity and reliable operation of your panic exit device.
- Cleaning: Clean the device regularly with a soft, damp cloth. Avoid abrasive cleaners or solvents that could damage the finish.
- Lubrication: Periodically apply a silicone-based lubricant to moving parts, such as the latch bolt and internal mechanisms, to ensure smooth operation. Do not over-lubricate.
- Inspection: Annually inspect all screws and bolts for tightness. Check for any signs of wear, corrosion, or damage to the panic bar, latch, strike, and external lever.
- Functionality Test: Regularly test the panic bar's operation to ensure the latch retracts fully and the door opens freely. Test the external locking mechanism and dogging feature if applicable.
6. Troubleshooting
Refer to the table below for common issues and their solutions.
| Problem | Possible Cause | Solution |
|---|---|---|
| Panic bar does not retract latch fully. | Misalignment of panic bar or strike; debris in mechanism; worn parts. | Check alignment and adjust if necessary. Clean any debris. Lubricate moving parts. If worn, replace components. |
| Door does not open when panic bar is pushed. | Latch not retracting; door binding in frame; external lock engaged. | Ensure latch retracts. Check door for obstructions. Verify external lock is disengaged. |
| External lever does not operate. | Key not fully inserted; internal mechanism jammed; incorrect installation. | Ensure key is fully inserted and turned correctly. Inspect internal connection to panic bar. Re-check installation steps. |
| Dogging feature not working. | Dogging key not fully engaged; mechanism obstructed. | Ensure dogging key is fully inserted and turned. Clean and lubricate the dogging mechanism. |
7. Specifications
Key features and technical specifications of the FORTSTRONG FS-950 Commercial Push Bar Panic Exit Device.
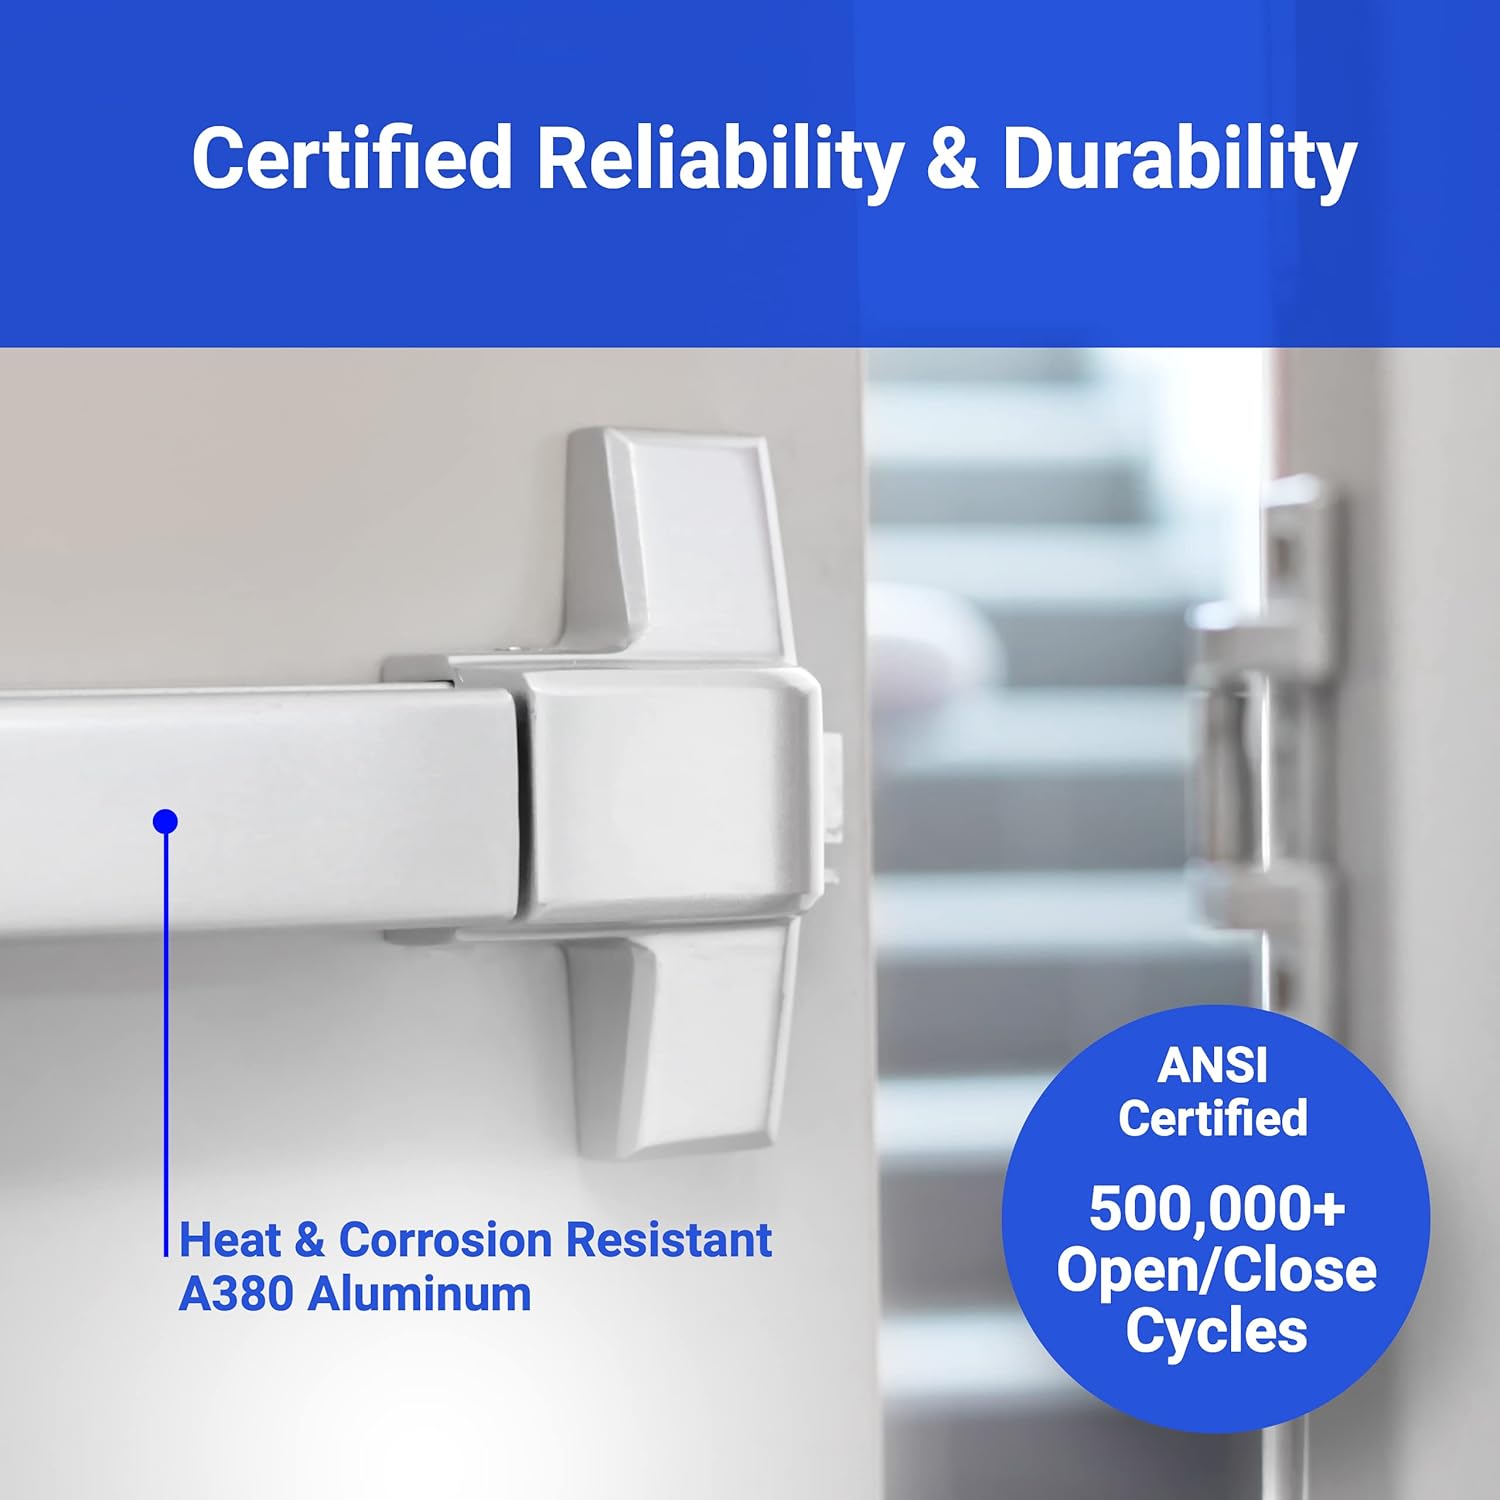
Figure 7.1: Certified reliability and durability with A380 Aluminum and ANSI standards.

Figure 7.2: Product dimensions for the FORTSTRONG FS-950 panic bar.
| Feature | Detail |
|---|---|
| Model Number | FS-950 |
| Certifications | UL 305 Listed, ADA Compliant, ANSI Grade 1 |
| Door Width Compatibility | 31" - 47" |
| Material | Aluminum (A380 Heat & Corrosion Resistant) |
| Finish | Brushed (Silver color variant) |
| Handing | Reversible (Left or Right) |
| Item Weight | 8.63 pounds (3.92 Kilograms) |
| Product Dimensions | 31.02"L x 6.06"W x 1.97"H |
| Installation Type | Screw-In |
| Included Components | Panic Bar, Door Handle, External Lever Keys, Dogging Key, End Cap, Fixing Screws and Thru Bolts, Roller Strike and Shim, Fitting Plate |
8. Warranty and Support
FORTSTRONG is committed to providing quality solutions. For warranty information, technical support, or assistance with your product, please refer to the contact information provided with your purchase or visit the official FORTSTRONG website.
- Customer Service: For any questions or issues, please contact FORTSTRONG customer support.
- Online Resources: Additional resources, FAQs, and product information may be available on the FORTSTRONG brand store or website.


