1. Introduction
Thank you for purchasing the Soundstream VR620B 2-DIN Digital Multimedia Receiver. This unit is designed to provide a comprehensive in-car entertainment and communication experience, featuring a 6.2-inch LCD display, Bluetooth connectivity for hands-free calling and audio streaming, and versatile multimedia playback options. This manual provides detailed instructions for installation, operation, maintenance, and troubleshooting to ensure you get the most out of your new device. Please read this manual thoroughly before operating the unit.
2. Safety Information
- Do not operate the unit in a manner that distracts you from driving. Always prioritize road safety.
- Ensure proper installation by a qualified professional to prevent damage to the unit or vehicle.
- Do not disassemble or modify the unit. This may cause malfunction, fire, or electric shock.
- Keep the volume at a level that allows you to hear outside sounds, such as emergency vehicles.
- Avoid exposing the unit to extreme temperatures, direct sunlight for prolonged periods, or excessive moisture.
- For safety, the video display function is disabled while the vehicle is in motion.
3. Package Contents
Please check that all items are present in your package:
- Soundstream VR620B Main Unit
- Wireless Remote Control
- Power/Speaker Wiring Harness
- Mounting Hardware (screws, brackets)
- User Manual (this document)
- Backup Camera (if included with your specific package)

Figure 3.1: Main unit, remote control, and optional backup camera.
This image displays the Soundstream VR620B 2-DIN receiver, its accompanying wireless remote control, and a compact backup camera. The main unit features a large touchscreen display with various function icons and physical buttons on the left side. The remote control is a standard rectangular shape with numerous buttons for controlling different functions. The backup camera is small and cylindrical, designed for rear vehicle mounting.
4. Product Overview
4.1 Front Panel Layout
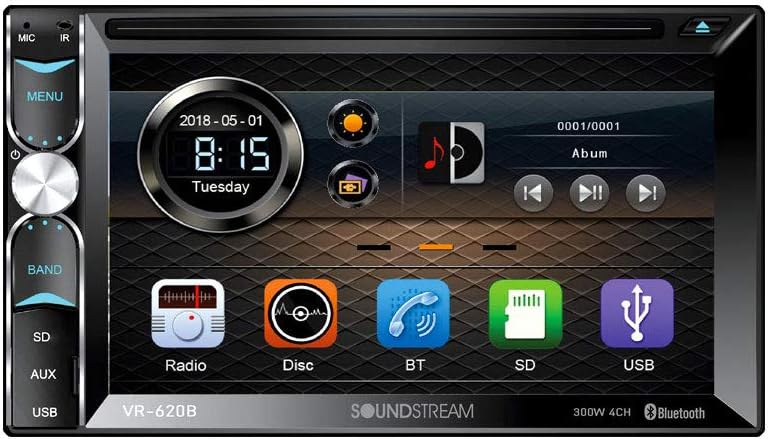
Figure 4.1: Front Panel of VR620B
This image provides a detailed view of the Soundstream VR620B's front panel. It highlights the 6.2-inch LCD touchscreen display, which shows the date, time, and various application icons such as Radio, Disc, BT (Bluetooth), SD, and USB. On the left side of the panel, there are physical buttons for MIC, IR, MENU, BAND, SD, AUX, and USB, along with a rotary knob for volume and selection. The unit also features an eject button for disc media.
The VR620B features a user-friendly interface with a 6.2-inch LCD touchscreen for intuitive control. Key physical controls are located on the left side for quick access to essential functions.
4.2 Wireless Remote Control

Figure 4.2: Wireless Remote Control and Backup Camera
This image shows a close-up of the Soundstream VR620B's wireless remote control alongside the compact backup camera. The remote control is black, rectangular, and features a comprehensive array of buttons for power, mode selection, navigation, volume control, numeric input, and various media playback functions. The backup camera, also black and cylindrical, is shown with its mounting bracket, indicating its compact size and design for discreet installation.
The included wireless remote control provides convenient access to most functions from a distance, enhancing user comfort and safety.
5. Setup and Installation
Proper installation is crucial for the optimal performance and longevity of your VR620B unit. It is highly recommended that installation be performed by a qualified professional car audio technician.
5.1 Wiring Connections
Refer to the wiring diagram provided with your unit for specific connections. Key connections include:
- Power (Yellow): Constant 12V supply.
- Accessory (Red): Switched 12V supply (ignition).
- Ground (Black): Connect to a clean chassis ground point.
- Speaker Outputs: Connect to vehicle speakers (Front L/R, Rear L/R). Ensure correct polarity.
- Antenna (Blue/White): Power antenna or amplifier remote turn-on.
- Parking Brake (Light Green): Connect to parking brake switch for video safety interlock.
- Reverse Gear (Brown): Connect to reverse light circuit for automatic backup camera display.
- RCA Pre-outs: Front, Rear, Subwoofer outputs for external amplifiers.
- Video Input (Yellow RCA): For backup camera connection.
- Audio/Video Input (RCA): For external audio/video sources.
5.2 Mounting
The VR620B is a Double DIN unit. Use the supplied mounting brackets and screws to secure the unit firmly into your vehicle's dashboard opening. Ensure adequate space for wiring and ventilation.
6. Operating Instructions
6.1 Basic Operation
- Power On/Off: Press the MODE button on the remote or the power button on the unit.
- Volume Control: Rotate the knob on the unit or use the VOL+/- buttons on the remote.
- Menu Navigation: Use the touchscreen or directional buttons on the remote to navigate menus.
- Source Selection: Press the MODE button on the remote or touch the desired source icon (Radio, Disc, BT, SD, USB, AUX) on the touchscreen.
6.2 Radio Operation
- Band Selection: Press the BAND button to switch between FM1, FM2, FM3, AM1, AM2.
- Manual Tuning: Touch the SEEK+/- icons on the screen or use the SEEK buttons on the remote.
- Auto Scan: Press and hold the SEEK+/- icons to automatically search for strong stations.
- Store Presets: Tune to a desired station, then press and hold a preset number (1-6) on the screen to save it.
6.3 Bluetooth Operation
The VR620B supports Bluetooth for hands-free calling and audio streaming.
- Pairing:
- Ensure Bluetooth is enabled on your mobile device.
- Select the 'BT' source on the VR620B.
- Search for available devices on your phone. The unit will appear as "Soundstream VR620B" or similar.
- Select the unit and enter the PIN (usually "0000") if prompted.
- Hands-Free Calling: Use the touchscreen to dial numbers, answer, reject, or end calls. The built-in microphone ensures clear communication.
- Audio Streaming (A2DP): Play music from your paired device. Use the unit's controls for play/pause, skip track.
6.4 USB/SD Playback
Insert a USB drive into the front USB port or an SD card into the SD card slot. The unit will automatically switch to the USB/SD source and begin playback of compatible media files (MP3, WMA, WAV, AAC, AVI, MP4, MPG, MOV, WMV).
- Navigation: Browse folders and files using the touchscreen.
- Playback Controls: Play/Pause, Next/Previous Track, Fast Forward/Rewind.
6.5 Disc Playback
Insert a CD or DVD into the disc slot. The unit will automatically switch to the Disc source and begin playback.
- Supported Formats: CD, CD-R/RW, DVD±R/RW, MP3, WMA, WAV, AAC, AVI, MP4, MPG, MOV, WMV.
- Playback Controls: Play/Pause, Next/Previous Chapter/Track, Fast Forward/Rewind.
6.6 Auxiliary Input
Connect external audio devices (e.g., MP3 players, smartphones) to the front 3.5mm auxiliary input jack using a stereo audio cable. Select the 'AUX' source on the unit to listen to audio from the connected device.
6.7 Backup Camera Display
If a backup camera is connected and wired correctly, the display will automatically switch to the camera view when the vehicle is shifted into reverse gear.
6.8 Smartphone Features (Android MHL PhoneLink)
The VR620B supports Android MHL PhoneLink for integrated control of select Android smartphones from the touchscreen. This allows you to launch applications, play videos, and access other content directly from the unit's display. Refer to your phone's compatibility and connection requirements for MHL.
7. Maintenance
- Cleaning the Screen: Use a soft, dry, lint-free cloth to wipe the touchscreen. For stubborn smudges, slightly dampen the cloth with water or a screen cleaner designed for electronics. Do not use abrasive cleaners or solvents.
- General Cleaning: Wipe the unit's exterior with a soft, dry cloth. Avoid spraying liquids directly onto the unit.
- Disc Care: Handle discs by their edges. Keep them clean and free of scratches. Store discs in their cases when not in use.
8. Troubleshooting
If you encounter issues with your VR620B, refer to the following common problems and solutions:
| Problem | Possible Cause | Solution |
|---|---|---|
| No power | Blown fuse; incorrect wiring; loose connection. | Check vehicle's fuse box and unit's fuse. Verify all power and ground connections. |
| No sound | Volume too low; Mute activated; incorrect speaker wiring; amplifier issue. | Increase volume. Check mute setting. Verify speaker connections and polarity. Check external amplifier if used. |
| Bluetooth not connecting | Bluetooth off on phone; unit not in pairing mode; interference. | Ensure phone's Bluetooth is on. Put unit in BT source. Delete previous pairings and re-pair. Move closer to unit. |
| Disc error | Dirty, scratched, or incompatible disc. | Clean disc. Try a different, known-good disc. Ensure disc format is supported. |
| Video not displaying | Parking brake safety wire not connected or engaged. | Ensure parking brake is engaged and the parking brake wire is correctly connected. |
9. Specifications
| Feature | Specification |
|---|---|
| Display | 6.2-inch LCD Touchscreen |
| Power Output (Peak) | 50 Watts x 4 Channels |
| Power Output (RMS) | 20 Watts x 4 Channels |
| Bluetooth | Hands-free Calling & Audio Streaming (A2DP) |
| Media Playback | CD, CD-R/RW, DVD±R/RW, MP3, WMA, WAV, AAC, AVI, MP4, MPG, MOV, WMV |
| Tuner | AM/FM Tuner with Presets |
| Inputs | Front 3.5mm Auxiliary, Front USB, Backup Camera (RCA), Rear RCA A/V Input |
| Outputs | 3 Sets of Preamp Outputs (Front, Rear, Subwoofer), Rear RCA Video Output |
| Smartphone Integration | Android MHL PhoneLink |
| Item Weight | 3.89 pounds |
| Package Dimensions | 8.98 x 8.19 x 6.3 inches |
10. Warranty and Support
Soundstream products are designed and manufactured to the highest quality standards. For information regarding your product's warranty period and terms, please refer to the warranty card included with your purchase or visit the official Soundstream website. For technical support, troubleshooting assistance beyond this manual, or service inquiries, please contact Soundstream customer support directly through their official channels.


