
1. Product Overview
This manual provides instructions for the assembly, operation, and maintenance of your Salsbury Industries 12-inch Wide Four-Tier Standard Metal Locker, Model 64365BL-U. This unassembled unit is designed for personal storage in various environments such as schools, locker rooms, and offices.
The locker features a durable 16 gauge steel construction with a blue powder-coated finish. It includes 12 individual compartments, each measuring 12 inches wide, 18 inches high, and 15 inches deep. The overall unit dimensions are 36 inches wide, 78 inches high (including 6-inch legs), and 15 inches deep.
Key features include a lift-up handle, a recessed hasp for accommodating combination or key padlocks (sold separately), and louvers for ventilation. Each compartment is equipped with an adjustable hat shelf and coat hooks for hanging items.

Figure 1: Overall dimensions of the locker unit.
2. Safety Information
Please read and understand all safety instructions before assembly and operation. Failure to follow these instructions may result in injury or damage to the product.
- Always assemble and disassemble with care to avoid injury.
- Be aware of pinch points around handles and hasps during assembly and use.
- Do not overload the lockers beyond their weight capacity.
- Always use appropriate safety gear, such as gloves, when handling heavy components or sharp edges during assembly.
- Ensure the locker is placed on a level, stable surface to prevent tipping.
3. Package Contents
Before beginning assembly, verify that all components are present and undamaged. If any parts are missing or damaged, please contact Salsbury Industries customer support.
- Locker side panels
- Top and bottom panels
- Back panel
- Door assemblies (12 units)
- Shelf components (adjustable hat shelves)
- Coat hooks
- Legs (6 units)
- Assembly hardware (screws, nuts, bolts)
- Instruction sheet (this document)
4. Setup and Assembly Instructions
This locker unit is shipped unassembled. Assembly typically requires two people and basic tools such as a screwdriver and wrench. Follow the steps below carefully.
- Prepare the Area: Choose a clear, level workspace. Unpack all components and lay them out, checking against the package contents list.
- Assemble the Frame: Attach the side panels to the back panel using the provided hardware. Ensure all connections are secure but do not fully tighten until the entire frame is assembled.
- Install Top and Bottom Panels: Secure the top and bottom panels to the assembled side and back panels.
- Attach Legs: Fasten the six legs to the bottom panel of the locker unit.
- Install Doors: Carefully attach each of the 12 door assemblies to the frame. Ensure hinges are properly aligned and doors open and close smoothly.
- Insert Shelves and Hooks: Place the adjustable hat shelves inside each compartment at the desired height. Install the coat hooks as indicated.
- Final Tightening: Once all components are in place and aligned, fully tighten all screws and bolts.
- Position Locker: Carefully move the assembled locker to its final desired location. Ensure it is stable and level.
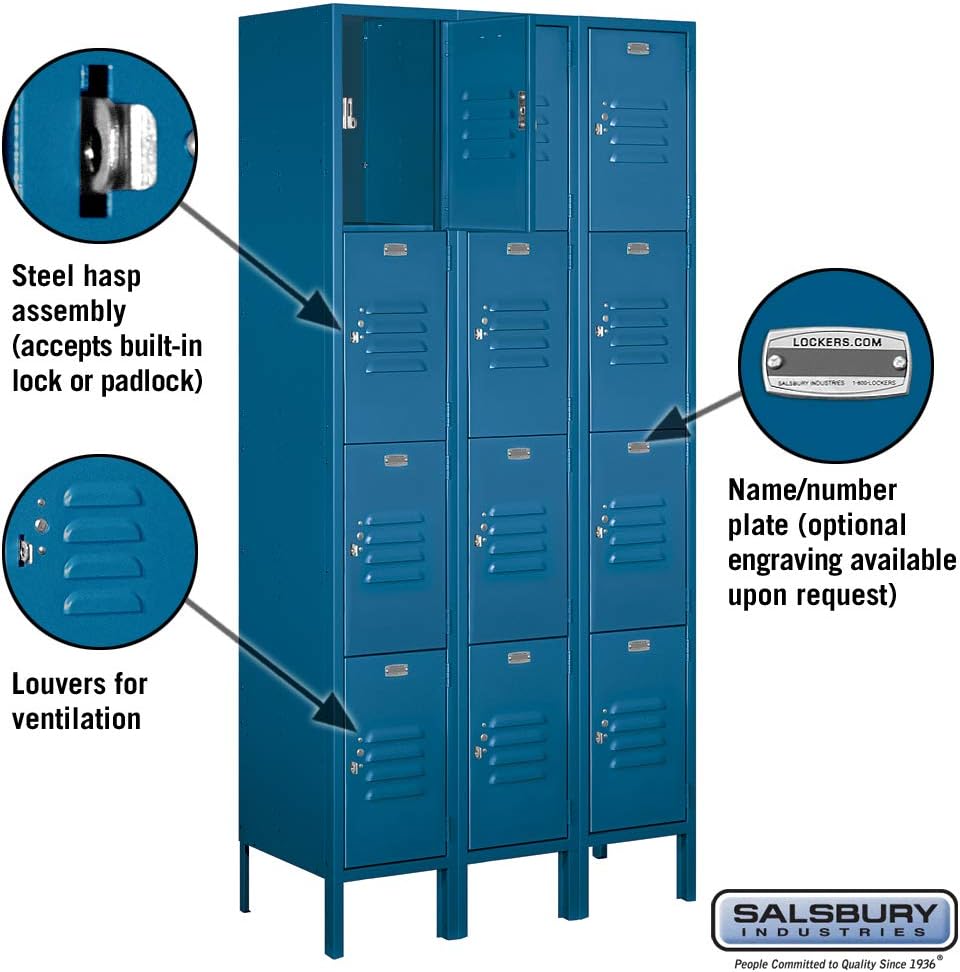
Figure 2: External features including hasp, louvers, and nameplate.

Figure 3: Interior features: adjustable hat shelf and coat hooks.
5. Operating Instructions
Using your Salsbury Industries locker is straightforward.
- Opening and Closing: To open a compartment, lift the handle and pull the door open. To close, push the door shut until it latches.
- Securing with a Padlock: The recessed hasp on each door is designed to accept a standard combination or key padlock (not included). Insert the padlock shackle through the hasp opening and secure it according to the padlock manufacturer's instructions.
- Using Internal Storage: Utilize the adjustable hat shelf for smaller items and the coat hooks for hanging garments or bags.

Figure 4: Locker door with optional padlock for security.
6. Maintenance
Regular maintenance will ensure the longevity and appearance of your locker unit.
- Cleaning: Wipe down the powder-coated steel surfaces with a soft, damp cloth and mild detergent. Avoid abrasive cleaners or solvents, which can damage the finish.
- Inspection: Periodically check all bolts and screws to ensure they remain tight. Inspect hinges and latches for smooth operation and lubricate with a silicone-based spray if necessary.
- Ventilation: Ensure the louvers are not obstructed to maintain proper airflow within the compartments.
7. Troubleshooting
If you encounter any issues with your locker, refer to the following common solutions:
- Door Sticking/Not Closing Properly: Check for obstructions in the door frame or hinge area. Ensure the locker is on a level surface; uneven flooring can cause misalignment. Adjust hinge screws if necessary.
- Hasp Not Aligning with Padlock: Verify that the door is fully closed and latched. Check for any bending or damage to the hasp or door.
- Excessive Noise: Tighten any loose hardware. Lubricate hinges with a suitable lubricant if squeaking occurs.
For issues not resolved by these steps, please contact customer support.
8. Specifications
| Feature | Detail |
|---|---|
| Model Number | 64365BL-U |
| Overall Dimensions (H x W x D) | 78" x 36" x 15" |
| Compartment Dimensions (H x W x D) | 18" x 12" x 15" (per compartment) |
| Number of Compartments | 12 (Four tiers, three wide) |
| Material | 16 Gauge Steel, Alloy Steel |
| Finish | Powder Coated (Blue) |
| Assembly Required | Yes (Unassembled unit) |
| Special Features | Lockable (with optional padlock), Ventilation Louvers, Adjustable Hat Shelf, Coat Hooks |
| Item Weight | 144.7 pounds |

Figure 5: Example installation of Salsbury Industries lockers.
9. Warranty Information
This Salsbury Industries locker unit is covered by a 3-year limited manufacturer warranty. This warranty covers defects in materials and workmanship under normal use and service. For specific terms and conditions, or to make a warranty claim, please refer to the official Salsbury Industries warranty documentation or contact customer support.
10. Customer Support
For further assistance, technical support, or to inquire about replacement parts, please contact Salsbury Industries directly. Visit the official Salsbury Industries website or refer to your purchase documentation for contact details.
Online Resources: www.salsburyindustries.com


