Hiluckey HI-S025
Hiluckey Solar Charger Power Bank User Manual
Model: HI-S025 | Brand: Hiluckey
1. Product Overview
The Hiluckey Solar Charger Power Bank is a high-capacity portable charging solution designed for outdoor enthusiasts and emergency preparedness. Featuring a 25000mAh battery, four high-performance solar panels, and multiple USB outputs, it provides reliable power for smartphones, tablets, and other USB-powered devices.
Key Features:
- 25000mAh High Capacity: Provides multiple charges for mobile devices, suitable for extended trips.
- 4 Foldable Solar Panels: Efficient solar energy conversion for charging in direct sunlight.
- Fast Charging: Upgraded 15W output for rapid device charging.
- Multiple Outputs: One USB-C port and dual USB-A ports for simultaneous charging of up to three devices.
- Built-in Flashlight: Integrated bright LED flashlight for emergency use.
- Durable Design: Built for outdoor conditions, offering scratch and impact resistance.

Figure 1: Hiluckey Solar Charger Power Bank (Black model)
2. Package Contents
Please verify that all items are present and in good condition upon opening the package:
- Hiluckey Solar Charger Power Bank (Model: HI-S025)
- USB Charging Cable
- User Manual (this document)

Figure 2: Typical package contents for the Hiluckey Solar Charger.
3. Product Layout and Ports
Familiarize yourself with the various components and connection points of your power bank:
- Solar Panels: Four foldable panels on the exterior for solar charging.
- USB-A Output Ports (OUT1, OUT2): Two standard USB ports for charging devices.
- USB-C Port (IN/OUT3): A versatile port supporting both input (for charging the power bank) and output (for charging devices).
- Power Button: Activates the power bank and controls the flashlight.
- LED Indicator Lights: Displays battery level and charging status.
- LED Flashlight: Located on the back, activated by holding the power button.

Figure 3: USB-A and USB-C ports with protective cover.

Figure 4: Rear view with LED flashlight and power button.
4. Setup
4.1 Initial Charging
Before first use, it is recommended to fully charge the power bank using a wall charger. This ensures optimal battery performance and longevity.
- Connect the provided USB charging cable to the USB-C (IN/OUT3) port on the power bank.
- Plug the other end of the cable into a compatible USB wall adapter (not included).
- The LED indicator lights will illuminate to show charging progress. All lights will be solid when fully charged. A full recharge may take approximately 8 hours with a PD fast charger.
4.2 Solar Panel Deployment
For solar charging, unfold the four solar panels completely. Ensure they are exposed to direct sunlight for maximum efficiency.
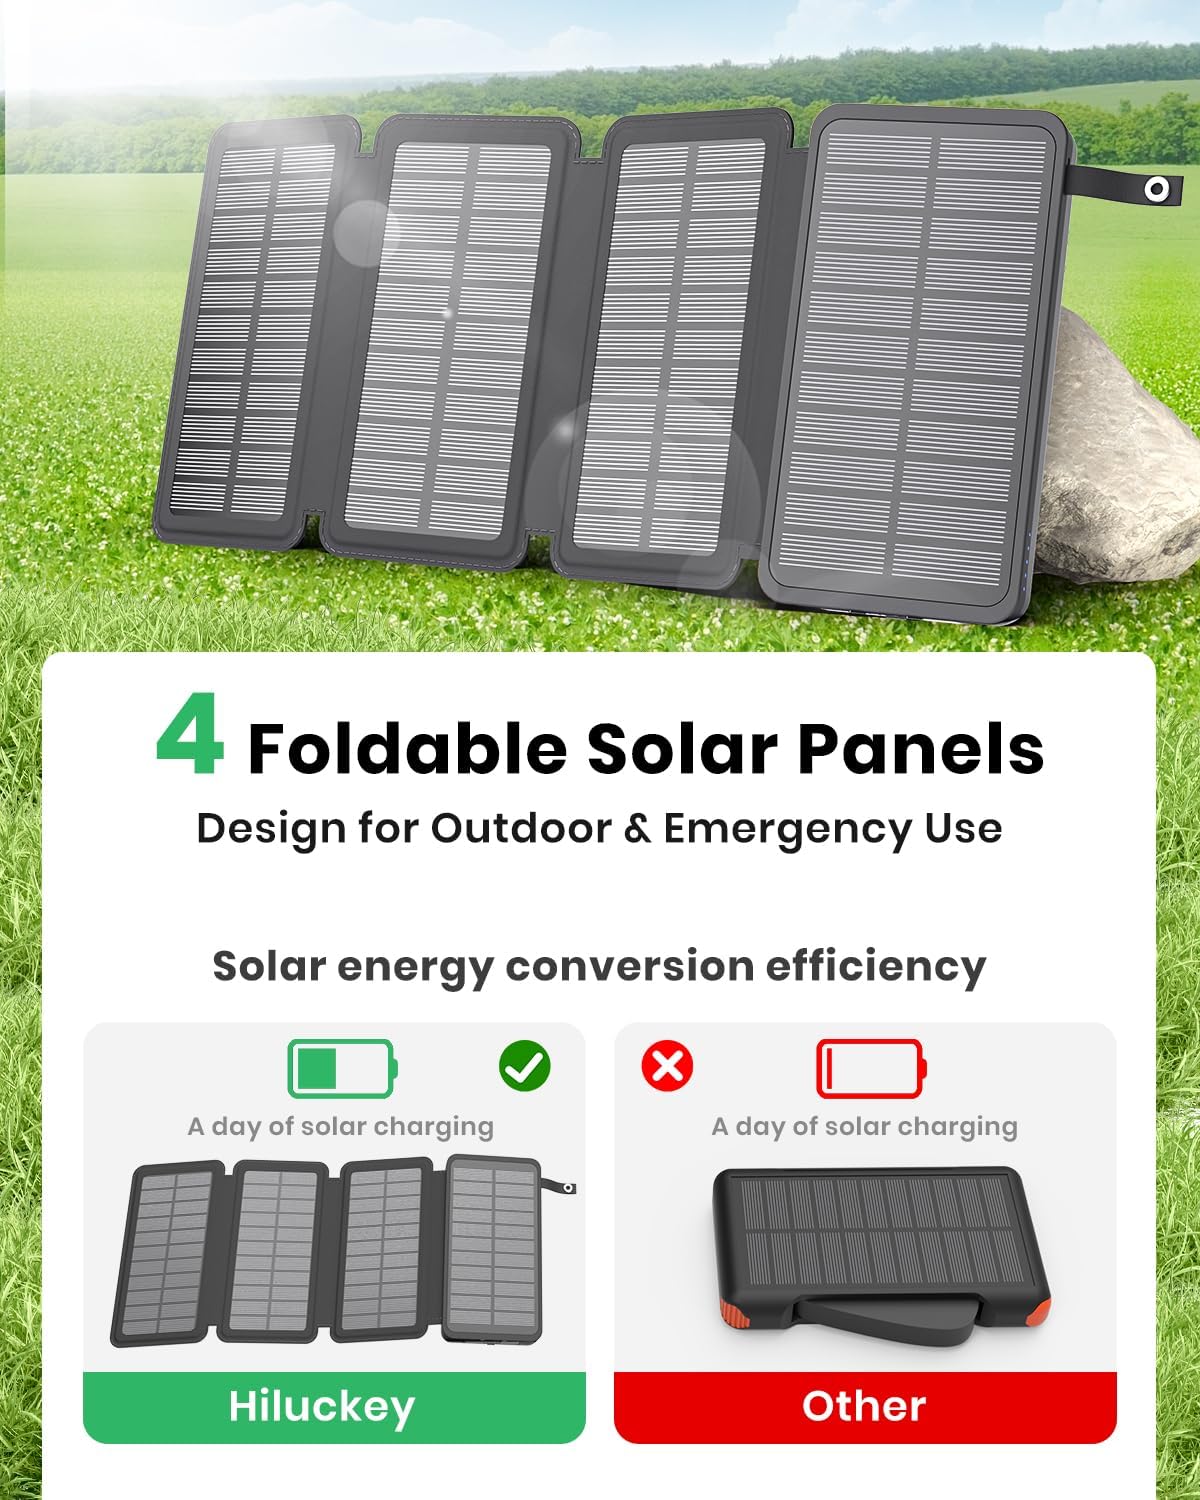
Figure 5: Power bank with solar panels fully deployed.
5. Operating Instructions
5.1 Charging Devices
To charge your electronic devices:
- Connect your device's charging cable to one of the USB-A output ports (OUT1, OUT2) or the USB-C port (IN/OUT3) on the power bank.
- Connect the other end of the cable to your device.
- The power bank will automatically begin charging your device. The LED indicator lights will show the remaining battery capacity.

Figure 6: Charging multiple devices.
5.2 Solar Charging the Power Bank
The solar panels provide a convenient way to recharge the power bank when a wall outlet is unavailable. Solar charging is slower than wall charging and is primarily intended for emergency or supplemental power.
- Unfold all four solar panels and place them in direct, unobstructed sunlight.
- Ensure the panels are facing the sun directly for optimal energy absorption.
- The solar indicator light (often a green LED) will illuminate when solar charging is active.
- Note that solar charging efficiency can vary significantly based on sunlight intensity, angle, and weather conditions.

Figure 7: Solar charging in an outdoor environment.
5.3 Using the Flashlight
To activate the built-in LED flashlight:
- Press and hold the Power Button for approximately 3 seconds.
- Repeat the action to turn off the flashlight.

Figure 8: Flashlight in use.
6. Maintenance
Proper care and maintenance will extend the lifespan of your Hiluckey Solar Charger Power Bank:
- Storage: Store the power bank in a cool, dry place away from direct sunlight and extreme temperatures.
- Regular Recharging: To maintain battery health, fully recharge the power bank at least once every three months, even if not in use.
- Avoid Over-Discharge: Do not allow the battery to completely drain for extended periods.
- Temperature Range: Operate and store the device within its recommended temperature range (32°F to 113°F / 0°C to 45°C). Avoid leaving it in hot vehicles.
- Water Resistance: The device is water-resistant, not waterproof. Avoid submerging it in water or exposing it to heavy rain. Ensure port covers are securely closed.
- Physical Care: Handle with care to prevent drops or impacts. Avoid scratching the solar panels.
- Cleaning: Use a soft, dry cloth to clean the device. Do not use harsh chemicals or abrasive materials.
7. Troubleshooting
If you encounter issues with your power bank, refer to the following common problems and solutions:
| Problem | Possible Cause | Solution |
|---|---|---|
| Power bank not charging via solar panels. | Insufficient sunlight; panels not fully deployed; power bank completely drained. | Ensure panels are in direct, strong sunlight. Fully unfold all panels. If completely drained, charge via wall adapter first. |
| Devices not charging from power bank. | Power bank battery is low; incorrect cable/port; device not compatible. | Recharge the power bank. Ensure cables are securely connected to the correct output ports. Verify device compatibility. |
| Flashlight not turning on. | Power button not held long enough; power bank battery is critically low. | Press and hold the power button for 3 seconds. Recharge the power bank. |
| Slow charging speed. | Using solar charging in low light; device requires higher wattage; multiple devices charging simultaneously. | For faster charging, use a wall adapter. Ensure your device supports 15W fast charging. Charge fewer devices at once. |
8. Specifications
| Feature | Detail |
|---|---|
| Model Number | HI-S025 |
| Battery Capacity | 25000mAh |
| Solar Panel Power | 6W (Max) |
| Input (USB-C) | 5V/3.0A |
| Output (USB-A, USB-C) | 5V/3.0A (15W Max) |
| Product Dimensions | 6.18 x 3.54 x 1.38 inches |
| Item Weight | 1.21 pounds |
| Color | Black |
| Manufacturer | Dongguan Jili Intelligent Technology Co., Ltd. |
9. Warranty and Support
Hiluckey is committed to providing high-quality products and excellent customer service. For specific warranty details and support inquiries, please refer to the warranty card included with your product or contact Hiluckey directly.
You may also reach out to our support team via email:
support@hiluckey.com
For the latest information and product registration, please visit the official Hiluckey website or their Amazon Brand Store:
Related Documents - HI-S025
 |
Hiluckey Solar Power Bank T11W - Declaration of Conformity EU Declaration of Conformity for the Hiluckey Solar Power Bank, Model T11W. Details manufacturer information, product specifications, and compliance with relevant European directives including RoHS and RED. |
 |
KEYENCE IL-1000 Amplifier Unit: Specifications, Dimensions, and Wiring Comprehensive data sheet for the KEYENCE IL-1000 amplifier unit, detailing its specifications, physical dimensions, and I/O circuit connection diagram for DIN-rail mounting applications. |
 |
Instrument Systems LGS Goniometer System Solutions for LED & SSL Analysis Discover the Instrument Systems LGS Goniometer System Solutions, a comprehensive turnkey system for high-end analysis of LED and SSL products. Featuring precise photometric and spectroradiometric measurements, versatile software, and detailed technical specifications for models like LGS 1000, LGS 650, and LGS 350. |
 |
KEYENCE IL Series CMOS Multi-Function Analog Laser Sensor User's Manual User's manual for the KEYENCE IL Series CMOS Multi-Function Analog Laser Sensor. Provides detailed information on operations, installation, safety precautions, specifications, and troubleshooting for industrial laser sensor applications. |
 |
KEYENCE IL Series: CMOS Multi-Function Analogue Laser Sensors - High-Performance Displacement Measurement Explore the KEYENCE IL Series of CMOS multi-function analogue laser sensors, offering stable detection, high performance, and versatile applications for industrial automation. Features include tuning-less operation, wide detection ranges, and advanced algorithms. |
 |
KEYENCE IL Series CMOS Multi-Function Analog Laser Sensor User's Manual This user's manual provides detailed information on the KEYENCE IL Series CMOS Multi-Function Analog Laser Sensor, covering installation, operation, safety precautions, specifications, and troubleshooting for industrial applications. |