
OttLite 799366629696
Ottlite Executive Desk Lamp User Manual
Model: 799366629696
Brand: OttLite
Introduction
The Ottlite Executive Desk Lamp is designed to enhance your workspace with versatile lighting and convenient features. With an adjustable arm, 3 color temperatures, and 5 brightness settings, this lamp provides optimal illumination for any task. OttLite technology helps reduce glare and eyestrain, allowing for extended comfortable use. Additionally, a built-in 2.1A USB port offers a convenient charging solution for your devices, keeping them within easy reach.
Important Safety Information
- Read all instructions before operating the lamp.
- Do not operate the lamp with a damaged cord or plug.
- Keep the lamp away from water or other liquids.
- Do not attempt to disassemble or repair the lamp yourself. Refer all servicing to qualified service personnel.
- Use only the power adapter supplied with the lamp.
- Unplug the lamp from the power outlet before cleaning.
Package Contents
Please check the box for the following items:
- Ottlite Executive Desk Lamp Unit
- Power Adapter
- User Manual (this document)
Product Overview
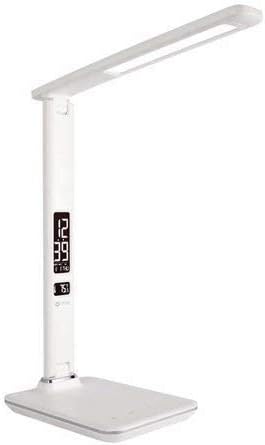
This image shows the Ottlite Executive Desk Lamp in white, featuring a sleek design with an adjustable arm and a rectangular LED light panel. The base includes a digital display showing time and temperature, along with touch controls.
The Ottlite Executive Desk Lamp features a sturdy base, an adjustable arm, and a rotatable lamp head. The base integrates a digital display for time, date, and temperature, along with touch-sensitive controls for light adjustments and other functions. A USB charging port is located on the side or back of the base.
Setup
- Carefully remove the lamp and all components from the packaging.
- Place the lamp on a stable, flat surface.
- Connect the power adapter cable to the power input port on the back of the lamp base.
- Plug the power adapter into a standard electrical outlet.
- The digital display should illuminate, and the lamp is now ready for use.
Operating Instructions
Power On/Off
- To turn the lamp on or off, gently touch the Power icon on the touch control panel located on the base.
Adjusting Brightness
- With the lamp on, repeatedly touch the Brightness icon (often represented by a sun or light bulb symbol) to cycle through the 5 available brightness levels.
Changing Color Temperature
- To change the light's color temperature (e.g., warm white, natural daylight, cool white), touch the Mode or Color Temperature icon. The lamp offers 3 distinct color temperature settings.
Using the 2.1A USB Charging Port
- Locate the USB charging port on the side or back of the lamp base.
- Plug your device's USB charging cable into this port.
- The 2.1A output provides fast charging for compatible smartphones, tablets, and other USB-powered devices.
Setting Time, Date, and Temperature Display
The digital display on the lamp base shows time, date, and ambient temperature. To set these:
- Press and hold the MODE button (often labeled 'M') on the control panel until the time display starts flashing.
- Use the UP and DOWN buttons (often labeled '+' and '-') to adjust the hour.
- Press MODE again to move to minutes, then adjust with UP/DOWN.
- Continue pressing MODE to cycle through year, month, and day settings, adjusting each with UP/DOWN.
- After setting the date, you may be able to switch between 12-hour and 24-hour format, and Celsius/Fahrenheit for temperature, using the UP/DOWN buttons when the respective setting is flashing.
- Press MODE one last time or wait a few seconds for the settings to save.
Setting the Alarm
If your lamp model includes an alarm function:
- Press the MODE button repeatedly until the alarm icon (often a bell) appears on the display.
- Press and hold MODE until the alarm time starts flashing.
- Use UP/DOWN to set the desired alarm hour and then minutes.
- Press MODE to confirm.
- To activate or deactivate the alarm, press the UP button when the alarm time is displayed (not flashing). An alarm icon will appear/disappear to indicate status.
Maintenance
- Ensure the lamp is unplugged before cleaning.
- Wipe the lamp surfaces with a soft, dry cloth.
- Do not use abrasive cleaners, waxes, or solvents as they may damage the finish.
- The LED light source is integrated and not user-replaceable.
Troubleshooting
| Problem | Possible Cause | Solution |
|---|---|---|
| Lamp does not turn on. | Power adapter not connected properly or no power from outlet. | Ensure power adapter is securely plugged into the lamp and a working electrical outlet. Test the outlet with another device. |
| Digital display is blank or flickering. | Power issue or internal malfunction. | Check power connection. Unplug and re-plug the lamp. If issue persists, contact customer support. |
| USB charging port not working. | Device not compatible, cable faulty, or lamp not powered. | Ensure the lamp is powered on. Try a different USB cable and another device. Verify device requires 2.1A charging. |
| Cannot set time/date. | Incorrect button sequence. | Refer to the 'Setting Time, Date, and Temperature Display' section and follow the steps carefully. Ensure you are pressing and holding the MODE button correctly. |
Specifications
| Feature | Detail |
|---|---|
| Brand | OttLite |
| Model Number | 799366629696 |
| Lamp Type | Desk Lamp |
| Light Source Type | LED |
| Brightness Settings | 5 Levels |
| Color Temperature Settings | 3 Modes |
| USB Charging Port | 2.1A Output |
| Control Method | Touch |
| Power Source | Corded Electric |
| Material | Plastic, Metal |
| Item Weight | 3.04 pounds |
| Package Dimensions | 17.6 x 8.3 x 6.8 inches |
Warranty and Support
For warranty information and customer support, please refer to the warranty card included with your product or visit the official OttLite website. Keep your purchase receipt as proof of purchase for any warranty claims.
Ask a question about this manual
Ask about setup, troubleshooting, compatibility, parts, safety, or missing instructions. Manuals+ will review the question and use this page’s manual context to help answer it.