1. Introduction
This manual provides essential information for the safe and efficient operation of your Bosch HKR39C220 freestanding electric cooker. Please read these instructions carefully before using the appliance and keep them for future reference. The Bosch HKR39C220 features a ceramic hob and an oven with 3D hot air function, designed for versatile cooking and baking.
2. Safety Instructions
Always prioritize safety when operating electrical appliances. Failure to follow these instructions may result in electric shock, fire, or injury.
- Electrical Safety: Ensure the appliance is correctly installed and grounded by a qualified professional. Do not use extension cords or adapters.
- Hot Surfaces: The hob and oven surfaces become very hot during operation and remain hot for some time after use. Always use oven mitts and keep children away.
- Fire Hazard: Never leave cooking unattended. Do not store flammable materials in or near the appliance. Clean grease and food residues regularly to prevent fire.
- Ventilation: Ensure adequate ventilation around the appliance.
- Cleaning: Disconnect the appliance from the power supply before cleaning.
- Children and Vulnerable Persons: This appliance can be used by children aged 8 years and above and persons with reduced physical, sensory or mental capabilities or lack of experience and knowledge if they have been given supervision or instruction concerning use of the appliance in a safe way and understand the hazards involved.
3. Product Overview
The Bosch HKR39C220 freestanding cooker combines a ceramic hob with an electric oven. Familiarize yourself with its components:

Image 3.1: Front view of the Bosch HKR39C220 freestanding cooker, showing the ceramic hob, control panel, oven door, and approximate dimensions.
3.1. Control Panel and Ceramic Hob

Image 3.2: Close-up of the ceramic hob and control panel. The panel features rotary knobs for hob and oven functions, along with a digital display for time and settings.
The control panel is located at the front of the appliance, above the oven door. It includes rotary knobs for selecting cooking zones and oven functions, as well as a digital display for time and other settings. The ceramic hob features four cooking zones of varying sizes, indicated by circular markings on the surface. These zones heat up quickly and efficiently.
3.2. Oven Interior and Accessories

Image 3.3: Interior view of the oven, showing the fan for 3D hot air circulation and multiple rack positions.

Image 3.4: Included oven accessories: a wire rack and a baking tray, designed to fit the oven's runners.
The oven has a capacity of 66 liters and is equipped with a fan for the 3D hot air function. It comes with two grids/supports (wire racks) and a baking tray, which can be placed on various levels within the oven cavity.
4. Setup and Installation
The Bosch HKR39C220 is a freestanding appliance. Proper installation is crucial for safety and performance.
- Unpacking: Carefully remove all packaging materials. Inspect the appliance for any damage.
- Positioning: Place the cooker on a level, stable surface. Ensure there is adequate clearance from adjacent cabinets and walls for ventilation. The dimensions are approximately 60 cm (width) x 60 cm (depth) x 85 cm (height).
- Electrical Connection: This appliance must be connected to the mains electricity supply by a qualified electrician, following local regulations. Ensure the voltage and frequency match the appliance's rating plate.
- First Use: Before first use, clean the oven interior and accessories with a damp cloth. Heat the empty oven at maximum temperature for approximately one hour to burn off any manufacturing residues. Ensure the room is well-ventilated during this process.
5. Operating Instructions
5.1. Using the Ceramic Hob
- Place a suitable pan on the desired cooking zone.
- Turn the corresponding hob control knob to the desired heat setting. The hob indicator light will illuminate.
- After cooking, turn the knob back to the '0' position. The residual heat indicator will remain lit until the zone has cooled down.
Note: The ceramic hob surface will remain hot after use. Avoid touching it until the residual heat indicator turns off.
5.2. Using the Oven
- Setting the Time: Use the digital display controls to set the current time. This is often required before the oven can be used.
- Selecting a Function: Turn the oven function selector knob to choose the desired cooking mode (e.g., 3D Hot Air, Top/Bottom Heat, Grill).
- Setting the Temperature: Turn the temperature selector knob to the required temperature. The oven indicator light will illuminate during heating.
- 3D Hot Air Function: This function uses a fan to distribute heat evenly throughout the oven, allowing for cooking on multiple levels simultaneously without flavor transfer.
- Grill Function: Use the grill for browning or toasting. Always monitor food closely when grilling.
- Ending Operation: Once cooking is complete, turn both the function and temperature knobs back to the 'Off' position.
Tip: Preheat the oven to the desired temperature before placing food inside for optimal results, especially for baking.
6. Maintenance and Cleaning
Regular cleaning and maintenance will prolong the life of your appliance and ensure hygienic operation.
- Before Cleaning: Always switch off the appliance and disconnect it from the power supply. Allow all surfaces to cool down completely.
- Ceramic Hob: Clean the ceramic surface with a specialized ceramic hob cleaner and a soft cloth. For stubborn stains, use a hob scraper. Avoid abrasive cleaners or scouring pads.
- Oven Interior: Wipe the oven interior with a damp cloth and mild detergent after each use. For baked-on food, use a non-abrasive oven cleaner, following the product instructions. Remove oven racks and trays for easier cleaning.
- Exterior Surfaces: Clean the exterior with a soft cloth and mild soapy water. Dry thoroughly.
- Accessories: Wash oven racks and trays in warm soapy water or in a dishwasher if suitable.
7. Troubleshooting
Before contacting customer service, try these troubleshooting steps for common issues:
| Problem | Possible Cause | Solution |
|---|---|---|
| Appliance does not turn on. | No power supply; fuse tripped; appliance not correctly plugged in. | Check power connection and circuit breaker. Ensure the appliance is properly plugged in. |
| Hob not heating. | Wrong cooking zone selected; control knob not set correctly. | Ensure the correct knob is turned to a heat setting. |
| Oven not heating. | Oven function or temperature not set; door not closed properly. | Verify function and temperature settings. Close the oven door completely. |
| Uneven cooking/baking. | Incorrect temperature or rack position; oven door opened too frequently. | Adjust temperature or rack position. Avoid opening the oven door unnecessarily. Utilize 3D Hot Air for even results. |
If the problem persists after attempting these solutions, please contact Bosch customer service.
8. Specifications
Key technical specifications for the Bosch HKR39C220 freestanding cooker:
- Brand: Bosch
- Model Number: HKR39C220
- Type: Freestanding Electric Cooker
- Dimensions (W x D x H): 60 cm x 60 cm x 85 cm
- Weight: 51.3 Kilograms
- Oven Capacity: 66 Litres
- Energy Efficiency Class: A (on a scale of A+++ to D)
- Hob Type: Vitroceramic (Ceramic)
- Number of Cooking Zones: 4
- Controls: Rotary Knobs
- Color: White
- Oven Functions: 3D Hot Air, Grill (among others)
- Included Accessories: 2 Grids/Supports, 1 Baking Tray
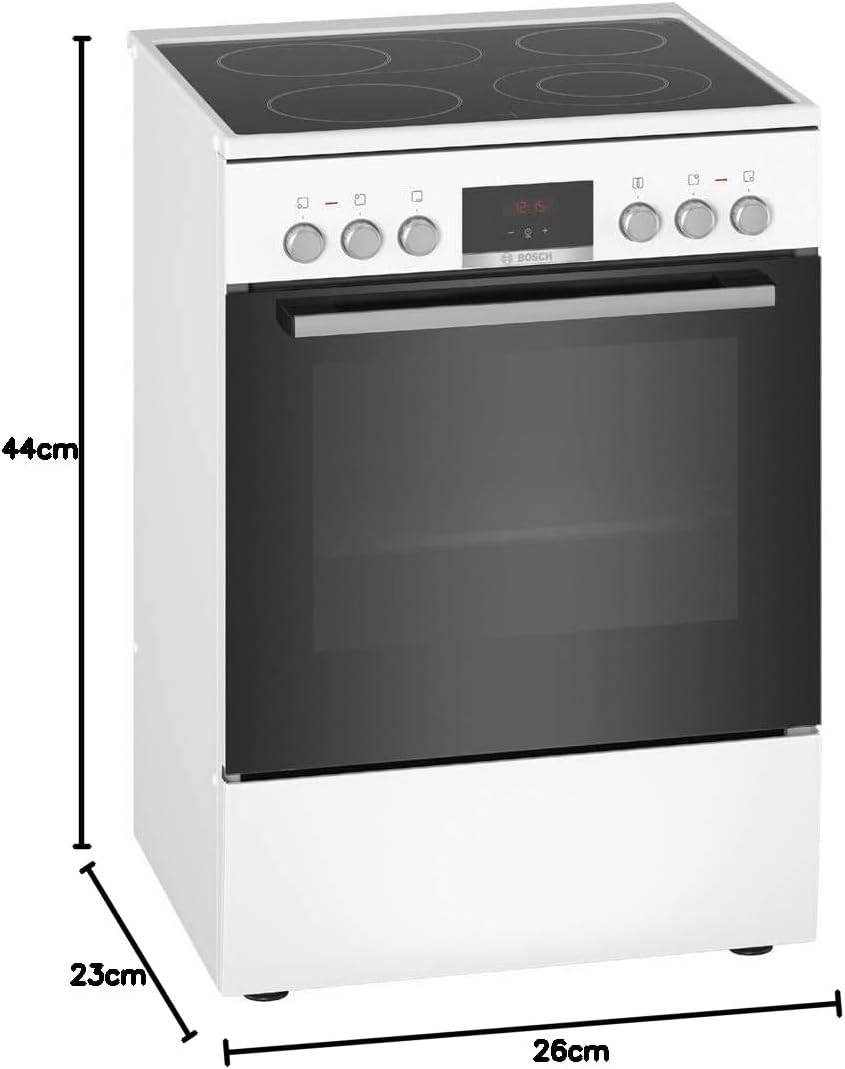
Image 8.1: Product card detailing energy efficiency and other specifications for the Bosch HKR39C220.
9. Warranty and Customer Support
For warranty information, please refer to the separate warranty document provided with your appliance or visit the official Bosch website. Information regarding the availability of spare parts is not provided in this document.
If you encounter any issues that cannot be resolved using the troubleshooting guide, or for service and spare parts inquiries, please contact Bosch customer support. Contact details can typically be found on the Bosch website or in your purchase documentation.
You can visit the Bosch store for more information: Bosch Professional Store


