1. Introduction
This manual provides essential information for the safe and effective operation of your SPTA Mini Polishing Machine Buffer. Designed for automotive detailing, this versatile tool is ideal for waxing, polishing, and sealing various coat paints, as well as for intricate detailing tasks on rough and small areas. Please read this manual thoroughly before initial use and retain it for future reference.
2. What's Included
Your SPTA Mini Polishing Machine Buffer package includes the following components:
- 1pc Superpolish R3 mini polisher
- 18pcs mixed polishing and wool polishing pads
- 3pcs mixed size polishing backing pads
- 1pc extension shaft
- Additional accessories as detailed below.

Figure 1: Overview of the SPTA Mini Polishing Machine Buffer and its complete accessory kit.

Figure 2: Detailed view of all components: polisher machine, 1", 2", 3" sponge pads, 1", 2", 3" wool polishing pads, 1", 2", 3" microfiber pads, 1", 2", 3" backing plates, and M14 extension rods.
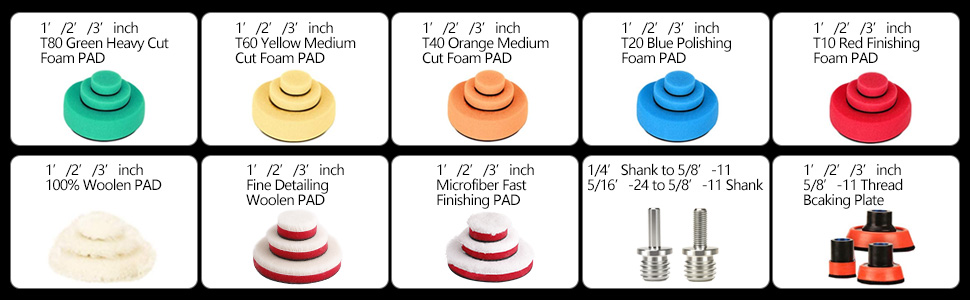
Figure 3: Assortment of foam pads (Green Heavy Cut, Yellow Medium Cut, Orange Medium Cut, Blue Polishing, Red Finishing), 100% Woolen Pad, Fine Detailing Woolen Pad, Microfiber Fast Finishing Pad, and various backing plates and shanks.
3. Specifications
| Model | ROMPS3ACUSA |
| Rated Input Power | 780W |
| Voltage | 240 Volts (AC) |
| No-Load Speed | 1500-5500 OPM (Orbits Per Minute) |
| Back Pad Diameter | 75mm / 3 inches |
| Orbital Size | 10MM |
| Item Weight | 6.6 Pounds |
| Power Source | Corded Electric |
| Material | High Quality Sponge and Wool |

Figure 4: Polisher dimensions and key technical specifications.
4. Setup
4.1 Attaching Backing Pads
- Ensure the polisher is unplugged from the power source.
- Select the desired backing pad size (1", 2", or 3") based on your task.
- Align the backing pad with the polisher's spindle.
- Securely screw the backing pad onto the spindle until it is hand-tight.

Figure 5: Attaching a 1-inch backing pad to the polisher.
4.2 Attaching Polishing Pads
- Choose the appropriate polishing pad (foam, wool, or microfiber) for your application. Different colored sponges have different softness levels for various polishing stages.
- The polishing pads feature an adhesive backing. Simply align the pad with the attached backing plate and press firmly to secure it.
- Pads can be changed in seconds due to the adhesive backing.
4.3 Using Extension Shafts
For reaching tight or recessed areas, the M14 thread extension shaft can be used.
- Attach the desired backing pad to one end of the extension shaft.
- Screw the other end of the extension shaft onto the polisher's spindle.
- Ensure all connections are secure before operation.

Figure 6: Polisher with extension shaft for enhanced reach in detailing.
Video 1: Demonstration of attaching pads and extension shafts to a mini polisher. This video is provided by Raybao Auto Detailing.
5. Operating Instructions
5.1 Powering On/Off and Speed Control
- Plug the polisher into a suitable power outlet.
- Locate the power switch and speed dial on the tool.
- To turn on, slide the power switch to the 'ON' position.
- Adjust the speed using the 6-speed rotary dial, ranging from 1500 to 5500 OPM. Lower speeds (1-2) are suitable for waxing and buffing, while higher speeds (3-6) are for polishing, defect removal, and oxidation correction.
- To turn off, slide the power switch to the 'OFF' position.

Figure 7: Speed control dial with 6 settings for various applications.
Video 2: Official SPTA video demonstrating the mini polisher in use on a vehicle. This video is provided by SPTA® Direct.

Figure 8: Polisher in action on intricate car detailing areas.
5.2 Application Tips
- Always ensure the surface to be polished is clean and free of debris.
- Apply a small amount of polishing compound or wax directly to the pad or the work surface.
- Start the polisher at a low speed and spread the product evenly over a small section.
- Gradually increase the speed as needed for the specific task (e.g., higher speed for defect removal, lower for finishing).
- Maintain consistent pressure and movement across the surface. Avoid excessive pressure in one spot.
- For optimal results, work in small sections and wipe off residue with a clean microfiber cloth.
6. Maintenance
6.1 Cleaning
- After each use, remove the polishing pad and clean it thoroughly. Most foam and wool pads are washable and reusable.
- Wipe down the polisher body with a clean, damp cloth. Do not use harsh chemicals or abrasive cleaners.
- Ensure the tool is dry before storage.
6.2 Storage
- Store the polisher and its accessories in a clean, dry place, away from direct sunlight and extreme temperatures.
- Keep out of reach of children.
7. Troubleshooting
If you encounter any issues with your SPTA Mini Polishing Machine Buffer, please refer to the following common troubleshooting tips:
- Polisher not turning on: Ensure the power cord is securely plugged into a functional outlet and the power switch is in the 'ON' position.
- Reduced performance: Check if the polishing pad is clogged with product or worn out. Clean or replace the pad as necessary. Ensure the backing pad and any extension shafts are securely attached.
- Excessive vibration or noise: Verify that all attachments are properly secured. If the issue persists, discontinue use and contact customer support.
For further assistance, please contact SPTA customer support.
8. Warranty and Support
For warranty information or technical support regarding your SPTA Mini Polishing Machine Buffer, please refer to the warranty card included in your package or visit the official SPTA website. Keep your purchase receipt as proof of purchase.

Figure 9: SPTA Brand Logo.