1. Introduction
This manual provides detailed instructions for the installation, operation, and maintenance of your Y&H CPY-2420 20A MPPT Solar Charge Controller. This device is designed to manage the power flow from your solar panel to your battery, ensuring efficient charging and protecting the battery from overcharge and deep discharge. It is suitable for 12V and 24V battery systems.
2. Safety Information
- Ensure all connections are tight and correct to avoid excessive voltage drop and loose connections that may cause heat accumulation.
- The controller should be installed indoors, away from direct sunlight, high temperature, and water.
- The controller generates heat during operation; ensure good ventilation.
- The controller automatically recognizes 12V/24V batteries. Ensure your battery voltage matches the system voltage.
- Always connect the battery first, then the solar panel, and finally the load. Disconnect in the reverse order.
- Do not attempt to repair or modify the controller yourself. Contact qualified personnel for service.
3. Product Overview
The Y&H CPY-2420 MPPT Solar Charge Controller features a compact design with clear indicators for system status. It includes a USB output for charging small electronic devices.

Figure 3.1: Front view of the Y&H CPY-2420 20A MPPT Solar Charge Controller. Shows LED indicators for Solar, Load, and Battery status, a 5V USB output, and terminal connections at the bottom.
3.1. Indicators and Ports
- Solar LED: Indicates solar panel charging status.
- Load LED: Indicates load output status.
- Battery LEDs: Indicate battery charge level.
- 5V USB Output: For charging compatible USB devices.
- Terminal Block: Connections for solar panel, battery, and load.
4. Setup and Installation
Follow these steps carefully to install your solar charge controller. Incorrect wiring can damage the controller or other components.
4.1. Wiring Sequence
- Connect the battery to the charge controller first. Ensure correct polarity (+ to + and - to -).
- Connect the solar panel to the charge controller. Ensure correct polarity.
- Connect the load to the charge controller. Ensure correct polarity.
Important: Always connect the battery first and disconnect the battery last. This prevents damage to the controller from voltage surges.
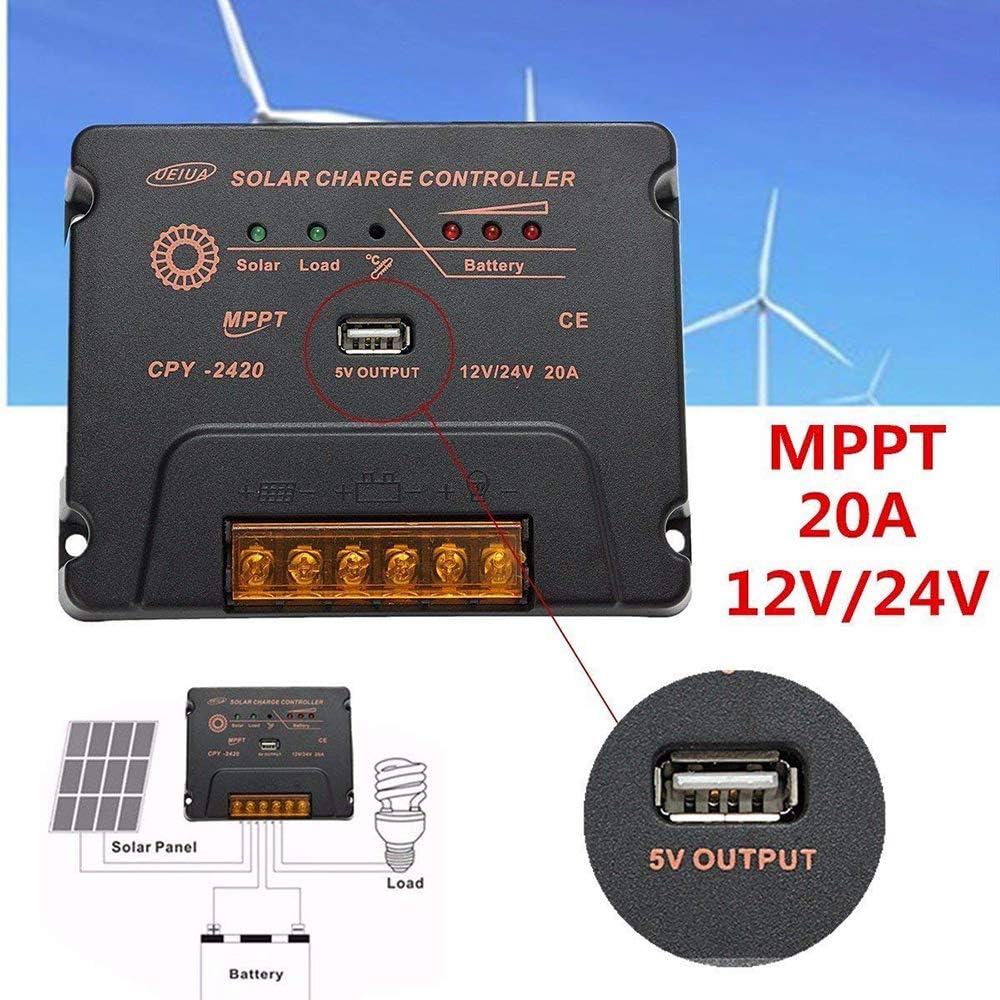
Figure 4.1: Wiring diagram illustrating the connection of the solar panel, battery, and load to the Y&H CPY-2420 controller. Note the positive and negative terminals for each connection.

Figure 4.2: Another detailed wiring diagram showing the Y&H CPY-2420 controller connected to a solar panel, a battery, and a light bulb as a load. This diagram emphasizes the correct polarity for all connections.
5. Operating Instructions
Once properly installed, the Y&H CPY-2420 controller operates automatically. It will manage the charging process from the solar panel to the battery and control the load output.
5.1. LED Indicators
- Solar LED (Green): Illuminates when the solar panel is actively charging the battery.
- Load LED (Green): Illuminates when the load output is active.
- Battery LEDs (Red): Indicate the battery's state of charge. Refer to the product's specific documentation for detailed interpretations of the battery LED patterns (e.g., solid, blinking).
5.2. USB Output
The integrated 5V USB output can be used to charge small electronic devices such as smartphones or tablets. The USB output is active when the controller has sufficient battery power.
6. Maintenance
Regular maintenance ensures optimal performance and longevity of your solar charge controller.
- Cleaning: Periodically clean the controller's exterior with a dry cloth to remove dust and dirt. Do not use liquid cleaners.
- Connections: Annually check all wiring connections for tightness and corrosion. Loose connections can cause overheating and damage.
- Ventilation: Ensure the area around the controller remains clear for proper airflow and heat dissipation.
- Environmental Check: Verify that the controller is not exposed to excessive moisture, extreme temperatures, or direct sunlight, which can degrade performance.
7. Troubleshooting
If you encounter issues with your Y&H CPY-2420 controller, refer to the following common problems and solutions:
| Problem | Possible Cause | Solution |
|---|---|---|
| No charging from solar panel |
|
|
| Load not working |
|
|
| Battery not charging fully |
|
|
| USB output not working |
|
|
8. Specifications
Technical specifications for the Y&H CPY-2420 20A MPPT Solar Charge Controller:
| Feature | Specification |
|---|---|
| Model | CPY-2420 |
| Rated Charge Current | 20A |
| System Voltage | 12V/24V Auto Recognition |
| USB Output | 5V |
| Package Dimensions | 6.1 x 4.92 x 1.77 inches |
| Item Weight | 10.3 ounces (291 Grams) |
| UPC | 704619167160 |
9. Warranty and Support
This product is covered by a standard manufacturer's warranty. Please retain your proof of purchase for warranty claims. For specific warranty terms and conditions, refer to the documentation provided with your purchase or contact the retailer.
9.1. Technical Support
If you require technical assistance or have questions not covered in this manual, please contact Y&H customer support through your retailer or the official Y&H website.


