1. Introduction
This manual provides detailed instructions for the installation, operation, and maintenance of your Olideauto SD300 Automatic Linear Chain Window Actuator. Please read this manual thoroughly before installation and use to ensure proper function and safety. This device is designed to automate the opening and closing of various window types, offering convenience and improved air circulation.

Image 1.1: The Olideauto SD300 Automatic Linear Chain Window Actuator.
2. Safety Information
Adherence to these safety guidelines is crucial for preventing injury and damage to the product.
- Always disconnect power to the unit before performing any installation, maintenance, or troubleshooting.
- Ensure all electrical wiring is performed by a qualified electrician if you are not confident in your abilities.
- Keep hands, clothing, and other objects clear of the moving chain and window during operation to avoid pinching or entanglement.
- Do not attempt to modify the actuator or its components. Unauthorized modifications can lead to malfunction and void the warranty.
- This device is intended for window automation only. Do not use it for purposes other than its intended design.
3. Package Contents
Verify that all items listed below are present in your package:
- Olideauto SD300 Electric Chain Window Opener Unit
- Mounting Brackets (various types for different installations)
- Receiver Unit
- Remote Control
- Installation Screws and Fasteners

Image 3.1: All components included in the package: the main electric chain window opener unit, two types of mounting brackets, a receiver unit, and a remote control.
4. Specifications
| Feature | Specification |
|---|---|
| Model Number | SD300 |
| Travel Distance | 11-4/5 inches (300mm) |
| Product Dimensions | 16.53 x 2.05 x 1.57 inches |
| Material | Aluminum |
| Color | White |
| Exterior Finish | White |
| Installation Type | Screw-In |
| UPC | 763891905396 |

Image 4.1: Diagram illustrating the dimensions of the Olideauto SD300 actuator, including its length, width, and height, along with the 11.81 inch (300mm) chain travel distance.
5. Installation
Follow these steps for proper installation of your Olideauto SD300 window actuator.
5.1 Mounting the Actuator
- Determine the optimal mounting position on your window frame. The actuator can be installed in various configurations (horizontal push, upper hanging, middle hanging, lower hanging, skylight).
- Secure the appropriate mounting brackets to the window frame using the provided screws. Ensure the brackets are firmly attached and level.
- Attach the actuator unit to the mounted brackets. Make sure the chain mechanism aligns correctly with the window sash.
- Connect the end of the chain to the window sash using the provided fasteners. Ensure a secure connection that allows for smooth window movement.

Image 5.1: The Olideauto SD300 actuator mounted horizontally on a window frame, with its chain extended to push open a casement window.
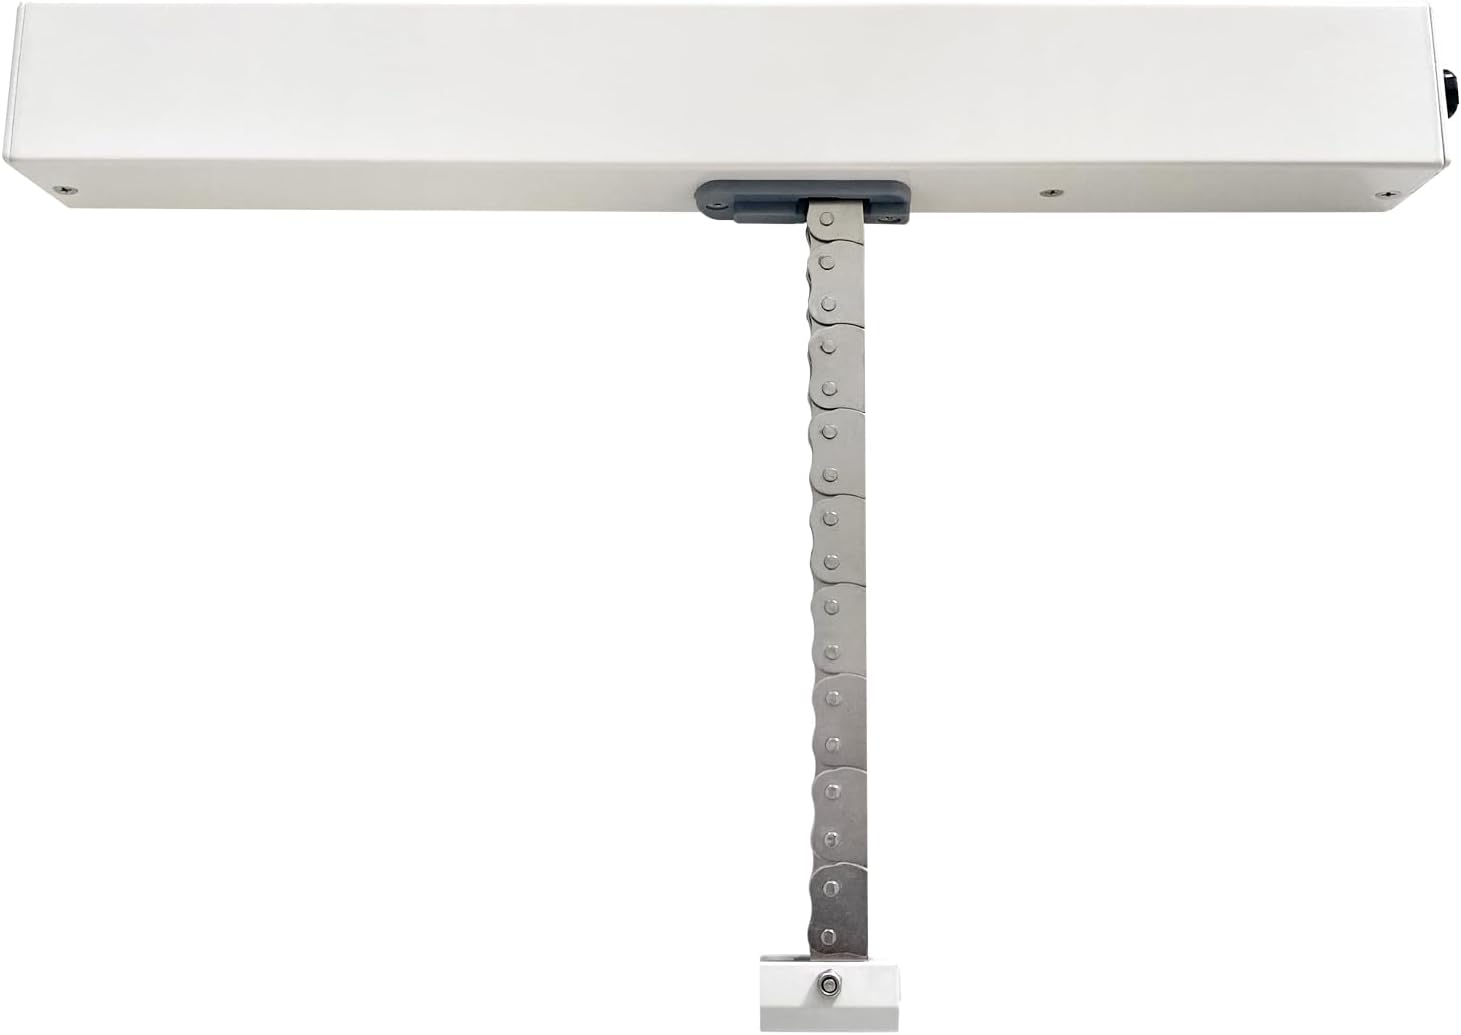
Image 5.2: A series of diagrams demonstrating the versatility of the Olideauto actuator, showing how it can be installed on various window configurations such as side-hung, top-hung, bottom-hung, and skylight windows.

Image 5.3: This image displays multiple examples of the Olideauto actuator successfully installed on different skylight windows, highlighting its use in overhead applications.
5.2 Electrical Wiring
The SD300 actuator operates on DC24V, converted from AC100-240V by the included transformer/receiver. Refer to the wiring diagram below for correct connections.
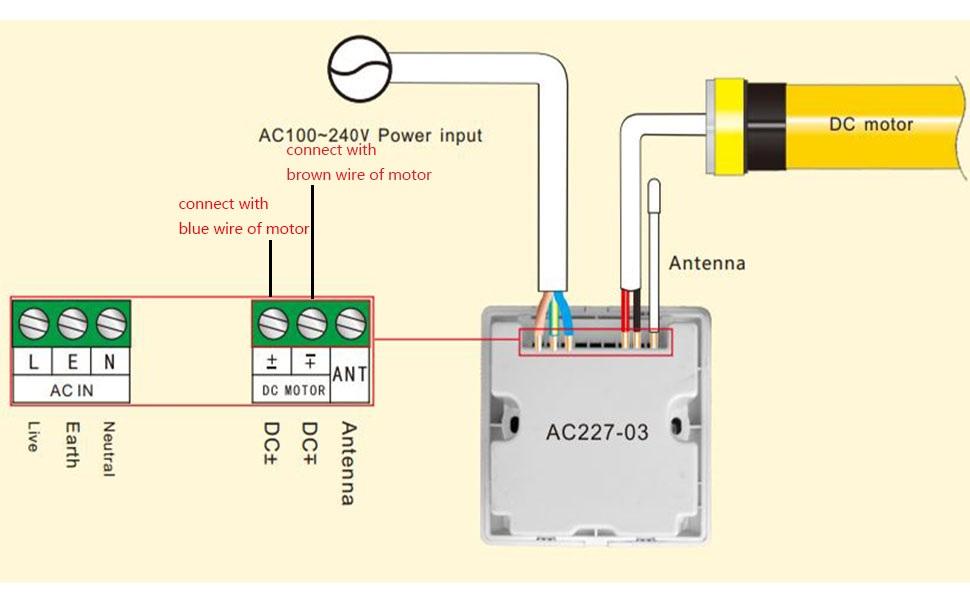
Image 5.4: This diagram illustrates the electrical connections for the Olideauto SD300 actuator, detailing how to connect the AC100-240V power input to the AC IN terminals, and the DC motor wires (brown and blue) to the DC MOTOR terminals on the AC227-03 controller, including the antenna connection.
- Connect the AC100-240V power input to the 'AC IN' terminals (L, N, E) on the receiver unit.
- Connect the brown wire from the actuator motor to the 'DC+' terminal on the receiver.
- Connect the blue wire from the actuator motor to the 'DC-' terminal on the receiver.
- Ensure the antenna is properly connected to the receiver for optimal remote control signal reception.
- Once all connections are secure, apply power to the unit.
5.3 Initial Test
After installation and wiring, perform a test to ensure correct operation.
Video 5.1: A brief video clip showing the Olideauto electric window opener in action, extending its chain to open a casement window and then retracting to close it. This demonstrates the basic functionality after installation.
6. Operation
The Olideauto SD300 actuator can be controlled using the provided remote control or a wired switch connected to the receiver.
6.1 Using the Remote Control
- Ensure the remote control has functional batteries.
- Press the 'Up' button to extend the chain and open the window.
- Press the 'Down' button to retract the chain and close the window.
- The actuator has a fixed travel distance of 11.81 inches (300mm). Once the 'Up' button is pressed, it will open to its full extent without stopping unless the 'Down' button is pressed.
Video 6.1: This video illustrates how to operate the Olideauto automatic window opener using its remote control, showing the window opening and closing in response to remote commands.
6.2 Using a Wired Switch
If a wired switch is connected to the receiver, its operation will typically mirror the remote control, with dedicated buttons for opening and closing the window.
7. Maintenance
Regular maintenance helps ensure the longevity and reliable operation of your window actuator.
- Cleaning: Keep the actuator housing clean and free of dust, dirt, and debris. Use a soft, dry cloth for cleaning. Do not use abrasive cleaners or solvents.
- Inspection: Periodically inspect the chain, mounting points, and wiring for any signs of wear, damage, or loose connections.
- Lubrication: The chain and internal components are pre-lubricated. Do not apply additional lubricants unless specifically instructed by Olideauto support.
- Obstructions: Ensure the window path remains clear of any obstructions that could impede the actuator's movement.
8. Troubleshooting
If you encounter issues with your Olideauto SD300 actuator, refer to the following common problems and solutions:
| Problem | Possible Cause | Solution |
|---|---|---|
| Actuator not responding to remote control/switch | No power to the unit; Remote control batteries are dead; Loose wiring connection; Receiver malfunction. | Check power supply to the receiver; Replace remote control batteries; Inspect all wiring connections; Contact support if issue persists. |
| Window not opening/closing fully | Obstruction in window path; Incorrect installation/alignment; Actuator malfunction. | Remove any obstructions; Verify correct installation and alignment of the actuator and chain; Contact support. Note: Travel distance is fixed at 11.81 inches (300mm). |
| Unusual noises during operation | Foreign object in chain mechanism; Worn components; Misalignment. | Inspect the chain for any foreign objects and remove them; Check for loose mounting points; Contact support if noises persist. |
9. Warranty and Support
Olideauto products purchased via Amazon typically carry a 2-year warranty. For specific warranty details, claims, or technical support, please contact Olideauto customer service directly.
You can find more information and contact details by visiting the official Olideauto Store: Olideauto Store on Amazon.


