1. Introduction
This manual provides detailed instructions for the installation, operation, and maintenance of your Geekpure 3-Stage Portable Reverse Osmosis (RO) Water Filter System. This system is designed to produce high-purity water, suitable for aquariums, residential drinking water, and other applications requiring low Total Dissolved Solids (TDS) water. Please read this manual thoroughly before installation and use to ensure proper function and longevity of your system.
2. Product Overview
The Geekpure 3-Stage Portable RO System utilizes a multi-stage filtration process to effectively reduce various contaminants from your water supply. It is a compact, tankless system with a capacity of 100 Gallons Per Day (GPD).

Figure 2.1: Overview of the Geekpure 3-Stage Portable RO Water Filter System.
2.1 Filtration Stages
The system employs three distinct filtration stages:
- Stage 1: PP Sediment Filter (Life time: 6-12 months)
This filter removes larger particles such as silt, sand, dirt, and sediment, protecting subsequent filters. - Stage 2: Thin-Film Composite (TFC) RO Membrane (Life time: 15-24 months)
The core of the system, this membrane reduces total dissolved minerals, heavy metals (Arsenic, Lead, Mercury), fluoride, and other microscopic contaminants down to 0.0001 micron. - Stage 3: Post Carbon Filter (Life time: 6-12 months)
This final stage improves water taste and odor by further reducing chlorine and other organic compounds.

Figure 2.2: Detailed view of the three filtration stages and their estimated lifespans.
2.2 Included Accessories
The system comes with various accessories to facilitate installation:
- Push-fit isolation valves
- Drain Saddle
- Diverter valve piercing kit
- Color-coded tubing (white for inlet, red for drain, blue for permeate)
- Housing wrench
- Fixing clips

Figure 2.3: Components included with your RO system.
3. Setup Instructions
Follow these steps for initial setup of your RO system. The system features quick push fittings for easy assembly.
3.1 System Diagram

Figure 3.1: System diagram illustrating component layout and tubing connections.
3.2 Membrane Installation
- Unscrew the cap of the RO membrane housing (the central, larger housing).
- Carefully insert the RO membrane into the housing. Ensure the end with the two O-rings goes in first.
- Screw the cap back on tightly by hand, then use the provided housing wrench for a final snug turn. Do not overtighten.
3.3 Water Connections
Identify the color-coded tubing:
- White Tube: Inlet water (connects to your water supply).
- Red Tube: Drain water (connects to a drain).
- Blue Tube: Permeate water (pure water output).
Connect the white inlet tube to your cold water supply using the appropriate adapter (e.g., diverter valve piercing kit for under-sink connection, or a garden hose adapter if connecting to a hose bibb, which may need to be purchased separately). Connect the red drain tube to a drain line using the drain saddle. Position the blue permeate tube to collect the purified water in a suitable container.
3.4 Initial System Flush
Before consuming water or using it for sensitive applications, the system must be flushed:
- Turn on the water supply to the RO system.
- Allow water to flow through the system and out the permeate (blue) and drain (red) lines for at least 30 minutes. This flushes out any manufacturing residues and air from the filters.
- After flushing, the system is ready for use.
4. Operating Instructions
The Geekpure 3-Stage Portable RO System operates continuously when connected to a water supply. It does not feature automatic on/off functionality or a storage tank.
- Water Production: The system produces up to 100 gallons of purified water per 24 hours, depending on water pressure and temperature.
- Waste Water Ratio: The typical ratio of pure water to waste water is approximately 1:2. This means for every gallon of pure water produced, about two gallons are sent to the drain.
- Usage: This system is ideal for producing purified water for aquariums, hydroponics, and general residential use where a tankless, portable solution is preferred. For continuous drinking water supply with a faucet and tank, consider a dedicated under-sink RO system.

Figure 4.1: The 3-Stage Portable RO System in an aquarium setting.
5. Maintenance
Regular filter replacement is crucial for maintaining the performance and water quality of your RO system. Filter lifespans are estimates and may vary based on feed water quality and usage volume.
5.1 Filter Replacement Schedule
- PP Sediment Filter: Replace every 6-12 months.
- Post Carbon Filter: Replace every 6-12 months.
- RO Membrane: Replace every 15-24 months.
Replacement filter sets are available. For standard replacement filters, search ASIN B07KHWKVCS on Amazon. An upgrade DI filter is available under ASIN B09NPRN4KJ.
5.2 Replacement Procedure
- Turn off the water supply to the RO system.
- Disconnect the tubing from the filter housing you intend to replace.
- Use the provided housing wrench to unscrew the filter housing.
- Remove the old filter and dispose of it properly.
- Insert the new filter, ensuring it is correctly seated.
- Screw the housing back on, tightening by hand, then with the wrench. Do not overtighten.
- Reconnect the tubing.
- After replacing any filter, perform a system flush as described in Section 3.4.
6. Troubleshooting
This section addresses common issues you might encounter with your RO system.
- Low Water Production: Check water pressure. Ensure the RO membrane is correctly installed and not clogged. Replace filters if they are past their recommended lifespan.
- Poor Water Quality (High TDS): This typically indicates a compromised RO membrane. Replace the RO membrane. Ensure all connections are secure and there are no bypasses.
- Leaks: Check all quick-connect fittings and threaded connections. Ensure O-rings are properly seated and not damaged. Tighten connections by hand, then with the wrench if necessary, but do not overtighten.
- Unpleasant Taste/Odor: Replace the Post Carbon Filter. Ensure initial flushing was performed adequately.
If issues persist after following these steps, please contact customer support.
7. Specifications
| Feature | Specification |
|---|---|
| Model Number | 3 STAGE |
| Product Dimensions | 9.2"D x 14.8"W x 5.8"H |
| Item Weight | 4 Pounds |
| Material | Polyamide, polysulfone, polypropylene, carbon, non-woven fabric |
| Capacity | 100 Gallons Per Day (GPD) |
| External Testing Certification | NSF |
| UPC | 610895384712 |
7.1 Operating Limits
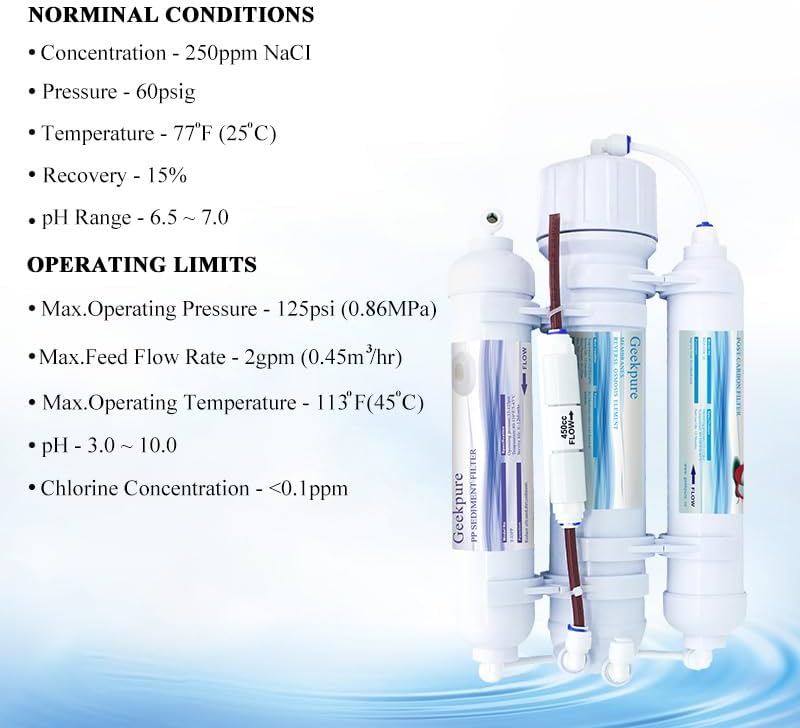
Figure 7.1: Nominal conditions and operating limits for the system.
- Max. Operating Pressure: 125 psi (0.86 MPa)
- Max. Feed Flow Rate: 2 gpm (0.45 m³/hr)
- Max. Operating Temperature: 113°F (45°C)
- pH Range: 3.0 – 10.0
- Chlorine Concentration: <0.1 ppm
8. Warranty and Support
Your Geekpure 3-Stage Portable RO Water Filter System comes with a 1-year manufacturer warranty. No registration is required for this warranty.
For technical assistance, troubleshooting, or warranty claims, please contact Geekpure customer support through the retailer where the product was purchased or visit the official Geekpure website for contact information.


