1. Product Overview
The ETEKJOY Electronic Door Lock (Model ET912) is a 3-in-1 digital touchscreen keypad lock designed for interior doors. It offers convenient and secure access through RFID cards, passwords, or a mechanical key. This manual provides detailed instructions for installation, operation, and maintenance to ensure optimal performance and security.
Key Features:
- Three Unlock Methods: RFID Card, Password, and Mechanical Key.
- Reversible Lever: Compatible with both left-handed and right-handed doors.
- Auto-Lock Feature: Automatically re-locks after unlocking for enhanced security.
- Password Protection: Supports garbled code input and temporary keypad lockout after multiple incorrect entries.
- Durable Construction: Made from zinc alloy and stainless steel with a backlight touch-sensitive keypad.
- Low Battery Alarm: Notifies users when batteries need replacement.

Figure 1: ETEKJOY Electronic Door Lock with included RFID key fobs and mechanical keys.
2. Package Contents
Before beginning installation, please verify that all components are present:
- 1x Complete set of ETEKJOY Electronic Door Lock
- 2x Metal Keys
- 5x RFID Key Fobs (Tags)
- 1x User Manual (this document)
- Mounting Screws and Hardware

Figure 2: All components included in the ETEKJOY Electronic Door Lock package.
3. Setup and Installation
Important Note: This lock requires two holes on the door for installation. If your door has only one hole, an additional hole must be drilled. This lock is designed for standard single latch interior doors with a thickness between 1.38” – 1.77” (35 - 45 mm) and an adjustable backset of 2-3/8" or 2-3/4". It is not suitable for outdoor use.
3.1. Door Preparation and Dimensions
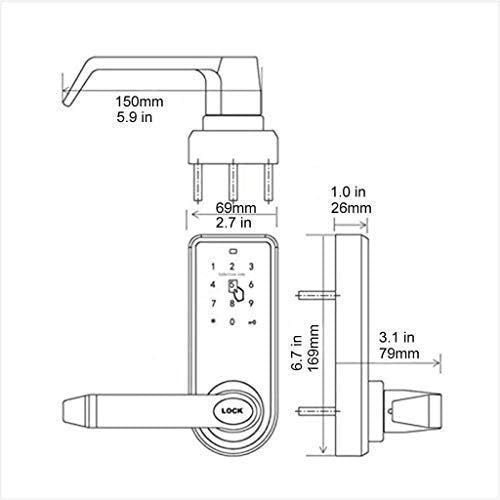
Figure 3: Detailed dimensions for door preparation and lock fitting.
3.2. Component Identification
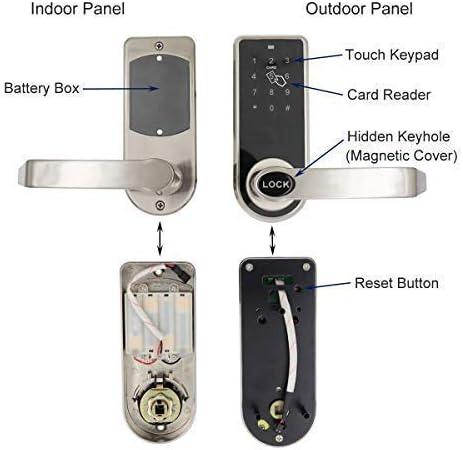
Figure 4: Indoor and Outdoor panels with key components labeled, including the battery box, touch keypad, card reader, hidden keyhole, and reset button.
3.3. Installation Steps
- Install Batteries and Connect Power Wire: Remove the black cover on the inside unit and insert 4x AA batteries (not included). Connect the power wire between the indoor and outdoor units.
- Reset the Lock (if necessary): The reset button is located on the back of the outdoor panel. Press and hold the reset button for approximately 3 seconds until a long beep sounds. This will reset the lock to its initial state, deleting all old settings.
- Install the Latch: Ensure the latch is correctly oriented for your door's swing.
- Install the Lock Set to the Door: Carefully align the outdoor and indoor units with the prepared holes in the door. Secure them using the provided screws. Ensure the square bar is properly inserted and secured with the cotter pin to prevent slippage.
- Install the Handle and Tumbler: Attach the handles to both sides of the lock. The lever is reversible to fit both left-handed and right-handed doors.
For a visual guide on installation, please refer to the following video:
Video 1: Detailed instructions on how to install the ETEKJOY Electronic Door Lock set to the door.
Video 2: Guide on how to install the handle and tumbler components of the lock.
4. Operating Instructions
4.1. Setting Up RFID Cards
The lock supports up to 2 admin cards and 200 guest cards. Admin cards can manage settings, while guest cards only unlock the door.
- After resetting the lock (if applicable), place an RFID card near the RFID sensing area on the keypad. The first card read will be set as the first admin card.
- To set a second admin card, repeat the process with another card.
- To add guest cards, swipe an already programmed admin card, then immediately swipe each new guest card one at a time over the sensing area.
For a visual guide on setting up RFID cards, please refer to the following video:
Video 3: Instructions on how to set up RFID cards for unlocking the door.
4.2. Setting Up Passwords
The lock supports 1 admin password and up to 50 guest passwords. The default admin password is 12345678.
- To Change Admin Password: Tap any number to wake the keypad. Enter the default admin password (12345678) then #. Tap 1. Enter your new 8-digit admin password then #. Re-enter the new password then #. You will hear 5 beeps upon success.
- To Set Guest Password: Enter your admin password then #. Tap 8. Enter a new 4-6 digit guest password then #. Re-enter the same guest password then #.
For a visual guide on setting up passwords, please refer to the following video:
Video 4: Instructions on how to set up password codes for unlocking the door.
4.3. Unlocking the Door
- By RFID Card: Swipe a programmed RFID card over the card icon on the keypad. The lock will disengage.
- By Password: Enter a programmed password on the touchscreen keypad, then press #. The lock will disengage.
- By Mechanical Key: Insert the mechanical key into the hidden keyhole (under the magnetic cover) and turn to unlock. This is for emergency access.
The lock features an Auto-Lock function, automatically re-locking after a set period once unlocked.

Figure 5: The ETEKJOY Electronic Door Lock installed on a typical interior door.
5. Maintenance
5.1. Battery Replacement
The lock is powered by 4x AA batteries (not included). Under normal use, batteries can last 10 to 15 months. The lock will provide a low battery power alarm when replacement is needed. To replace batteries, remove the interior panel cover, replace the old batteries with new ones, and re-secure the cover.
5.2. General Care
- Clean the keypad and lock surface with a soft, dry cloth. Avoid abrasive cleaners or solvents.
- Ensure the lock is not exposed to excessive moisture or direct outdoor elements, as it is designed for interior use only.
- Regularly check that all screws are tight and the lock operates smoothly.
6. Troubleshooting
If you encounter issues with your ETEKJOY Electronic Door Lock, please refer to the following common solutions:
- Lock Not Responding: Check battery levels. Replace batteries if the low battery alarm has sounded or if the keypad does not light up.
- Keypad Temporarily Locked: The keypad will temporarily lock for 5 minutes after 5 consecutive wrong password inputs. Wait for the lockout period to expire.
- RFID Card/Password Not Working: Ensure the RFID card is correctly programmed. If issues persist, perform a factory reset (Section 3.3) and re-program all cards and passwords.
- Handle Not Engaging Lock: Verify that the square bar connecting the handles is properly secured with the cotter pin. Refer to Section 3.3 and the installation videos for correct assembly.
- Emergency Access: In case of electronic failure or forgotten codes, use the mechanical key for emergency access through the hidden keyhole.
7. Specifications
| Feature | Specification |
|---|---|
| Brand | ETEKJOY |
| Model Number | ET912 |
| Lock Type | Keypad |
| Special Feature | Touchscreen |
| Material | Zinc Alloy, Stainless Steel |
| Color | Silver and Black |
| Item Dimensions (L x W x H) | 6.7 x 5.9 x 3.1 inches |
| Item Weight | 6.21 pounds |
| Door Thickness Compatibility | 1-3/8” – 1-3/4” (35 - 45 mm) |
| Backset | Adjustable 2-3/8" or 2-3/4" |
| Power Supply | 4x AA batteries (not included) |
| RFID Card Type | Universal 125kHz RFID Card/Tag |
| Max RFID Card Users | 2 Admins, 200 Guests |
| Max Password Users | 1 Admin, 50 Guests |
8. Warranty and Support
ETEKJOY provides a standard warranty for this product. For specific warranty terms and conditions, please refer to the warranty card included in your product packaging or visit the official ETEKJOY website. If you require technical assistance, troubleshooting beyond this manual, or have questions regarding your product, please contact ETEEKJOY customer support through their official channels.
For more information and support, visit the ETEKJOY Store on Amazon.