
1. Introduction
This manual provides essential information for the safe and effective operation of your Trevi GO 2500 4K Action Camera. Please read it thoroughly before using the device and keep it for future reference.
The Trevi GO 2500 4K Action Camera is a high-quality image and video camera that can be used in all conditions. The SONY 179 image sensor technology ensures sports recordings in 4K ULTRA HD format. The Trevi sports camera is very solid and compact and can be set up as well as worn thanks to the mounts for attachment to handlebars, helmets, etc. The Wi-Fi connection allows you to see (or check) everything you record in real-time on the smartphone screen or to start a new recording at the right time. Equipped with a waterproof housing, you can immerse the GO 2500 4K up to a depth of 30 meters without risking damage. The 170° wide angle allows for a wide and high-quality image. You can also control the Trevi sports camera via a dedicated app, and power is supplied by a rechargeable lithium battery.
2. Package Contents
Please check the package contents upon unboxing to ensure all items are present:
- Trevi GO 2500 4K Action Camera
- USB Cable
- Mounting brackets for handlebars, sports helmets, and other mounts
- Underwater housing
- Instruction Manual
- Warranty Certificate
3. Product Overview
3.1 Camera Components

Figure 3.1: Front view of the Trevi GO 2500 4K Action Camera, showing the lens, front display, and power button.
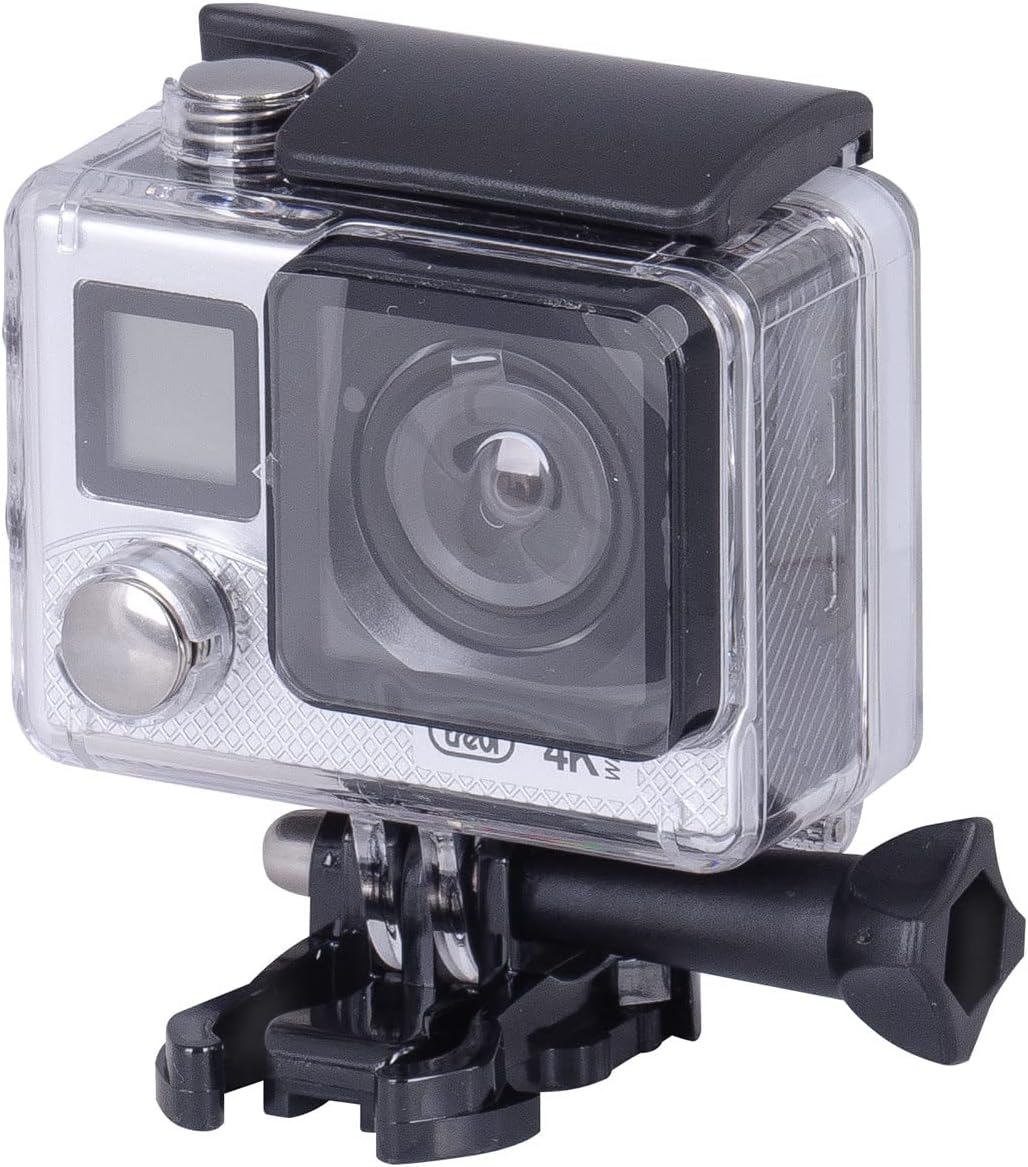
Figure 3.2: Trevi GO 2500 4K Action Camera enclosed in its transparent waterproof housing, attached to a mounting bracket.
- Lens: Captures video and still images.
- Front Display (LCD): Shows status information like battery, mode, and recording time.
- Rear Display (2" TFT): Main screen for live view, playback, and menu navigation.
- Power/Mode Button: Turns the camera on/off and switches between modes.
- Shutter/OK Button: Starts/stops recording, takes photos, confirms selections.
- Micro SD Card Slot: For memory card insertion.
- USB Port: For charging and data transfer.
- Mini HDMI Port: For connecting to an external display.
- Microphone: Records audio.
4. Setup
4.1 Charging the Battery
The camera is powered by a rechargeable lithium-ion battery. Before first use, fully charge the battery.
- Connect the camera to a USB power adapter (not included) or a computer's USB port using the supplied USB cable.
- The charging indicator light will illuminate. It will turn off or change color once charging is complete.
4.2 Inserting a Micro SD Card
A Micro SD card (not included) is required to store photos and videos. The camera supports Micro SD cards.
- Locate the Micro SD card slot on the side of the camera.
- Insert the Micro SD card with the contacts facing the correct direction until it clicks into place.
- To remove, gently push the card in until it springs out.
Note: Format the Micro SD card in the camera's settings menu before first use to ensure optimal performance.
4.3 Attaching the Waterproof Housing
For underwater use or protection against dust and impact, use the included waterproof housing.
- Open the latch on the top of the waterproof housing.
- Carefully place the camera inside the housing, ensuring it fits snugly.
- Close the latch securely. Ensure the seal is clean and free of debris before closing.
Warning: Always test the waterproof housing without the camera submerged in water before actual use to ensure no leaks.
5. Operating Instructions
5.1 Powering On/Off
- To Power On: Press and hold the Power/Mode button for a few seconds.
- To Power Off: Press and hold the Power/Mode button again until the camera shuts down.
5.2 Switching Modes
Press the Power/Mode button repeatedly to cycle through the available modes:
- Video Recording Mode: Indicated by a video camera icon.
- Photo Mode: Indicated by a camera icon.
- Playback Mode: Indicated by a play icon, for reviewing recorded content.
- Settings Mode: Indicated by a gear icon, for adjusting camera settings.
5.3 Recording Videos
- Switch to Video Recording Mode.
- Press the Shutter/OK button to start recording. A red dot or timer will appear on the screen.
- Press the Shutter/OK button again to stop recording. The camera will save the video file.
5.4 Taking Photos
- Switch to Photo Mode.
- Frame your shot using the display.
- Press the Shutter/OK button to take a photo.
5.5 Wi-Fi Connectivity and App Control
The Trevi GO 2500 features Wi-Fi connectivity for remote control and live view via a dedicated smartphone app.
- Download and install the official Trevi GO 2500 app on your smartphone (check your camera's packaging or the manufacturer's website for the app name and download links).
- On the camera, navigate to the Settings menu and enable Wi-Fi. The camera's Wi-Fi name (SSID) and password will be displayed.
- On your smartphone, go to Wi-Fi settings and connect to the camera's Wi-Fi network using the provided password.
- Open the Trevi GO 2500 app. You should now see a live preview from the camera and be able to control recording, photo capture, and settings remotely.
6. Maintenance
- Cleaning the Lens: Use a soft, lint-free cloth specifically designed for camera lenses. Do not use harsh chemicals.
- Cleaning the Camera Body: Wipe with a soft, damp cloth. Avoid getting water into ports.
- Waterproof Housing Care: After each use in water, rinse the housing with fresh water and allow it to air dry. Inspect the rubber seal for any debris or damage.
- Battery Care: Store the camera with a partially charged battery if not used for extended periods. Avoid extreme temperatures.
- Storage: Store the camera in a cool, dry place away from direct sunlight and excessive humidity.
7. Troubleshooting
| Problem | Possible Cause | Solution |
|---|---|---|
| Camera does not turn on. | Battery is depleted. | Charge the battery fully. |
| Camera freezes or is unresponsive. | Software glitch; low battery. | Press and hold the Power button to force a shutdown, then restart. Ensure battery is charged. |
| Cannot record video/take photos. | No Micro SD card; card full; card error. | Insert a Micro SD card. Delete old files or use a new card. Format the card in camera settings. |
| Wi-Fi connection issues. | Incorrect password; app not running; camera Wi-Fi off. | Ensure correct password. Restart app and camera Wi-Fi. Check camera Wi-Fi is enabled. |
| Poor image/video quality. | Dirty lens; low light; incorrect settings. | Clean the lens. Ensure adequate lighting. Adjust resolution or other settings. |
8. Specifications
| Feature | Detail |
|---|---|
| Model Name | GO 2500 |
| Model Number | 25004K06 |
| Brand | Trevi |
| Video Resolution | Up to 4K |
| Effective Still Resolution | 12 MP |
| Image Sensor | Sony 179 |
| Display | 2" TFT Display + LCD Front Display |
| Lens Angle | 170° Wide-angle |
| Water Resistance | Waterproof with housing up to 30 meters |
| Connectivity | Wi-Fi, USB, Mini HDMI |
| Storage | Micro SD (Flash Memory Type) |
| Battery | 1 Lithium-Ion battery (included) |
| Color | Gray |
9. Warranty Information
This product comes with a warranty certificate included in the package. Please refer to the certificate for specific terms and conditions of the warranty. Keep your proof of purchase for warranty claims.
For warranty service, please contact the retailer or the manufacturer's customer support as detailed in the warranty certificate.
10. Customer Support
For further assistance, technical support, or inquiries not covered in this manual, please visit the official Trevi website or contact their customer service department.
Online Resources: Refer to the official Trevi website for updated FAQs, software downloads, and additional support materials.
Contact Information: Specific contact details (phone, email) can typically be found on the manufacturer's website or the product packaging.


