
PIX-LINK WiFi Range Extender
PIX-LINK WiFi Range Extender User Manual
Model: WiFi Range Extender (B07GXCGS4L)
Brand: PIX-LINK
1. Introduction
This user manual provides detailed instructions for the installation, configuration, and operation of your PIX-LINK WiFi Range Extender. This device is designed to extend the coverage of your existing wireless network, eliminating Wi-Fi dead zones and providing a stronger, more reliable connection throughout your home or office.
2. Product Overview
2.1 Package Contents
- PIX-LINK WiFi Range Extender
- User Manual
2.2 Device Layout and Indicators
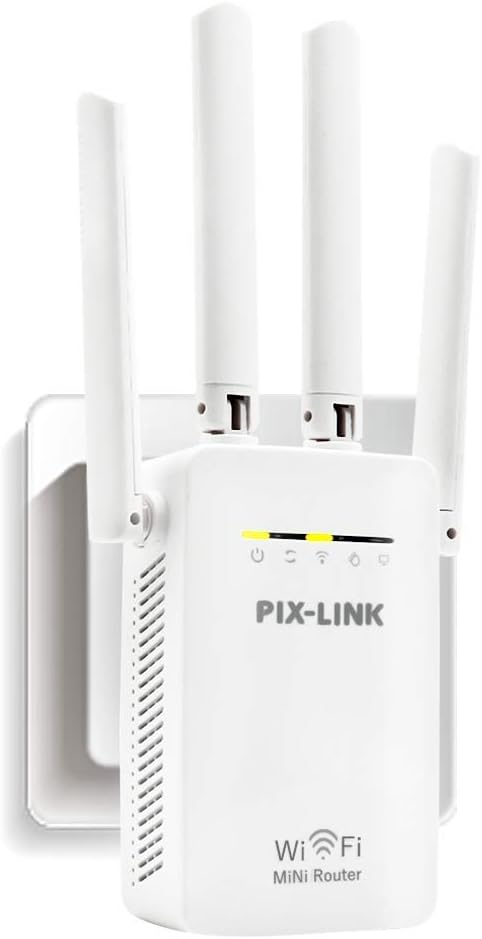
Figure 2.1: Front view of the PIX-LINK WiFi Range Extender.

Figure 2.2: Detailed view of the PIX-LINK WiFi Range Extender components.
- Rotatable Antenna (x4)
- Power Indicator
- WPS Indicator
- WiFi Indicator
- WAN Indicator
- LAN Indicator
- WPS Button
- Reset Button
- WAN Port
- LAN Port
3. Setup and Configuration
3.1 Initial Power On
Plug the PIX-LINK WiFi Range Extender into a standard electrical outlet. Wait for the Power indicator light to turn on, indicating the device is receiving power.
3.2 Operating Modes

Figure 3.1: PIX-LINK WiFi Range Extender Operating Modes.
The PIX-LINK WiFi Range Extender supports multiple operating modes:
- Wireless Router Mode: Connects to a modem and acts as the primary wireless router.
- Client Mode: Connects to an existing wireless network and provides a wired connection for devices without Wi-Fi capabilities.
- Repeater Mode: Extends the coverage of an existing wireless network. This is the most common use case.
- Access Point Mode: Converts a wired network connection into a wireless access point.
- WISP Client Router Mode: Connects wirelessly to an ISP access point and shares the internet connection with local devices.
3.3 Repeater Mode Configuration (WPS Method)

Figure 3.2: WPS setup for Repeater Mode.
The easiest way to set up the extender in Repeater Mode is by using the WPS (Wi-Fi Protected Setup) function:
- Plug the PIX-LINK extender into an electrical outlet near your main router.
- Press the WPS button on your main router for 1-2 seconds.
- Within 30 seconds, press the WPS button on the bottom of the PIX-LINK extender.
- Wait approximately 30 seconds for the devices to connect. The Wi-Fi indicator on the extender should become solid, indicating a successful connection.
- Once connected, the extender will broadcast a new network with the same SSID (network name) as your host router, appended with "_EXT" or similar, and use the same security key.
- You can now unplug the extender and move it to a location between your router and the Wi-Fi dead zone. Ensure the Wi-Fi indicator remains solid for optimal performance.
3.4 Manual Configuration (Web Browser Method)
If your router does not support WPS, or for advanced settings, you can configure the extender via a web browser:
- Plug the extender into an electrical outlet.
- Connect your computer or mobile device to the extender's default Wi-Fi network (e.g., "PIX-LINK_XXXX" or "Wireless-N"). No password is required initially.
- Open a web browser (e.g., Chrome, Firefox) and enter the default IP address or domain name in the address bar. Common addresses include http://myrepeater.net or http://192.168.1.254.
- Log in using the default username and password (usually "admin" for both).
- Follow the on-screen wizard to select your desired operating mode (e.g., Repeater Mode).
- Scan for available Wi-Fi networks, select your main router's network, and enter its Wi-Fi password.
- Configure the extended network's SSID and password if desired, or keep them the same as the main network.
- Save the settings and wait for the extender to restart. The Wi-Fi indicator should turn solid.
4. Operation
Once configured, the PIX-LINK WiFi Range Extender will automatically extend your wireless network. Devices within the extended range will connect to the stronger signal provided by the extender.

Figure 4.1: Extending Wi-Fi coverage with the PIX-LINK extender.
The extender is designed to provide better wireless performance, allowing multiple users to connect and enjoy stable internet access in areas where the signal was previously weak or non-existent.

Figure 4.2: Enhanced wireless experience for multiple users.
5. Maintenance
- Placement: For optimal performance, place the extender in a central location between your main router and the area requiring extended coverage. Avoid placing it near large metal objects, concrete walls, or other electronic devices that may cause interference.
- Cleaning: Keep the device clean and free from dust. Use a soft, dry cloth for cleaning. Do not use liquid cleaners or aerosols.
- Ventilation: Ensure the ventilation holes are not blocked to prevent overheating.
- Firmware Updates: Periodically check the manufacturer's website for firmware updates to ensure optimal performance and security.
6. Troubleshooting
- No Power: Ensure the extender is securely plugged into a working electrical outlet. Check if the power indicator light is on.
- Cannot Connect to Extender's Wi-Fi: Ensure the extender is powered on. Try resetting the extender by pressing the reset button for 5-10 seconds with a paperclip, then re-attempt configuration.
- No Internet Access After Connecting to Extender: Verify that your main router has an active internet connection. Ensure the extender is successfully connected to your main router (Wi-Fi indicator solid). Try repositioning the extender closer to the main router.
- Slow Speed or Intermittent Connection: The extender might be too far from the main router, or there might be too much interference. Try moving the extender to a location roughly halfway between your router and the desired coverage area. Reduce interference from other electronic devices.
- WPS Setup Fails: Ensure your main router supports WPS and that you are pressing the WPS buttons within the specified time frame. If WPS continues to fail, use the manual web browser configuration method.
- Forgot Login Password for Web Interface: Perform a factory reset by pressing and holding the reset button for 5-10 seconds. This will revert the extender to its default settings, and you can then log in with the default username and password.
7. Technical Specifications
| Feature | Specification |
|---|---|
| Brand | PIX-LINK |
| Model Reference | FHF4665 |
| ASIN | B07GXCGS4L |
| Wireless Communication Standard | 802.11n |
| Data Transfer Rate | 300 Megabits Per Second |
| Frequency Band Class | Dual-Band |
| Product Dimensions | 11 x 7 x 7 cm |
| Product Weight | 105 g |
| Manufacturer | PIX-LINK |
| First Available Date | 1 Aug. 2019 |
8. Warranty and Support
For warranty information and technical support, please refer to the documentation included with your product or visit the official PIX-LINK website. Keep your purchase receipt for warranty claims.
Related documentsWiFi Range Extender


Ask a question about this manual
Ask about setup, troubleshooting, compatibility, parts, safety, or missing instructions. Manuals+ will review the question and use this page’s manual context to help answer it.