1. Introduction
This manual provides detailed instructions for the safe and effective use of your MakerHawk Type-C USB Tester Voltmeter Meter V1. This multi-function tester is designed for quality inspection of 3C digital and peripheral products with a Type-C interface, allowing real-time monitoring of various electrical parameters including voltage, current, capacity, power, temperature, and timing.
2. Key Features
- High-Quality Construction: Features aluminum alloy joints for durability and resistance to oxidation and rust. The robust interface ensures sensitive contact and anti-friction properties for repeated use.
- Enhanced Durability: The Type-C interface is fully reinforced to prevent loosening or damage from frequent plugging and unplugging.
- High-Definition Color LCD Display: Provides clear, bright, and easy-to-read real-time charging data.
- Comprehensive Monitoring: Displays current, voltage, capacity, power, temperature, and timing.
- High Temperature Warning: The temperature value on the display turns red and an exclamation mark appears if the detected temperature exceeds 45°C, indicating abnormal temperature and recommending discontinuation of use.
- Power-Off Storage Function: Automatically stores capacity and energy data when power is disconnected, allowing for later review.
- Two-Way Current Measurement: Capable of measuring both forward and reverse current.

Figure 1: The reinforced Type-C interface and the visual high-temperature warning on the display.

Figure 2: Internal view highlighting the quality components and construction of the tester.
3. Product Components and Display Overview
The MakerHawk Type-C USB Tester V1 features a compact design with a clear display and intuitive controls.

Figure 3: Front view of the MakerHawk Type-C USB Tester V1 with its color display active.
The display panel provides the following information:
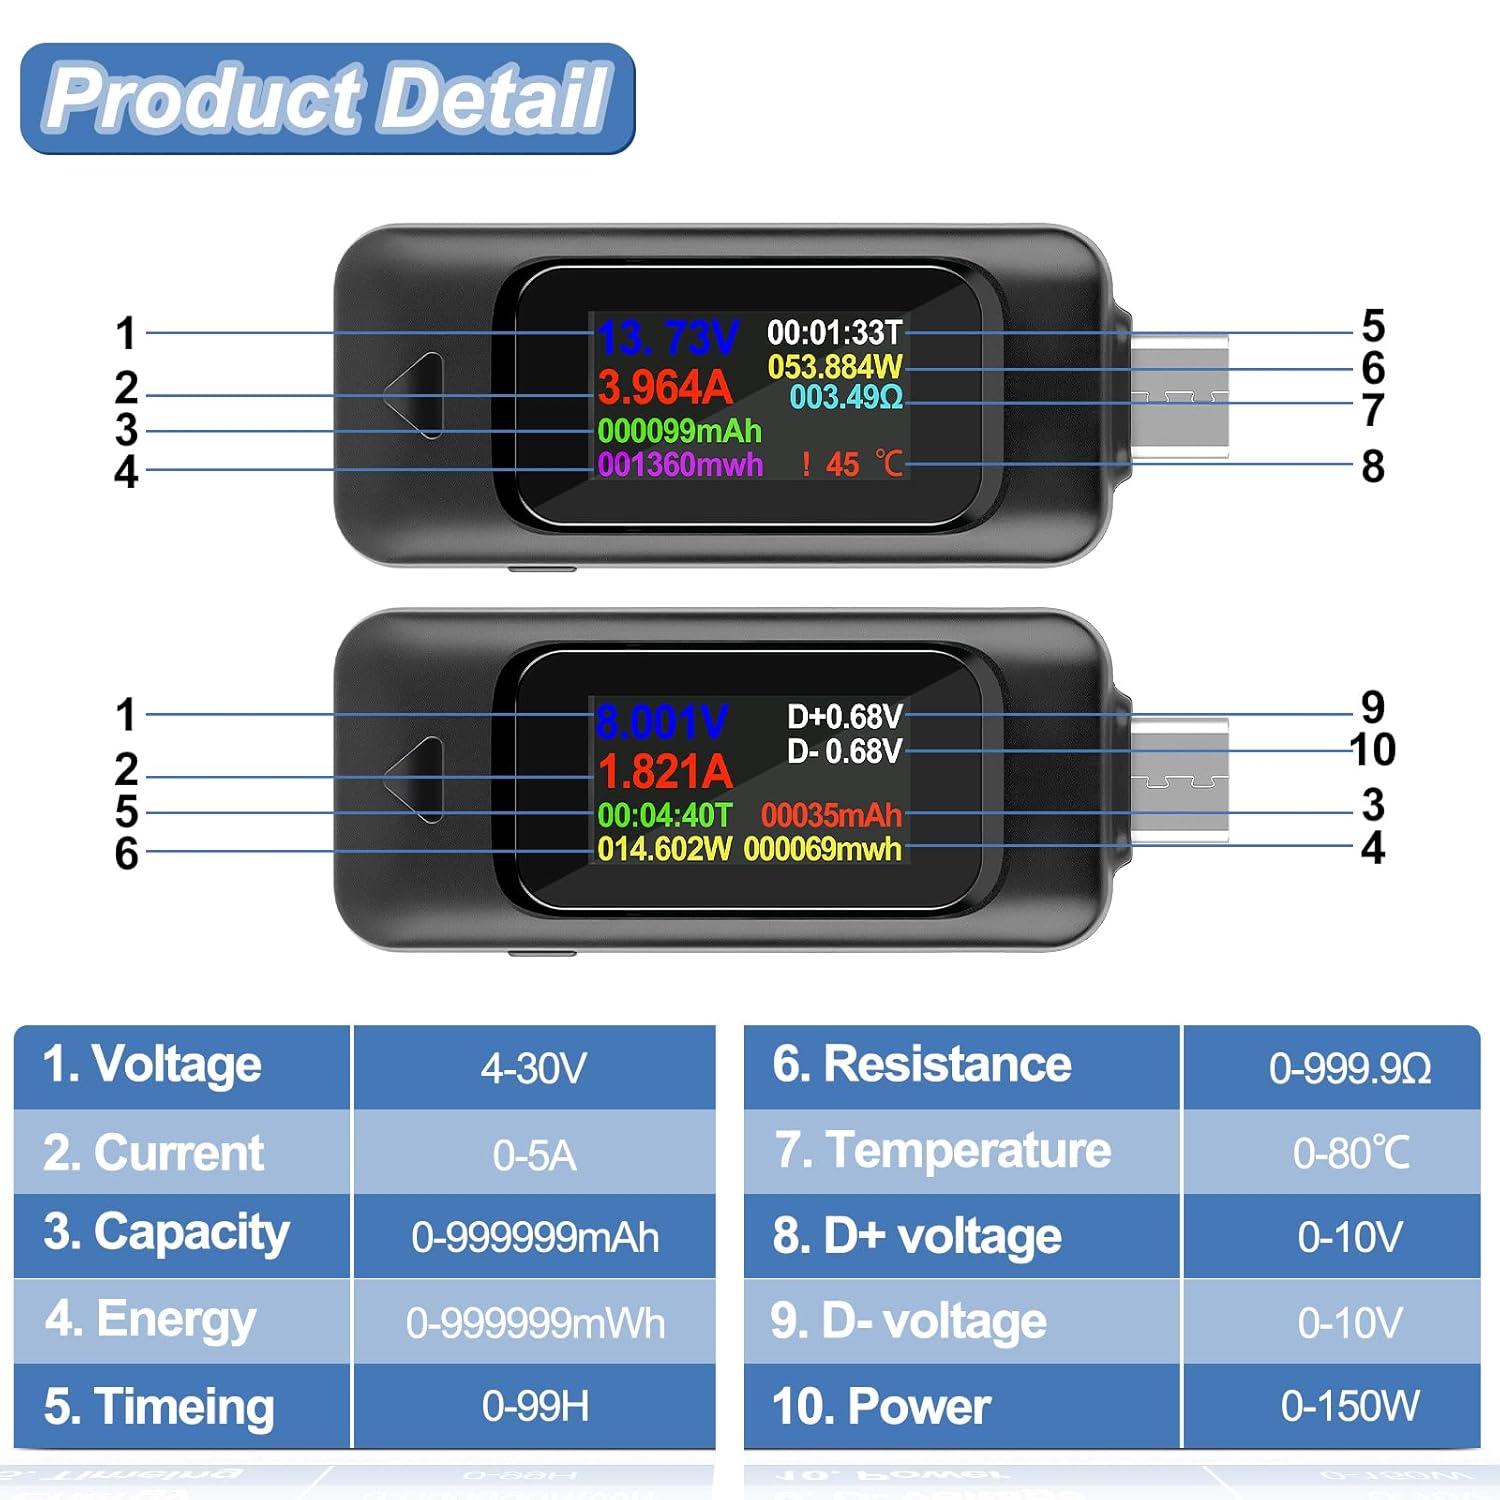
Figure 4: Detailed diagram of the tester's display and physical features with numbered labels.
- Voltage: 4-30V
- Current: 0-5A
- Capacity Range: 0-999999mAh
- Energy Range: 0-999999mWh
- Timer: 0-99H
- Power: 0-150W
- Charging Resistance: 0-999.9Ω
- Temperature: 0-80℃ (The red icon will flash when the temperature is higher than 45℃; it is recommended to stop using)
- D Positive Voltage: 0-10V
- D Negative Voltage: 0-10V
- Function Key
- Input/Output Ports
4. Setup and Connection
The MakerHawk Type-C USB Tester V1 is designed for simple plug-and-play operation. Connect the tester in series between your power source (e.g., USB-C power adapter) and the device you wish to test (e.g., smartphone, laptop).

Figure 5: Examples of connecting the Type-C USB Tester to different devices and power adapters.
Connection Method:
- Connect the male Type-C end of the tester to your USB-Type-C power adapter or power source.
- Connect your load or digital device (e.g., phone, tablet) to the female Type-C port of the tester using a compatible Type-C cable.
The tester will automatically power on and begin displaying real-time data once connected.
5. Operating Instructions
The tester features a single function button for various operations:
- Switching Display Interfaces: Click the function button to cycle through different display screens, showing various data sets.
- Rotating Display Content: Double-click the function button to rotate the display content by 180 degrees for convenient viewing from different angles.
- Clearing Data: Press and hold the function button for 3 seconds to clear the charging data saved in the currently displayed group.
Video 1: Demonstration of the MakerHawk Type-C USB Tester's basic operations, including interface switching, screen rotation, and data clearing.
Voltage Calibration:
If the voltage reading appears inaccurate, you can perform a calibration:
- Ensure the tester is not connected to any load.
- Press and hold the function button.
- While holding the button, connect the tester to a stable 5V power supply.
- Release the button once the display shows "5.000V". The calibration is complete.
Note: Do not exceed the specified voltage and current range (4-30V, 0-5A) when using the device.

Figure 6: Visual guide to button operations and the high-temperature warning feature.

Figure 7: The tester's ability to measure current flow in both directions.
6. Maintenance and Care
- Keep the device clean and dry. Avoid exposure to moisture or extreme temperatures.
- Handle the Type-C connectors with care to prevent bending or damage. The reinforced design improves durability, but excessive force can still cause issues.
- Store the tester in a safe place when not in use to prevent physical damage.
7. Troubleshooting
- Display Not Lighting Up: Ensure the tester is correctly connected between a powered source and a device. If the source or device is faulty, the tester may not receive power.
- Inaccurate Voltage/Current Readings: Perform the voltage calibration procedure as described in Section 5. Ensure all connections are secure.
- Temperature Warning (Red Icon): If the temperature display turns red and flashes (above 45°C), immediately disconnect the tester and connected devices. Allow them to cool down before resuming use. This indicates potential overheating.
- Loose Type-C Port: While the Type-C interface is reinforced, repeated rough handling can still cause wear. Ensure gentle insertion and removal of cables. If the port becomes excessively loose and affects functionality, contact customer support.
8. Specifications
| Parameter | Value |
|---|---|
| Model Number | V1 |
| Voltage Range | 4-30V |
| Current Range | 0-5A |
| Power Range | 0-150W |
| Capacity Range | 0-999999mAh |
| Energy Range | 0-999999mWh |
| Timer Range | 0-99H |
| Charging Resistance | 0-999.9Ω |
| Temperature Range | 0-80℃ |
| D+ Voltage | 0-10V |
| D- Voltage | 0-10V |
| Product Dimensions | 0.14 x 0.1 x 0.79 inches |
| Item Weight | 0.36 Ounces |
9. Warranty and Support
MakerHawk provides dedicated after-sales service. If you encounter any questions or issues with your product, please contact the MakerHawk-US support team. You can reach them by clicking "MakerHawk-US" on the product page and then selecting "Ask a question."


