1. Introduction
This manual provides detailed instructions for the safe and effective operation of your MICTUNING 18 LED UV Black Light. Please read this manual thoroughly before use and retain it for future reference.
2. Product Overview
The MICTUNING 18 LED UV Black Light is designed to produce an iridescent violet light source, enhancing various environments. It features multiple lighting modes and can be controlled via a remote or manual panel.
2.1 Components
- 18 UV LED Black Light Unit
- RF Remote Control (battery not included)
- Adjustable Mounting Bracket
- Power Cable
- User Manual

Image: The MICTUNING 18 LED UV Black Light unit, its remote control, power cable, and mounting bracket.
2.2 Key Features
- High-Quality UV LEDs: Equipped with 18 high-quality UV LEDs for efficient light output.
- Multiple Lighting Modes: Includes Auto, Jump, Color Gradient, Flash, Pulse, and Sound-activated modes.
- Remote Control: Convenient RF remote control for mode selection and speed adjustment.
- DMX-512 Control: Standard DMX-512 compatibility for professional setups.
- Robust Construction: Aluminum alloy housing with an integrated fan for heat dissipation.
- Adjustable Angle: Features an adjustable mounting bracket for flexible positioning.
3. Setup Instructions
- Unpack: Carefully remove all components from the packaging.
- Mounting:
- Attach the adjustable bracket to the light unit using the provided screws.
- The unit can be placed on a flat surface or mounted to a wall/ceiling using appropriate hardware (not included).
- Adjust the lighting angle as needed using the knobs on the side of the bracket.

Image: The adjustable bracket allows for 360-degree rotation to direct the light.
- Power Connection: Connect the power cable to the light unit and then plug it into a standard AC 100-240V power outlet.
- Remote Control Battery: Insert the required battery into the RF remote control (battery not included).
- DMX Connection (Optional): For DMX control, connect a DMX cable from your DMX controller to the "DMX IN" port on the light unit. If chaining multiple units, connect from "DMX OUT" of the first unit to "DMX IN" of the next.
4. Operating Instructions
The MICTUNING UV Black Light can be operated using the included RF remote control or the manual control panel on the back of the unit.
4.1 Manual Control Panel
The manual control panel features an LCD screen and buttons for mode selection and adjustment.

Image: The back panel of the light unit showing DMX IN/OUT, LCD display, and control buttons. The remote control layout is also shown.
- Use the buttons next to the LCD screen to navigate through modes and settings.
- The LCD screen will display the currently selected mode (e.g., "A 1.05" for Auto mode).
4.2 Remote Control Operation
The RF remote control provides convenient access to all lighting modes and adjustments.
- Power On/Off: Press the red power button to turn the unit on or off.
- Mode Selection:
- AUTO: Automatic mode cycling through various effects.
- SOUND: Light reacts to sound/music.
- STROBE: Flashing effect.
- ALL ON: All LEDs are continuously lit.
- FADE: Gradual transition between effects.
- JUMP: Abrupt changes between effects.
- PULSE: Pulsating light effect.
- COLOR +/-: Adjusts color-related settings or selects specific effects within certain modes.
- SPEED +/-: Adjusts the speed of effects in modes like Auto, Jump, Fade, and Pulse.
5. Maintenance
Regular maintenance ensures optimal performance and longevity of your UV Black Light.
- Cleaning: Periodically clean the lens and housing with a soft, dry cloth. Do not use abrasive cleaners or solvents.
- Ventilation: Ensure the integrated fan and ventilation openings are free from dust and obstructions to prevent overheating.
- Storage: When not in use for extended periods, store the unit in a cool, dry place, away from direct sunlight and extreme temperatures.
- Power Disconnection: Always disconnect the power before cleaning or performing any maintenance.
6. Troubleshooting
| Problem | Possible Cause | Solution |
|---|---|---|
| Light does not turn on. | No power supply; faulty power cable; unit off. | Check power connection and outlet. Ensure power button is pressed. Try a different power cable if available. |
| Remote control not working. | Battery depleted or incorrectly inserted; remote out of range; obstruction. | Replace remote battery. Ensure battery is inserted correctly. Operate remote within close range and without obstructions. |
| Light effects are not changing. | Stuck in a single mode; DMX conflict. | Try selecting a different mode using the remote or manual panel. If using DMX, ensure DMX settings are correct and no conflicts exist. |
| Unit overheats. | Poor ventilation; fan obstruction. | Ensure adequate airflow around the unit. Clean any dust or debris from the fan and vents. |
7. Specifications
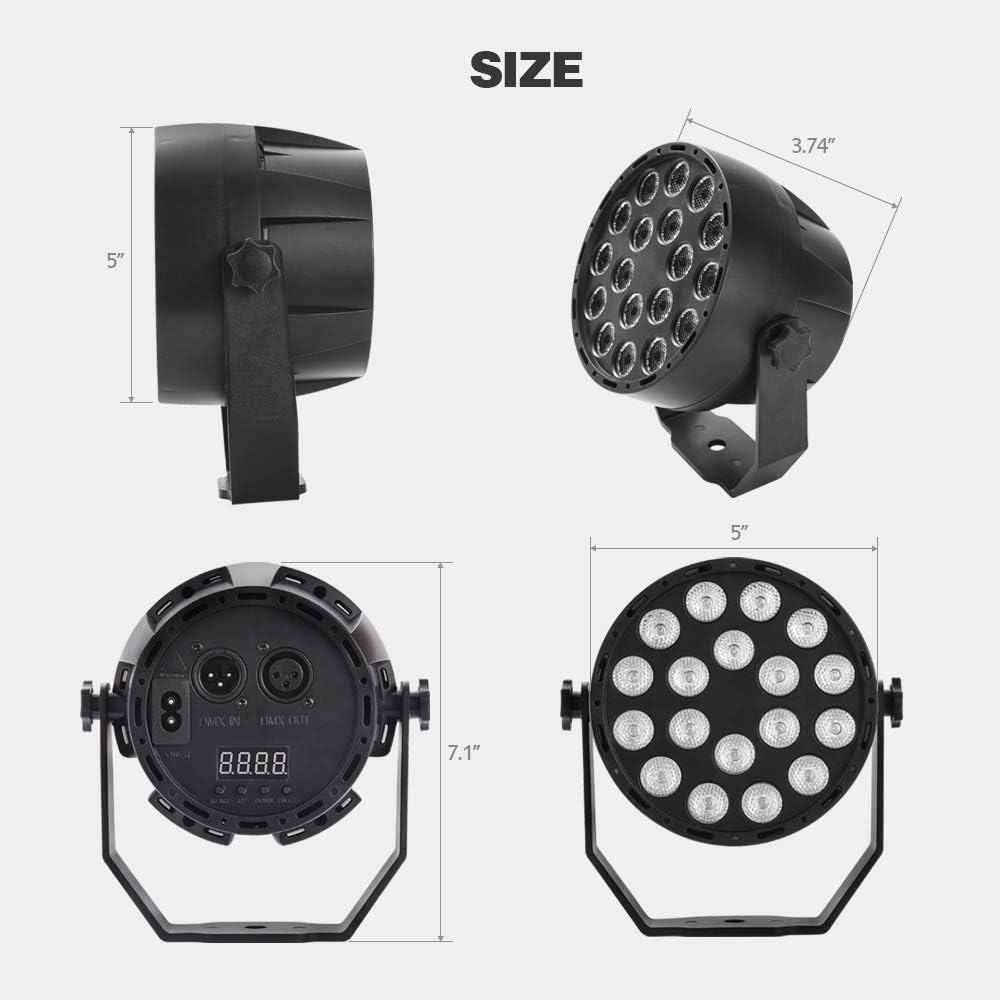
Image: Dimensions of the MICTUNING 18 LED UV Black Light.
| Feature | Detail |
|---|---|
| Brand | MICTUNING |
| Model Number | MIC-UBL-207D |
| Product Dimensions (L x W x H) | 9.5 x 9.5 x 12.7 cm (3.74 x 3.74 x 5 inches) |
| Weight | 490 grams (1.08 lbs) |
| Material | Aluminum Alloy |
| Power | 18 Watts |
| Voltage | AC 100-240 Volts |
| Control Modes | Auto, Jump, Color Gradient, Flash, Pulse, Sound, DMX-512 |
| Remote Control | RF Remote (battery not included) |
8. Safety Information
- Do not look directly into the UV light source. Prolonged exposure can be harmful to eyes.
- Ensure the unit is securely mounted or placed on a stable surface to prevent falling.
- Keep the unit away from water or other liquids.
- Do not operate the unit if the power cable is damaged.
- This product is for indoor use only.
- Keep out of reach of children.
9. Warranty and Support
For warranty information or technical support, please contact MICTUNING customer service. Details regarding spare parts availability are not provided in this manual.
Please refer to the product packaging or the official MICTUNING website for the most current support contact information.


