1. Introduction
This instruction manual provides detailed guidance for the safe and effective use of your BEARFORCE Pressure Washer Foam Cannon. Please read this manual thoroughly before initial use and retain it for future reference. This foam cannon is designed to produce thick, dense foam for vehicle washing when connected to a compatible pressure washer.
2. Safety Information
- Always wear appropriate personal protective equipment, including eye protection, when operating a pressure washer and foam cannon.
- Ensure all connections are secure before operating the unit to prevent leaks or disconnections under pressure.
- Do not point the foam cannon at people, pets, or electrical equipment.
- Use only car wash soaps specifically designed for foam cannons and pressure washers. Follow the soap manufacturer's dilution instructions.
- Keep out of reach of children.
- Disconnect the foam cannon from the pressure washer and relieve pressure before performing any maintenance or adjustments.
3. Package Contents
Verify that all components are present in your package:
- Foam Cannon Body (Brass and Plastic)
- 1 Liter (1000ml) Bottle with Measuring Marks
- Suction Tube with Filter
- 1.25mm Orifice (pre-installed)
- 1.1mm Orifice (extra, for lower PSI pressure washers)
- Pressure Washer Adapter (specific to your model)
- PTFE Thread Seal Tape

Figure 1: Overview of Foam Cannon components.
4. Setup and Assembly
Follow these steps to assemble your foam cannon:
- Attach Suction Tube: Insert the clear suction tube into the bottom of the foam cannon body. Ensure the filter is securely attached to the end of the tube.
- Connect Bottle: Screw the 1L bottle onto the bottom of the foam cannon body until it is hand-tight.
- Select Orifice: The foam cannon comes with a 1.25mm orifice pre-installed, suitable for pressure washers above 1850 PSI. If your pressure washer is between 900-1850 PSI (common for household electric models), it is recommended to replace the 1.25mm orifice with the included 1.1mm orifice for optimal foam production. To do this, use a flat screwdriver to carefully remove the pre-installed orifice and replace it with the 1.1mm orifice.
- Attach Adapter: Apply PTFE thread seal tape to the threads of your pressure washer adapter. Screw the adapter into the inlet of the foam cannon body.
- Connect to Pressure Washer: Connect the assembled foam cannon to your pressure washer gun using the quick-connect fitting. Ensure it clicks securely into place.
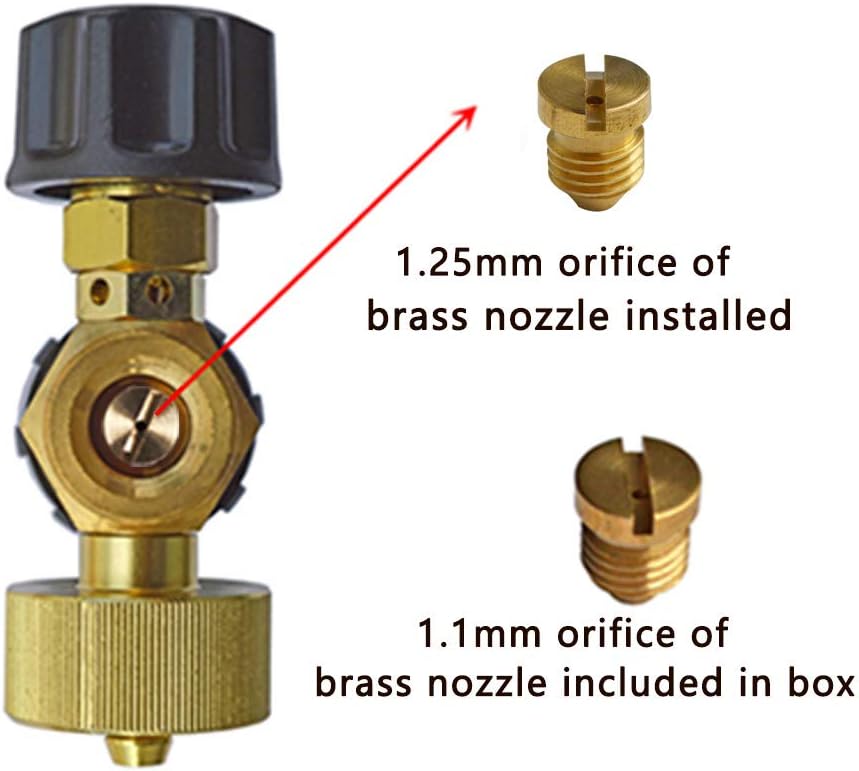
Figure 2: Orifice selection for different pressure washer PSI ratings.

Figure 3: Detailed view of foam cannon components for assembly.
Video 1: Assembly and demonstration of the BEARFORCE Professional Foam Cannon.
5. Operation
Once assembled, follow these steps to use your foam cannon:
- Prepare Soap Solution: Fill the 1L bottle with your desired car wash shampoo. A common mixing ratio is 1 part soap to 5 parts water (1:5). Adjust this ratio based on the soap manufacturer's recommendations and desired foam thickness.
- Adjust Foam Concentration: The top knob on the foam cannon body controls the soap mixture ratio. Turn the knob clockwise for less water and more foam bubbles (thicker foam). Turn it counter-clockwise for more water and less foam bubbles (thinner foam).
- Adjust Spray Pattern: The front nozzle on the foam cannon can be rotated to adjust the spray pattern. Rotate it to achieve a wide fan spray for broad coverage or a straight stream for targeted application.
- Apply Foam: With the pressure washer running, activate the trigger on your pressure washer gun to begin spraying foam onto the vehicle. Cover the entire surface evenly.
- Dwell Time: Allow the foam to dwell on the vehicle surface for a few minutes to loosen dirt and grime. Do not let the foam dry on the vehicle.
- Rinse: After the foam has dwelled, disconnect the foam cannon and reattach your standard pressure washer nozzle. Rinse the vehicle thoroughly from top to bottom with clean water.

Figure 4: Adjusting foam concentration and spray pattern.

Figure 5: Foam cannon in use, demonstrating foam application.
6. Maintenance
Proper maintenance ensures the longevity and performance of your foam cannon:
- Rinse After Each Use: After each use, empty any remaining soap solution from the bottle. Fill the bottle with clean water and run it through the foam cannon until only clear water sprays out. This prevents soap residue from clogging the internal components.
- Clean Filter: Periodically inspect and clean the filter on the end of the suction hose to ensure it remains free of particles. A clogged filter can reduce foam production.
- Use Distilled Water: If you live in an area with hard water, consider using distilled water for mixing your soap solution to minimize mineral buildup inside the foam cannon.
- Store Properly: Store the foam cannon in a clean, dry place away from extreme temperatures.
7. Troubleshooting
If you encounter issues with your foam cannon, refer to the following common solutions:
- No Foam or Thin Foam:
- Check soap-to-water ratio; increase soap concentration if necessary.
- Ensure the top knob is adjusted for maximum foam (clockwise).
- Verify the correct orifice (1.1mm for lower PSI, 1.25mm for higher PSI) is installed for your pressure washer.
- Check if the suction tube or filter is clogged.
- Leaking Connections:
- Ensure all threaded connections are tight and properly sealed with PTFE thread seal tape.
- Check O-rings for damage and replace if necessary.
- Difficulty Connecting/Disconnecting:
- Ensure the quick-connect fitting is clean and free of debris.
- Verify compatibility of the adapter with your pressure washer gun.
8. Specifications
| Feature | Specification |
|---|---|
| Brand | BEAR FORCE |
| Model Number | B07GJB7375 |
| Material | Brass, Stainless Steel |
| Bottle Capacity | 1 Liter (1000ml) |
| Orifice Sizes | 1.25mm (pre-installed), 1.1mm (extra) |
| Item Weight | 1.15 pounds |
| Package Dimensions | 9.84 x 5.12 x 3.74 inches |
9. Warranty and Support
For warranty information or technical support, please refer to the product packaging or contact BEAR FORCE directly through their official channels. Keep your purchase receipt as proof of purchase.