1. Introduction
This manual provides comprehensive instructions for the safe and effective operation, setup, and maintenance of your Ohaus PX84/E Pioneer Analytical Balance. The Ohaus PX series is designed for high accuracy and repeatability in essential weighing applications across laboratory, industrial, and educational environments.
Key features include a durable construction with a cast metal lower housing, sub-pan, and stainless steel weighing pan, ensuring long-term reliability. The balance is equipped with a 2-line LCD display for clear information, a static removal bar for convenient grounding, and USB and RS232 connectivity for data communication.
2. Safety Information
Please read all safety instructions carefully before operating the balance. Failure to comply with these instructions may result in injury or damage to the equipment.
- Operate the balance only in a stable, level environment free from excessive vibrations, drafts, and extreme temperature fluctuations.
- Use only the supplied AC adapter. Using an incorrect power supply may damage the unit.
- Do not overload the balance beyond its maximum capacity of 84g.
- Avoid spilling liquids or corrosive substances onto the balance. In case of spillage, disconnect power immediately and clean thoroughly.
- Do not attempt to service or repair the balance yourself. Refer all servicing to qualified personnel.
- Keep the balance away from strong electromagnetic fields.
3. Components Overview
Familiarize yourself with the main components of the Ohaus PX84/E Analytical Balance:
- Weighing Pan: Stainless steel platform where samples are placed.
- Draftshield: Glass enclosure to protect the weighing pan from air currents, ensuring stable readings.
- Display: 2-Line LCD with backlight for displaying weight readings and operational messages.
- Keypad: Buttons for Zero, Print, Function, Tare, and Menu/Cal operations.
- Level Indicator: Bubble level for ensuring the balance is perfectly horizontal.
- Adjustable Feet: Used to level the balance.
- AC Adapter Port: For connecting the power supply.
- Communication Ports: USB and RS232 for connecting to external devices.
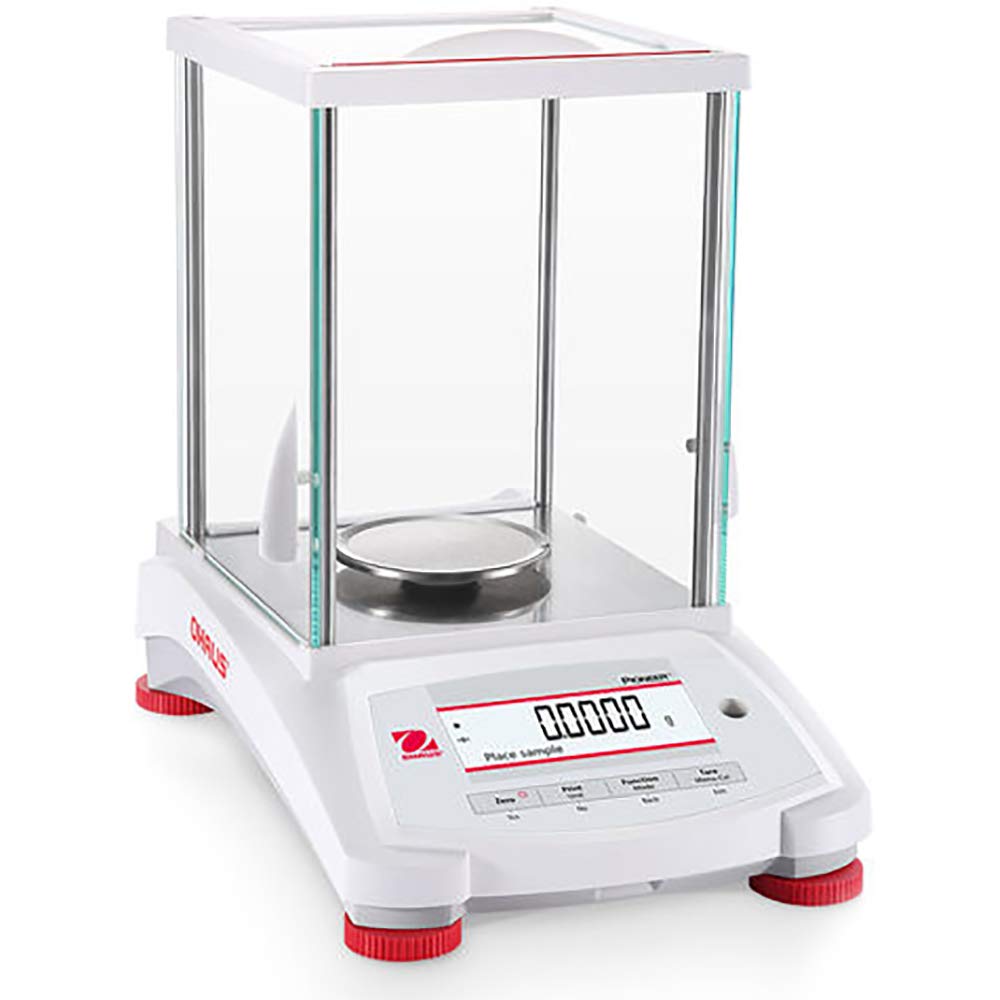
Figure 1: Ohaus PX84/E Pioneer Analytical Balance. This image shows the complete balance unit, including the main body, stainless steel weighing pan, glass draftshield, and the front panel with the 2-line LCD display and control buttons. The adjustable feet are visible at the base.
4. Setup
- Unpacking: Carefully remove the balance and all components from the packaging. Retain packaging for future transport or storage.
- Placement: Place the balance on a firm, stable, and level surface, away from direct sunlight, heat sources, air currents (e.g., vents, open windows), and vibrations.
- Leveling: Adjust the two front adjustable feet until the bubble in the level indicator (usually located near the display or at the back) is centered. Ensure the balance is perfectly level for accurate measurements.
- Draftshield Assembly: Assemble the glass draftshield panels around the weighing pan according to the diagrams in the separate draftshield assembly guide (if provided). Ensure all panels are securely in place to minimize air disturbance.
- Power Connection: Connect the supplied AC adapter to the power input port on the balance and then plug it into a suitable electrical outlet.
- Initial Warm-up: Allow the balance to warm up for at least 30 minutes after connecting power before performing any measurements or calibration. This ensures thermal stability.
5. Operating Instructions
5.1 Basic Weighing
- Power On: Press the ON/OFF button (if present, otherwise connecting power usually turns it on, or a dedicated power button).
- Zeroing the Balance: Before placing any sample, ensure the weighing pan is empty and the display reads "0.0000g". If not, press the Zero button to set the display to zero.
- Placing the Sample: Carefully open the draftshield door, place your sample (or container) centrally on the weighing pan. Close the draftshield door.
- Reading the Weight: Wait for the stability indicator (usually a small circle or star on the display) to appear, indicating a stable reading. Read the weight displayed on the 2-line LCD.
- Removing the Sample: Open the draftshield door, remove the sample, and close the door.
5.2 Taring (Weighing with a Container)
- Place the empty container on the weighing pan.
- Wait for a stable reading.
- Press the Tare button. The display will return to "0.0000g", effectively subtracting the container's weight.
- Add your sample to the container. The display will show the net weight of the sample.
5.3 Unit Selection
The Ohaus PX84/E supports various weighing units. To change the unit:
- Press the Units or Function button (refer to the specific button layout on your balance) to cycle through available units such as Gram (g), Milligram (mg), Kilogram (kg), Carat (ct), Ounce (oz), Pound (lb), etc.
- The display will show the currently selected unit.
Supported units include: Carat, Custom, Grain, Gram, Hong Kong Tael, Kilogram, Mesghal, Milligram, Momme, Newton, Ounce, Ounce Troy, Pennyweight, Pound, Singapore Tael, Taiwan Tael, Tical, Tola.
5.4 External Calibration
For precise measurements, regular external calibration is essential. This balance requires an external calibration weight (not included) of appropriate class and value (e.g., 50g or 80g, Class E2 or F1, depending on local regulations and desired accuracy).
- Ensure the balance is level and has warmed up.
- Refer to the balance's display or a separate calibration guide for the exact procedure, which typically involves pressing the Menu/Cal button, selecting "Calibration", and following the on-screen prompts to place and remove the calibration weight.
- Always perform calibration in a stable environment, free from drafts and vibrations.
6. Maintenance
6.1 Cleaning
- Disconnect the balance from the power supply before cleaning.
- Use a soft, damp cloth with a mild detergent to clean the exterior surfaces. Avoid abrasive cleaners or solvents.
- The stainless steel weighing pan can be removed and cleaned separately with mild soap and water. Ensure it is completely dry before re-installing.
- Clean the glass draftshield panels with a glass cleaner and a soft cloth.
- Do not allow liquids to enter the balance housing or display area.
6.2 General Care
- Always handle the balance with care. Avoid dropping or subjecting it to sudden shocks.
- When not in use, keep the draftshield doors closed to prevent dust accumulation.
- Store the balance in a dry, temperature-controlled environment.
7. Troubleshooting
| Problem | Possible Cause | Solution |
|---|---|---|
| No display/Balance does not turn on | No power, faulty AC adapter, loose connection. | Check power cable connection. Ensure AC adapter is plugged into a live outlet. Try a different outlet. |
| Unstable readings | Drafts, vibrations, unlevel balance, temperature changes, electromagnetic interference. | Close draftshield doors. Relocate balance to a stable, draft-free area. Level the balance. Allow warm-up time. Move away from electronic devices. |
| Inaccurate readings | Needs calibration, unlevel balance, dirty pan, incorrect weighing procedure. | Perform external calibration. Level the balance. Clean the weighing pan. Ensure proper weighing technique (e.g., central placement). |
| "Error" message on display | Overload, internal fault, calibration error. | Remove excess weight if overloaded. Power cycle the balance. Re-attempt calibration. If error persists, contact Ohaus support. |
8. Specifications
| Feature | Detail |
|---|---|
| Model | PX84/E |
| Item Model Number | 30429845 |
| Capacity | 84g |
| Readability | 0.0001g |
| Pan Size | 3.54 inches (90 mm) |
| Display | 2-Line LCD with Backlight |
| Calibration | External Calibration |
| Power | AC Adapter (Included) |
| Construction | Metal base, plastic top housing, removable stainless steel pan, glass draftshield, integrated weigh-below-hook, security bracket, calibration lock, in-use cover. |
| Connectivity | USB, RS232 |
| Product Dimensions | 21 x 16 x 21 inches; 10 Pounds |
| Recommended Uses | Education, Industrial, Laboratory |
9. Warranty and Support
Ohaus products are manufactured under strict quality standards. For specific warranty terms and conditions, please refer to the warranty card included with your product or visit the official Ohaus website. In case of technical issues or for further assistance, please contact Ohaus customer support or your authorized Ohaus dealer.
For the most up-to-date support information, please visit: www.ohaus.com/en-us/support


