Introduction
This manual provides essential information for the safe and efficient operation of your TX Automatic Wire Crimping Machine, Model 1.5T with horizontal mold. This high-speed, super mute terminal crimping machine is designed for high output and low maintenance, utilizing frequency conversion technology for electronic precision positioning. Please read this manual thoroughly before operating the machine.
Safety Precautions
- Always ensure the machine is properly grounded before operation.
- Wear appropriate personal protective equipment (PPE), including safety glasses, during operation.
- Do not operate the machine with wet hands or in damp conditions.
- Keep hands and loose clothing away from moving parts.
- Disconnect power before performing any maintenance or adjustments.
- Ensure the work area is clean, well-lit, and free of obstructions.
Product Overview
The TX Automatic Wire Crimping Machine is a robust tool designed for precise and efficient crimping of various terminals. Its advanced features ensure stable voltage, high speed, and high accuracy in crimping operations.

Figure 1: Front view of the TX Automatic Wire Crimping Machine, showing the control panel and crimping mechanism.
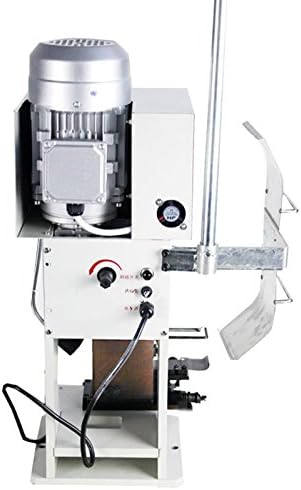
Figure 2: Side view of the machine, highlighting the motor and power connections.
Setup
Unpacking and Inspection
Carefully unpack the machine and all accessories. Inspect for any shipping damage. Report any damage to your supplier immediately.
Package Contents:
- 1 x Automatic Wire Crimping Machine
- 1 x Support Stand
- 1 x Horizontal Mold with Tools (pre-installed or separate)
- Accessories (power cord, etc.)
Assembly
- Place the machine on a stable, level surface.
- Attach the support stand to the machine using the provided hardware. Ensure it is securely fastened.
- Verify that the horizontal mold is correctly installed. The machine is capable of fitting vertical, horizontal, and single grain molds. Ensure the correct mold type is in place for your application.
- Connect the power cord to the machine and then to a compatible power outlet (110V/60HZ for this model).

Figure 3: Illustration of various mold types compatible with the machine: vertical, horizontal, and single grain molds.
Operating Instructions
Powering On and Initial Checks
- Ensure all safety precautions are observed.
- Turn on the main power switch, usually located on the control panel.
- Observe the display for any error codes or indicators.
Adjusting the Mold and Crimping Force
The machine features convenient and swift adjustment for the mold. Refer to the control panel and any specific markings for fine-tuning the crimping force and position to match your terminal and wire specifications. The crimping force is rated at 1500KG.

Figure 4: Detailed view of the crimping mechanism, showing the area where terminals and wires are inserted.
Crimping Process
- Select the appropriate terminal and wire for your application.
- Insert the terminal into the mold.
- Carefully position the stripped wire into the terminal.
- Activate the crimping cycle using the foot pedal or control button. The machine will perform a high-speed, precise crimp.
- Remove the crimped terminal and inspect the quality of the crimp.

Figure 5: Examples of different types of crimped terminals, demonstrating the machine's versatility.
This machine is suitable for crimping DC terminals, AC terminals, single terminals, and continuous terminals.
Maintenance
Regular maintenance ensures the longevity and optimal performance of your crimping machine. Always disconnect power before performing any maintenance.
Daily Maintenance:
- Clean the crimping area and mold after each use to remove wire debris and dust.
- Wipe down the exterior of the machine with a clean, dry cloth.
Weekly/Monthly Maintenance:
- Inspect all moving parts for wear and tear.
- Apply a light lubricant to pivot points and sliding surfaces as recommended by the manufacturer (if applicable).
- Check all electrical connections for tightness and signs of damage.
- Ensure the support stand is stable and all fasteners are secure.

Figure 6: View of the machine's base and lower mechanism, important for cleaning and lubrication.
Troubleshooting
This section provides solutions to common issues you may encounter. For problems not listed here, please contact customer support.
| Problem | Possible Cause | Solution |
|---|---|---|
| Machine does not power on. | No power supply; loose power cord; tripped circuit breaker. | Check power connection; ensure power outlet is functional; reset circuit breaker. |
| Poor crimp quality (loose or deformed). | Incorrect mold; improper crimping force setting; worn mold. | Verify mold type matches terminal; adjust crimping force; inspect and replace mold if worn. |
| Machine makes unusual noise. | Lack of lubrication; loose components; foreign object. | Lubricate moving parts; check and tighten fasteners; inspect for and remove any foreign objects. |
| Crimping cycle does not complete. | Obstruction in mechanism; sensor issue. | Clear any obstructions; contact support if sensor issue is suspected. |
Specifications
| Parameter | Value |
|---|---|
| Model | LY 1.5T |
| Stroke | 30mm |
| Power | 110V/60HZ (for this model) |
| Weight | 49KG |
| Dimensions (L*W*H) | 270*240*650mm |
| Motor Power | 0.55KW |
| Crimping Force | 1500KG |
| Applicable Terminals | DC terminals, AC terminals, Single terminals, Continuous terminals |
| Material | Steel plate |
Warranty and Support
For warranty information, technical support, or to inquire about additional molds (vertical, horizontal, or single grain), please contact your original supplier or the manufacturer, TZ. Ensure you have your product model number (LY 1.5T) and purchase details available when seeking support.
The manufacturer is TZ. For specific inquiries regarding molds, please message your supplier directly as indicated in the product description.