
1. Introduction
This manual provides comprehensive instructions for the installation, operation, and maintenance of the PVI MINIMOD 2 Vecoax HDMI to Coax Modulator. This device is designed to convert an HDMI video signal from any HDMI source into a real HDTV channel with Full HD up to 1080p, allowing distribution over existing coaxial cable networks to multiple televisions.
The MINIMOD 2 offers a simple and efficient solution for distributing high-definition video content throughout a building without the need for new wiring.
2. Product Overview
The PVI MINIMOD 2 Vecoax is a high-definition HDMI video digital TV RF coax modulator. It takes an HDMI input signal and modulates it into a digital television channel (ATSC or QAM), which can then be broadcast over a standard coaxial cable system.
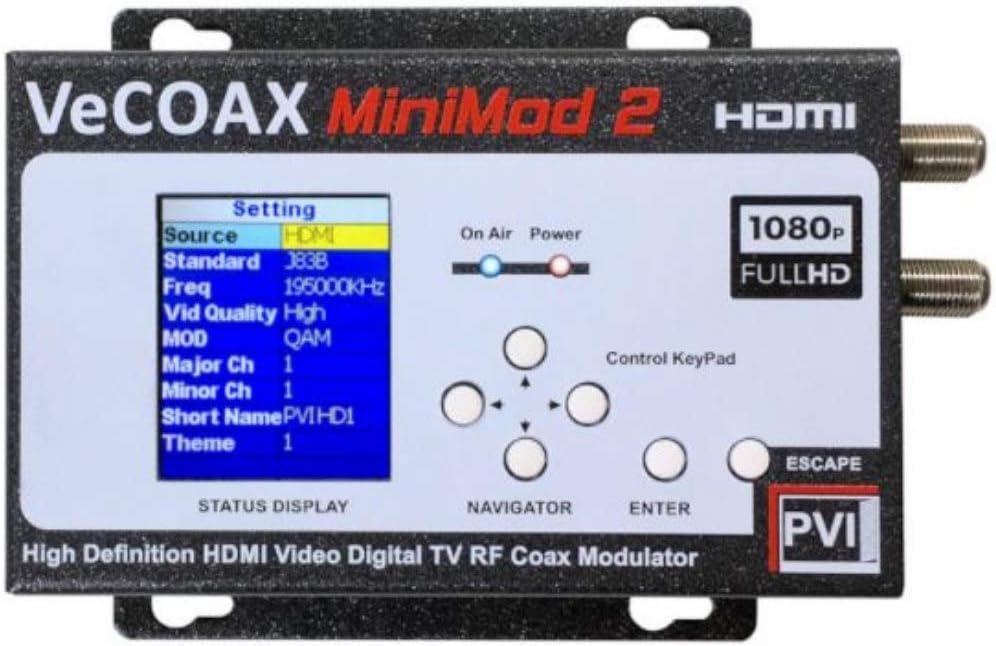
Figure 2.1: Front Panel of the MINIMOD 2 Vecoax Modulator. This image shows the device's display screen, control keypad, and status indicators for 'On Air' and 'Power'. The display indicates settings such as Source (HDMI), Standard (3838), Frequency (195000KHz), Video Quality (High), Modulation (QAM), Major Channel (1), Minor Channel (1), and Short Name (PVIHD1).
Key Features:
- Converts HDMI video signals up to 1080p Full HD at 60 frames per second.
- MPEG2 1080p Full HD Video Encoding & Dolby Sound.
- Supports Closed Captioning from the HDMI source.
- Selectable QAM Cable & ATSC RF Output (Agile: 30 MHz to 951 MHz).
- User-configurable channel number (1 to 9999) and channel name via color display.
- High RF output level (+45dB mV) capable of driving extensive coaxial networks.
- Plug-and-play operation for quick setup.
3. Setup and Installation
Follow these steps to set up your MINIMOD 2 Vecoax modulator:
- Unpack the Device: Carefully remove the MINIMOD 2 from its packaging. Ensure all components are present.
- Connect HDMI Source: Connect your HDMI video source (e.g., Blu-ray player, set-top box, computer) to the HDMI input port on the MINIMOD 2 using a high-quality HDMI cable.
- Connect Coaxial Output: Connect the RF output of the MINIMOD 2 to your existing TV distribution coaxial cable network. This can be done via a wall TV socket or directly to your TV distribution box.
- Power On: Connect the provided power adapter to the MINIMOD 2 and then plug it into an electrical outlet. The 'Power' indicator light on the front panel should illuminate.
- Configure Channel Settings:
- Use the control keypad (Navigator and Enter buttons) on the front panel to access the settings menu on the color display.
- Navigate to the 'Channel Number' setting and select your desired channel number (1 to 9999).
- Navigate to the 'Channel Name' setting and input a desired name for your new channel.
- Select the appropriate modulation standard (ATSC for over-the-air broadcast or QAM for cable systems) based on your region and setup.
- Rescan TVs: On all televisions connected to the coaxial network, perform a channel scan (or auto-tune) to discover the newly added channel from the MINIMOD 2. Refer to your TV's instruction manual for specific channel scanning procedures.
- Verify Signal: Once the scan is complete, tune to the channel you configured on the MINIMOD 2 to verify that the HDMI video source is being successfully distributed.
The MINIMOD 2 can combine its output with existing antenna or cable signals on the same coaxial network, allowing you to watch both standard TV channels and the modulated HDMI channel.
4. Operating Instructions
Operating the MINIMOD 2 is straightforward once initial setup is complete.
Front Panel Controls:
- Color Display: Shows current settings, status, and menu options.
- Control Keypad (Navigator): Used for navigating through menu options (Up, Down, Left, Right arrows).
- Enter Button: Confirms selections or enters sub-menus.
- Escape Button: Returns to the previous menu or exits the current menu.
- On Air Indicator: Illuminates when the modulated signal is being broadcast.
- Power Indicator: Illuminates when the device is powered on.
Changing Settings:
To modify channel name, number, or modulation type after initial setup:
- Press the 'Enter' button to access the main menu.
- Use the 'Navigator' arrows to scroll through the options.
- Press 'Enter' to select an option (e.g., 'Channel Settings').
- Adjust the desired parameters using the 'Navigator' and 'Enter' buttons.
- Press 'Escape' repeatedly to exit the menu and save changes.
Any changes to the channel number or modulation type will require a re-scan on your connected televisions.
5. Maintenance
The MINIMOD 2 Vecoax modulator is designed for reliable operation with minimal maintenance. Follow these guidelines to ensure optimal performance and longevity:
- Cleaning: Use a soft, dry cloth to clean the exterior of the device. Do not use liquid cleaners or aerosol sprays, as they may damage the unit.
- Ventilation: Ensure the device is placed in a well-ventilated area. Do not block any ventilation openings. Overheating can affect performance and lifespan.
- Environment: Keep the device away from direct sunlight, heat sources, and excessive moisture. Operate within recommended temperature and humidity ranges.
- Cable Connections: Periodically check all HDMI and coaxial cable connections to ensure they are secure and free from damage. Loose connections can lead to signal degradation.
- Firmware Updates: Check the PVI manufacturer's website periodically for any available firmware updates. Follow the manufacturer's instructions carefully if an update is required.
No user-serviceable parts are inside the MINIMOD 2. Do not attempt to open or repair the device yourself, as this will void the warranty and may cause damage or injury.
6. Troubleshooting
If you encounter issues with your MINIMOD 2, refer to the following troubleshooting guide:
| Problem | Possible Cause | Solution |
|---|---|---|
| No picture or sound on TV. |
|
|
| Poor picture quality (pixelation, distortion). |
|
|
| Cannot find the channel after scanning. |
|
|
If the problem persists after trying these solutions, please contact PVI customer support for further assistance. For additional visual guidance, you may refer to the manufacturer's official YouTube channel for setup videos, such as the one referenced in the product description (video ID: nbbsBZym0vg).
7. Specifications
| Feature | Detail |
|---|---|
| Model Number | 0649070908115 |
| Brand | PVI |
| Manufacturer | PVI ProVideoInstruments |
| Input Connector Type | HDMI |
| Output Connector Type | Coaxial (F-type) |
| Compatible Devices | Television |
| Video Input Resolution | Up to 1080p @ 60 frames per second |
| Video Encoding | MPEG2 1080p Full HD |
| Audio Encoding | Dolby Sound |
| RF Output Standards | QAM Cable & ATSC Air |
| RF Output Frequency Range | 30 MHz to 951 MHz (Agile) |
| RF Output Level | +45dB mV |
| Configurable Channels | 1 to 9999 |
| Color | Black |
| Item Weight | 1.5 pounds |
| Package Dimensions | 11.42 x 6.34 x 3.7 inches |
8. Warranty Information
Specific warranty details for the PVI MINIMOD 2 Vecoax Modulator are provided by the manufacturer. Please refer to the official PVI ProVideoInstruments website or the documentation included with your product for the most current and complete warranty information.
Typically, product warranties cover defects in materials and workmanship under normal use for a specified period from the date of purchase. Keep your proof of purchase for warranty claims.
9. Customer Support
For technical assistance, troubleshooting beyond this manual, or warranty inquiries, please contact PVI ProVideoInstruments customer support.
Visit the official PVI website for contact information, FAQs, and additional resources. When contacting support, please have your product model number (0649070908115) and purchase details ready.