1. Introduction
This manual provides detailed instructions for the installation, operation, and maintenance of your Culligan WH-S200-C Whole House Sediment Water Filter. Please read this manual thoroughly before installation and retain it for future reference. Proper installation and maintenance are crucial for the optimal performance and longevity of your filtration system.
The Culligan WH-S200-C system is designed to reduce sediment from your entire household water supply, protecting plumbing and appliances from dirt, sand, silt, and rust particles.
2. Product Overview
2.1 Key Features
- Stainless steel reinforced inlet/outlet for enhanced durability.
- Integrated bypass valve with shut-off valve for convenient filter changes without interrupting water supply to the entire house.
- Pressure relief button to release pressure before filter changes, ensuring safety and ease of maintenance.
- Removable filter timer to help track filter life and schedule replacements.
- Integrated bracket design for easy mounting.
- Clear sump housing allows for visual inspection of the filter cartridge.
- Certified to NSF 42 for sediment reduction.
2.2 Components
The Culligan WH-S200-C system typically includes:
- Filter Head Assembly (with bypass valve, shut-off valve, pressure relief button, and integrated bracket)
- Clear Filter Sump
- Sediment Filter Cartridge (P5 filter included)
- Filter Wrench
- Removable Filter Timer
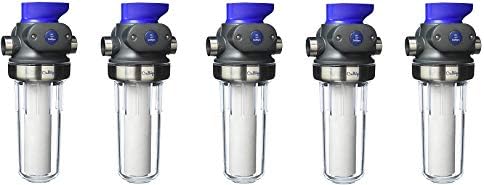
This image displays five units of the Culligan WH-S200-C Whole House Sediment Water Filter. Each unit consists of a blue and gray head assembly with a clear sump housing a white sediment filter cartridge. The units are designed for whole-house water filtration.
3. Installation Instructions
Important: Installation should be performed by a qualified plumber or technician. Ensure local plumbing codes are followed. Turn off the main water supply before beginning installation.
- Select Location: Choose a suitable location on your 3/4" main water line, after the main shut-off valve and before any other plumbing fixtures or appliances. Ensure there is adequate space below the filter for sump removal.
- Turn Off Water: Close the main water supply valve to your home. Open a faucet at the lowest point in your house to drain the water lines and relieve pressure.
- Cut Pipe: Carefully cut a section of the 3/4" main water line to accommodate the filter housing. Ensure cuts are clean and straight.
- Install Fittings: Apply thread sealant tape to the male threads of the 3/4" compression x 3/4" male iron pipe fittings (not included, TV #467-621 recommended). Install these fittings onto the inlet and outlet ports of the filter head assembly.
- Mount Filter Head: Use the integrated mounting bracket to secure the filter head assembly to a sturdy surface, ensuring it is level.
- Connect Plumbing: Connect the main water line to the installed fittings on the filter head. Ensure all connections are tight to prevent leaks.
- Insert Filter Cartridge: Unwrap the P5 sediment filter cartridge. Place it into the clear sump, ensuring it is centered on the standpipe.
- Attach Sump: Hand-tighten the clear sump onto the filter head assembly. Use the provided filter wrench for a final snug turn (do not overtighten).
- Restore Water Supply: Slowly open the main water supply valve. Check for leaks. Once water flows, press the red pressure relief button on the filter head to release trapped air.
- Flush System: Run water through a nearby cold water faucet for several minutes to flush out any carbon fines or air from the system.
4. Operating Instructions
The Culligan WH-S200-C operates automatically once installed. Water flows through the filter, and sediment is removed. The clear sump allows for visual monitoring of the filter's condition.
- Bypass Valve: The integrated bypass valve allows you to divert water around the filter system. This is useful during filter changes or if maintenance is required on the filter itself, without shutting off water to your entire home.
- Shut-off Valve: The shut-off valve integrated into the bypass mechanism allows for complete isolation of the filter system.
- Pressure Relief Button: Located on the filter head, this button is used to relieve pressure within the sump before unscrewing it for filter replacement. Always use this button before attempting to remove the sump.
- Filter Timer: Set the removable filter timer according to the recommended filter life (typically 3-6 months, depending on water quality and usage) to remind you when a replacement is due.
5. Maintenance
5.1 Filter Cartridge Replacement
Replace the sediment filter cartridge every 3-6 months, or sooner if you notice a drop in water pressure or visible sediment in the clear sump. The included P5 filter is a standard sediment filter. Compatible replacement cartridges include Culligan TV #'s 529-286, 583-393, 583-401, or 614-800.
- Turn Off Water: Engage the bypass valve to divert water around the filter and close the integrated shut-off valve to isolate the filter.
- Relieve Pressure: Press the red pressure relief button on the filter head to release any trapped pressure.
- Remove Sump: Using the provided filter wrench, slowly unscrew the clear sump from the filter head. Be prepared for some residual water to spill.
- Discard Old Filter: Remove and discard the used filter cartridge.
- Clean Sump: Wash the clear sump with warm, soapy water and rinse thoroughly. Inspect the O-ring for any damage or wear; replace if necessary. Lubricate the O-ring with food-grade silicone grease if it appears dry.
- Insert New Filter: Unwrap a new filter cartridge and carefully insert it into the sump, ensuring it seats properly on the standpipe.
- Reattach Sump: Hand-tighten the sump onto the filter head. Use the filter wrench for a final snug turn (do not overtighten).
- Restore Water: Slowly open the integrated shut-off valve and disengage the bypass valve to restore water flow through the filter. Check for leaks.
- Flush System: Open a nearby cold water faucet to flush the system for several minutes until the water runs clear and all air is expelled.
- Reset Timer: Reset the removable filter timer to track the life of the new cartridge.
5.2 O-Ring Maintenance
The O-ring provides a watertight seal between the sump and the filter head. Inspect it during each filter change. If it appears cracked, stretched, or damaged, replace it immediately. Always lubricate the O-ring with food-grade silicone grease to ensure a proper seal and prevent sticking.
6. Troubleshooting
- Low Water Pressure:
- Cause: Clogged filter cartridge.Solution: Replace the filter cartridge.
- Cause: Air trapped in the system.Solution: Press the pressure relief button to release air, then flush the system.
- Water Leaks from Sump:
- Cause: Sump not tightened sufficiently.Solution: Ensure the sump is hand-tightened, then use the wrench for a snug turn. Do not overtighten.
- Cause: Damaged or improperly seated O-ring.Solution: Turn off water, relieve pressure, remove sump, inspect O-ring. Clean, lubricate, or replace O-ring as needed. Ensure it is properly seated in its groove before reattaching the sump.
- Cause: Cracked sump.Solution: Replace the sump.
- Water Leaks from Inlet/Outlet Connections:
- Cause: Loose fittings or insufficient thread sealant.Solution: Turn off water, drain lines, re-tighten fittings, or reapply thread sealant tape.
7. Specifications
| Feature | Detail |
|---|---|
| Model Number | WH-S200-C |
| Brand | Culligan |
| Inlet/Outlet Size | 3/4 inch |
| Special Features | Pressure Relief Button, Bypass Valve with Shut-off, Removable Filter Timer, Integrated Bracket Design, Stainless Steel Reinforced Inlet/Outlet |
| Purification Method | Sedimentation |
| Power Source | Manual Operation |
| Included Filter | P5 Sediment Filter |
| Compatible Replacement Cartridges | Culligan TV #'s 529-286, 583-393, 583-401, 614-800 |
| Certifications | Certified to NSF 42 |
8. Warranty and Support
For warranty information, technical support, or to purchase replacement parts and filters, please refer to the official Culligan website or contact Culligan customer service directly. Keep your purchase receipt as proof of purchase.
You can often find support resources and contact information on the Culligan Store on Amazon or the official Culligan website.


