
Planet XT-705A
Planet XT-705A 10G/5G/2.5G/1G/100M Copper to 10GBASE-X SFP+ Media Converter User Manual
Model: XT-705A | Brand: Planet
1. Introduction
The Planet XT-705A is a high-performance media converter designed to bridge the gap between copper-based Ethernet networks and fiber optic networks. It facilitates the conversion of 10G/5G/2.5G/1G/100M Copper Ethernet to 10GBASE-X SFP+ fiber, enabling flexible and extended network deployments. This manual provides essential information for the proper installation, operation, and maintenance of your XT-705A media converter.
2. Safety Information
Please read and understand all safety instructions before operating the device. Failure to do so may result in injury or damage to the product.
- Ensure the power supply voltage matches the device's requirements (External 5V DC, 2A).
- Do not open the device casing. Refer all servicing to qualified personnel.
- Avoid exposing the device to water, moisture, or extreme temperatures.
- Handle fiber optic cables and SFP+ modules with care. Do not look directly into active fiber ports as invisible laser radiation may be present.
- Install the device in a well-ventilated area to prevent overheating.
3. Package Contents
Verify that all items are present in your product package:
- Planet XT-705A Media Converter
- External 5V DC Power Adapter
- User Manual
- Warranty Card

4. Product Overview
The XT-705A media converter features a compact design with essential ports and LED indicators for easy monitoring.
4.1 Front Panel

Ports:
- 10GBASE-X SFP+ Slot: For connecting a 10G SFP+ transceiver module (fiber or DAC).
- 10G/5G/2.5G/1G/100BASE-T RJ45 Port: For connecting to a copper Ethernet network device. Supports auto MDI/MDI-X.
LED Indicators:
- PWR (Power): Indicates power status.
- LNK/ACT (Link/Activity): Indicates network link and data activity for both SFP+ and RJ45 ports.
- SPD (Speed): Indicates the current speed of the RJ45 connection (e.g., 10G, 5G, 2.5G, 1G, 100M).
4.2 Rear Panel
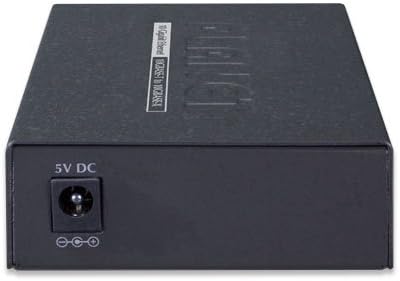
Power Port:
- DC 5V-12V: Connect the provided external power adapter here.
5. Specifications
| Feature | Description |
|---|---|
| Model Number | XT-705A |
| Ethernet Standards | IEEE 802.3u/802.3ab/802.3bz/802.3ae |
| Copper Port | 1x 10G/5G/2.5G/1G/100BASE-T RJ45 (Auto MDI/MDI-X) |
| Fiber Port | 1x 10GBASE-X SFP+ slot |
| Duplex Mode | 100Mbps half/full duplex, 1/2.5/5/10Gbps full duplex |
| Flow Control | Back pressure (half-duplex), IEEE 802.3x pause frame (full-duplex) |
| Jumbo Frame Size | 16K |
| Power Supply | External 5V DC, 2A |
| Dimensions (L x W x H) | 3.7 x 2.76 x 1.02 inches |
| Weight | 15.8 ounces |
| Mounting Options | DIN-rail and wall-mount design |
6. Setup
Follow these steps to set up your XT-705A Media Converter:
- Install SFP+ Module: Insert a compatible 10GBASE-X SFP+ transceiver module into the SFP+ slot on the front panel. Ensure it is securely seated.
- Connect Fiber Optic Cable: Connect the appropriate fiber optic cable (e.g., LC fiber optic cable for SFP+ modules) to the SFP+ module. Ensure the correct multimode or singlemode jumper cord is used based on your SFP+ module.
- Connect Copper Ethernet Cable: Connect a standard RJ45 Ethernet cable from your network device (e.g., switch, router, PC) to the RJ45 port on the media converter.
- Connect Power: Plug the external 5V DC power adapter into the DC power port on the rear panel of the media converter, then plug the adapter into a power outlet.
- Verify Connections: Check the LED indicators on the front panel. The PWR LED should be on. The LNK/ACT and SPD LEDs for both the SFP+ and RJ45 ports should illuminate to indicate a successful link and data activity.

Setup Demonstration Video
Video 6.1: This video demonstrates the unboxing and setup process for a 10G Fiber Ethernet to Copper UTP Media Converter, including SFP+ module installation, fiber cable connection, and power-up. Note that the specific brand in the video may differ, but the setup steps are generally applicable.
Video 6.2: This video provides an overview and demonstration of a 10G SFP+ Fiber Media Converter, showcasing its features and connectivity options. It illustrates how different SFP+ modules can be used with the converter.
7. Operation
Once the XT-705A Media Converter is properly set up and powered on, it operates automatically. It functions as a transparent bridge between your copper Ethernet network and your fiber optic network.
- The device automatically detects the speed and duplex mode of the connected copper device (100Mbps, 1Gbps, 2.5Gbps, 5Gbps, or 10Gbps).
- Data packets are converted and transmitted between the RJ45 and SFP+ interfaces without requiring any user configuration.
- Monitor the LED indicators to confirm network link status and data activity. A solid LNK/ACT LED indicates a stable connection, while blinking indicates data transmission.
8. Maintenance
To ensure optimal performance and longevity of your XT-705A Media Converter, follow these maintenance guidelines:
- Keep the device clean and free from dust. Use a soft, dry cloth for cleaning.
- Ensure proper ventilation around the device to prevent heat buildup.
- Regularly check cable connections for any damage or loose fittings.
- When handling SFP+ modules and fiber optic cables, always use protective caps to prevent dust and damage to the optical connectors.
9. Troubleshooting
If you encounter issues with your XT-705A Media Converter, refer to the following common troubleshooting steps:
| Problem | Possible Solution |
|---|---|
| No Power (PWR LED off) | Check if the power adapter is securely connected to the device and a working power outlet. Verify the power outlet is functional. |
| No Link on RJ45 Port | Ensure the Ethernet cable is correctly connected to both the media converter and the network device. Verify the network device is powered on and functioning. Try a different Ethernet cable. |
| No Link on SFP+ Port | Confirm the SFP+ module is correctly inserted and compatible. Check the fiber optic cable for damage and ensure it's properly connected to the SFP+ module and the remote fiber device. Verify the remote fiber device is operational. |
| Slow Network Speed | Check the SPD LED to confirm the negotiated speed. Ensure both connected devices (copper and fiber) support the desired speed. Verify the quality of the Ethernet and fiber cables. |
| Intermittent Connection | Inspect all cable connections for looseness or damage. Ensure the device is not overheating. Check for electromagnetic interference from other devices. |
10. Warranty and Support
The Planet XT-705A Media Converter comes with a standard manufacturer's warranty. Please refer to the included Warranty Card for specific terms and conditions, including warranty duration and coverage details.
For technical support, product inquiries, or warranty claims, please contact Planet customer service through their official website or the contact information provided on your warranty card.
When contacting support, please have your product model number (XT-705A) and serial number ready.
Related documentsXT-705A


Ask a question about this manual
Ask about setup, troubleshooting, compatibility, parts, safety, or missing instructions. Manuals+ will review the question and use this page’s manual context to help answer it.