1. Introduction
The deleyCON CAT6 Network Outlet provides a reliable and high-speed network connection point for your home or office. Designed for surface mounting, this outlet features a single RJ45 port and supports data transmission speeds up to 1 Gbit/s with a bandwidth of up to 250 MHz. It is compatible with various network-enabled devices such as PCs, laptops, printers, TVs, receivers, and game consoles, ensuring a stable and efficient wired network connection.
2. Safety Information
- Always disconnect power to the installation area before beginning any wiring or installation work.
- Ensure proper grounding practices are followed during installation to prevent electrical hazards.
- If you are unsure about electrical installations or wiring procedures, consult a qualified electrician or network technician.
- Do not expose the network outlet to excessive moisture or extreme temperatures.
- This product is intended for indoor use only.
3. Package Contents
Verify that all items are present in the package:
- 1x deleyCON CAT6 Network Outlet (MK3547)
- Mounting Screws
- Installation Instructions (this manual)
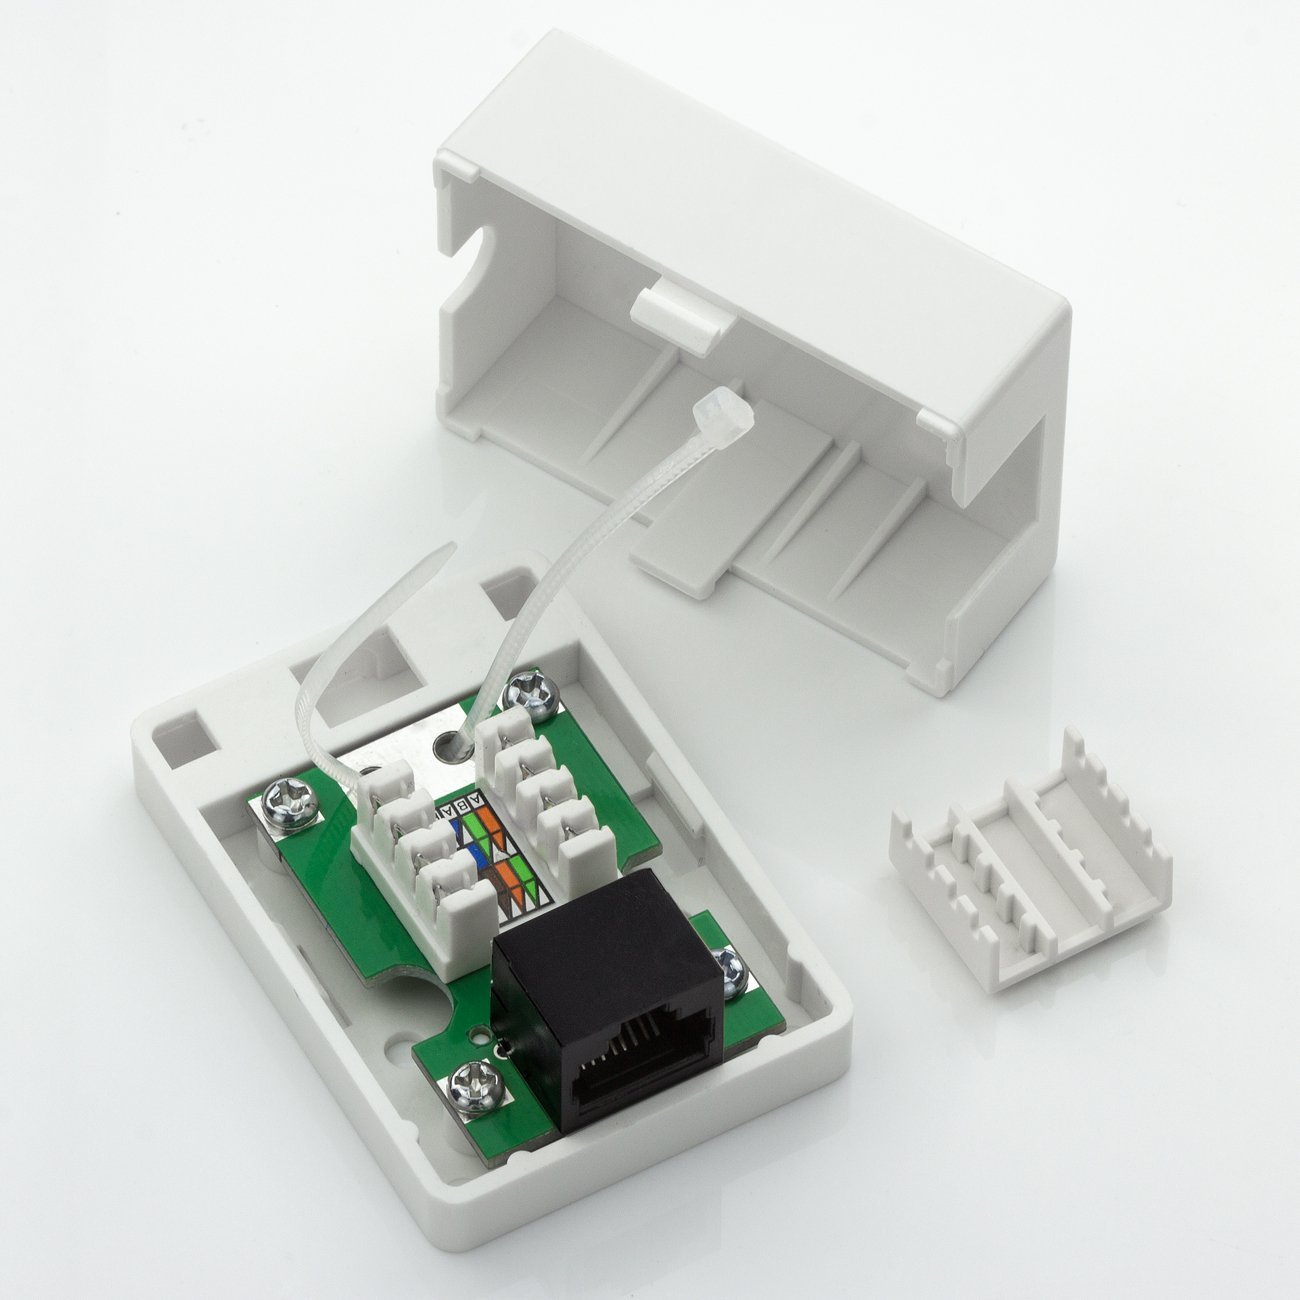
Image: The deleyCON CAT6 Network Outlet shown with its mounting screws and a small instruction leaflet.
4. Setup and Installation
The deleyCON CAT6 Network Outlet is designed for surface mounting and features tool-free installation for the network cable using LSA IDC terminals. Follow these steps for proper installation:
4.1 Preparing the Outlet
- Carefully open the casing of the network outlet. The top cover can be gently pried off to reveal the internal components.
- Identify the LSA IDC terminal block inside the outlet. This is where the solid core network cable will be connected.

Image: The deleyCON CAT6 Network Outlet with its top cover removed, revealing the internal LSA IDC terminal block for cable connection.
4.2 Connecting the Network Cable
The outlet uses a solderless press-in connection technology (DIN EN 60352-5:2012-10) for rigid installation cables (AWG 22-25). The color coding for wiring follows EIA/TIA 568A and B standards.
- Strip approximately 2-3 cm of the outer jacket from your solid core CAT6 network cable. Be careful not to damage the twisted pairs inside.
- Untwist the wire pairs and arrange them according to either the EIA/TIA 568A or 568B color code diagram printed on the LSA IDC terminal block. Ensure consistency with your existing network infrastructure.
- Insert each individual wire into its corresponding slot on the LSA IDC terminal block. The tool-free design allows you to press the wires firmly into place. For optimal connection, a specialized LSA punch-down tool can be used, though it is not strictly required for this tool-free system.
- Trim any excess wire ends flush with the terminal block.
- Secure the cable within the casing using the provided cable tie or strain relief mechanism to prevent accidental disconnections.

Image: A technical diagram demonstrating the solderless press-in connection method used in the deleyCON network outlet, compliant with DIN EN 60352-5:2012-10.
4.3 Mounting the Outlet
- Once the cable is securely connected and the casing is closed, position the network outlet on your desired surface.
- Mark the positions for the mounting screws.
- Drill pilot holes if necessary, then secure the outlet to the surface using the provided mounting screws. Alternatively, the outlet can be affixed using suitable adhesive if screws are not preferred.

Image: A front view of the deleyCON CAT6 Network Outlet, highlighting its compact and unobtrusive design for surface mounting.

Image: Two deleyCON CAT6 Network Outlets, illustrating the design with and without a visible RJ45 port, emphasizing its clean aesthetic.

Image: A technical drawing indicating the precise dimensions (2.7 cm x 4.3 cm x 6 cm) of the deleyCON CAT6 Network Outlet.
5. Operating Instructions
Once the deleyCON CAT6 Network Outlet is installed and wired, operating it is straightforward:
- Take a standard RJ45 patch cable.
- Connect one end of the RJ45 patch cable to the RJ45 port on the deleyCON CAT6 Network Outlet.
- Connect the other end of the RJ45 patch cable to the network port of your device (e.g., PC, laptop, smart TV, game console, network printer).
- Ensure both connections are firm and secure. Your device should now have a wired network connection.

Image: A close-up view of a blue RJ45 network cable securely plugged into the deleyCON CAT6 Network Outlet, demonstrating a typical connection.
6. Maintenance
The deleyCON CAT6 Network Outlet requires minimal maintenance:
- Keep the exterior of the outlet clean by wiping it with a soft, dry cloth.
- Do not use harsh chemicals or abrasive cleaners, as these can damage the surface.
- Ensure the RJ45 port remains free of dust and debris to maintain optimal connection quality.
- There are no user-serviceable parts inside the unit. Do not attempt to disassemble the outlet beyond opening the casing for initial wiring.
7. Troubleshooting
If you encounter issues with your deleyCON CAT6 Network Outlet, consider the following troubleshooting steps:
7.1 No Network Connection
- Check Cable Connections: Ensure that both the internal installation cable and the external patch cable are securely connected to the outlet and your device/router.
- Verify Wiring: If you performed the installation, double-check that the internal wires are correctly punched down into the LSA IDC terminals according to the EIA/TIA 568A or 568B color code. Incorrect wiring is a common cause of connection issues.
- Test with Another Cable/Device: Try using a different RJ45 patch cable or connecting a different network device to the outlet to determine if the issue lies with the outlet, the cable, or the device.
- Check Network Equipment: Ensure your router, switch, or other network equipment is functioning correctly and providing an active network signal.
7.2 Slow Network Speed
- Cable Quality: Ensure you are using high-quality CAT6 or higher-rated cables for both the installation and patch connections. Lower category cables can limit speed.
- Cable Length: Excessive cable length can lead to signal degradation. Ensure your cable runs are within recommended limits for CAT6 (up to 100 meters for 1 Gbps).
- Network Device Settings: Verify that your connected device and network equipment are configured for Gigabit Ethernet (1000 Mbps) and not limited to lower speeds.
- Interference: Keep network cables away from sources of electromagnetic interference (e.g., power cables, fluorescent lights).
8. Specifications
| Model | MK3547 |
| Type | CAT6 Network Outlet, Surface Mount |
| Port | 1x RJ45 (8P8C, shielded) |
| Internal Connection | LSA IDC 8-pole terminal for rigid installation cables (AWG 22-25) |
| Data Transfer Rate | Up to 1 Gbit/s (10/100/1000 Mbit/s) |
| Bandwidth | Up to 250 MHz |
| Shielding | UTP (Unshielded Twisted Pair) |
| Color Code Standard | EIA/TIA 568A and B |
| Dimensions (H x W x L) | 2.7 cm x 4.3 cm x 6 cm |
| Weight | 30 grams |
| Color | RAL9003 White |
| Special Features | Solderless press-in connections (DIN EN 60352-5:2012-10), Tool-free installation |
9. Warranty and Support
9.1 Warranty Information
For detailed warranty information regarding your deleyCON CAT6 Network Outlet, please refer to the purchase documentation or contact your retailer. Warranty terms and conditions may vary based on region and point of purchase.
9.2 Customer Support
Should you require technical assistance, have questions about the product, or need further support, please contact deleyCON customer service. Contact details can typically be found on the official deleyCON website or on your product packaging.