
1. Safety Instructions
Please read these safety instructions carefully before operating the unit. Keep this manual for future reference.
- Power Source: Ensure the unit is connected to an AC power supply that matches the voltage specified on the rating label.
- Ventilation: Do not block any ventilation openings. Allow adequate space around the unit for proper airflow.
- Water and Moisture: Do not expose the unit to rain, moisture, dripping, or splashing. Do not place objects filled with liquids, such as vases, on the unit.
- Heat Sources: Keep the unit away from heat sources such as radiators, heat registers, stoves, or other apparatus (including amplifiers) that produce heat.
- Cleaning: Unplug the unit from the wall outlet before cleaning. Use a soft, dry cloth. Do not use liquid cleaners or aerosol cleaners.
- Servicing: Do not attempt to service this product yourself. Refer all servicing to qualified service personnel.
- Placement: Place the unit on a stable, flat surface to prevent it from falling.
2. Product Overview
The Soundmaster NR566BR is a versatile 7-in-1 Hi-Fi system designed to play various audio formats with a nostalgic aesthetic.
2.1 Main Components
- Turntable: Supports 33, 45, and 78 RPM records, equipped with an Audio Technica magnetic cartridge.
- DAB+/FM Digital Radio: For receiving digital and analog radio broadcasts.
- CD/MP3 Player: Compatible with CD and MP3-CD discs.
- USB Port: For MP3 playback and digitization (recording).
- Cassette Player: For playing audio cassettes.
- Bluetooth Connectivity: For wireless audio streaming from compatible devices.
- Integrated Stereo Speakers: 2 x 4 Watt RMS output.
- Equalizer: For sound customization.
- Remote Control: For convenient operation.
2.2 Front Panel Controls and Features

Figure 2.2.1: Front view of the Soundmaster NR566BR Hi-Fi System with the turntable lid open, showcasing the turntable and the main control panel below.

Figure 2.2.2: Detailed view of the CD player tray located on the front panel of the unit.

Figure 2.2.3: Close-up of the USB port, showing a USB flash drive inserted, located on the front panel.

Figure 2.2.4: Detailed view of the cassette player slot, typically located on the side of the unit.
- Power Button: Turns the unit on/off.
- Function Selector: Switches between Turntable, Radio, CD, USB, Cassette, and Bluetooth modes.
- Volume Control: Adjusts the overall sound level.
- Tuning Knob/Buttons: For radio station selection.
- Playback Controls: Play/Pause, Stop, Skip/Search (for CD, USB, Cassette).
- Display Screen: Shows current mode, track information, radio frequency, etc.
- Equalizer Controls: Buttons or knobs for adjusting bass, treble, or preset EQ modes.
2.3 Rear Panel Connections
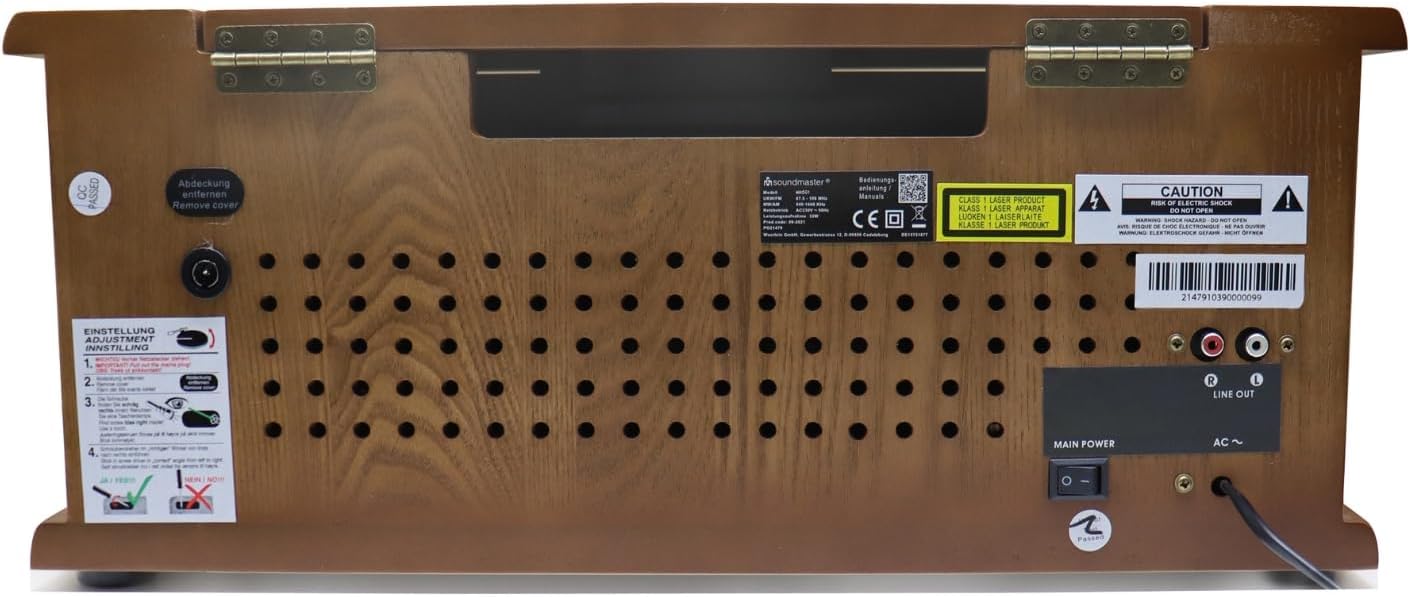
Figure 2.3.1: Rear panel of the Soundmaster NR566BR, displaying the power input, antenna connection, and Line Out ports.

Figure 2.3.2: Close-up view of the red and white RCA Line Out ports on the rear of the unit, labeled 'R' and 'L'.
- AC Power Input: For connecting the power cord.
- Antenna Terminal: For connecting the DAB+/FM antenna.
- Line Out (RCA): Red (Right) and White (Left) outputs for connecting to an external amplifier or powered speakers.
3. Setup
3.1 Unpacking and Placement
- Carefully remove the unit from its packaging.
- Place the unit on a stable, level surface, ensuring adequate ventilation around all sides.
- Avoid placing the unit near strong magnetic fields, direct sunlight, or sources of excessive heat or moisture.
3.2 Connecting Power
- Ensure the unit's power switch is in the OFF position.
- Connect the AC power cord to the AC power input on the rear of the unit.
- Plug the other end of the power cord into a suitable wall outlet.
3.3 Antenna Connection
- Connect the supplied DAB+/FM antenna to the antenna terminal on the rear of the unit.
- Extend the antenna fully and position it for optimal reception. You may need to adjust its position later to improve signal quality.
4. Operating Instructions
Press the Power button to turn on the unit. Use the Function Selector to choose your desired audio source.
4.1 Turntable Operation

Figure 4.1.1: Detailed view of the turntable platter and tonearm, highlighting the Audio Technica magnetic cartridge.
- Lift the turntable lid.
- Place a record on the platter.
- Select the appropriate speed (33, 45, or 78 RPM) using the speed selector switch. For 45 RPM records, place the included adapter on the spindle.
- Release the tonearm lock.
- Gently lift the tonearm using the cueing lever and position the stylus over the desired track of the record.
- Lower the tonearm slowly using the cueing lever. The record will begin to play.
- At the end of the record, the tonearm will automatically return to its rest position (if auto-stop is enabled).
- To stop playback manually, lift the tonearm, return it to its rest, and engage the tonearm lock.
4.2 Radio (DAB+/FM) Operation
- Select the 'Radio' function.
- For DAB+ radio, the unit will automatically scan for available digital stations. Use the tuning controls to navigate through the station list.
- For FM radio, use the tuning knob or buttons to manually tune to a station or perform an auto-scan.
- To save a station as a preset, refer to the specific instructions in the full manual (usually involves pressing and holding a preset button).
4.3 CD/MP3 Player Operation
- Select the 'CD' function.
- Press the Eject button to open the CD tray.
- Place a CD or MP3-CD disc with the label side facing up into the tray.
- Press the Eject button again to close the tray. The unit will read the disc and begin playback.
- Use the Play/Pause, Stop, and Skip/Search buttons to control playback.
4.4 USB Playback
- Insert a USB flash drive into the USB port.
- Select the 'USB' function. The unit will automatically detect and begin playing MP3 files.
- Use the navigation buttons to browse folders and select specific tracks.
4.5 Cassette Player Operation
- Insert an audio cassette into the cassette slot.
- Select the 'Cassette' function.
- Use the playback controls (Play, Stop, Fast Forward, Rewind) to operate the cassette player.
4.6 Bluetooth Connectivity
- Select the 'Bluetooth' function. The unit will enter pairing mode, indicated on the display.
- On your Bluetooth-enabled device (smartphone, tablet), search for available Bluetooth devices.
- Select 'Soundmaster NR566BR' from the list to pair. Once paired, you can stream audio wirelessly to the unit.
4.7 Digitization (Recording to USB)
The NR566BR allows you to record audio from Vinyl, CD, or Radio directly to a USB flash drive in MP3 format.
- Insert a USB flash drive with sufficient free space into the USB port.
- Select the desired source (Turntable, CD, or Radio).
- Begin playback of the source audio.
- Press the 'Record' button (usually labeled 'REC') on the unit or remote control. Recording will begin.
- Press the 'Record' button again or 'Stop' to end the recording. The recorded file will be saved on the USB drive.
4.8 Equalizer Adjustment
Use the Equalizer controls to adjust the sound characteristics to your preference. This may include preset modes (e.g., Rock, Pop, Classic) or manual bass/treble adjustments.

Figure 4.8.1: The remote control for the Soundmaster NR566BR, featuring various function and playback buttons, including EQ controls.
5. Maintenance
5.1 Cleaning the Unit
- Always unplug the unit from the power outlet before cleaning.
- Use a soft, dry, lint-free cloth to wipe the exterior surfaces.
- Do not use abrasive cleaners, waxes, or solvents as they may damage the finish.
5.2 Turntable and Stylus Care
- Keep the turntable platter and stylus free from dust. Use a soft brush specifically designed for stylus cleaning.
- Avoid touching the stylus with your fingers.
- If the sound quality deteriorates, the stylus may need cleaning or replacement. Consult a qualified technician for stylus replacement.
5.3 CD Player Care
- Handle CDs by their edges to avoid fingerprints.
- Clean discs with a soft, lint-free cloth, wiping from the center outwards.
- Do not use abrasive cleaners or solvents on discs.
6. Troubleshooting
If you experience problems with your unit, please check the following points before contacting service personnel.
| Problem | Possible Cause | Solution |
|---|---|---|
| No power | Power cord not connected; Power outlet faulty; Unit is off. | Ensure power cord is securely plugged in; Test outlet with another device; Press the Power button to turn on the unit. |
| No sound | Volume too low; Incorrect function selected; Speakers disconnected (if external). | Increase volume; Select correct function (e.g., CD, Turntable); Check speaker connections. |
| Poor radio reception | Antenna not extended or positioned correctly; Weak signal. | Extend and adjust the antenna; Try relocating the unit for better signal. |
| Turntable not spinning or sound distorted | Speed setting incorrect; Stylus dirty or damaged; Tonearm locked. | Select correct RPM (33/45/78); Clean or replace stylus; Release tonearm lock. |
| CD not playing or skipping | Disc dirty or scratched; Disc inserted incorrectly; Incompatible disc format. | Clean disc; Insert disc with label side up; Ensure disc is CD or MP3-CD format. |
| Bluetooth pairing failed | Unit not in pairing mode; Device too far; Bluetooth on device is off. | Ensure unit is in Bluetooth mode; Move device closer; Enable Bluetooth on your device. |
7. Specifications
| Feature | Specification |
|---|---|
| Model Name | NR566BR |
| Dimensions (L x W x H) | 51 x 35 x 22 cm |
| Weight | 8 Kilograms |
| Manufacturer | Soundmaster |
| Turntable Speeds | 33, 45, 78 RPM |
| Included Components | CD Player, Integrated Speakers |
| Special Feature | Adjustable speed, Digitization function |
| Material | Wood |
| Color | Brown |
| Compatible Devices | Smartphone, Tablet |
| Speaker Output | 2 x 4 Watt RMS |
8. Warranty and Support
This product is covered by a manufacturer's warranty. Please refer to the warranty card included with your purchase for specific terms and conditions.
For technical support, service, or warranty claims, please contact your retailer or the Soundmaster customer service department. Contact information can typically be found on the manufacturer's official website or on the product packaging.
When contacting support, please have your product model number (NR566BR) and proof of purchase readily available.