1. Introduction
This manual provides detailed instructions for the installation, operation, maintenance, and troubleshooting of your GIGABYTE B450 AORUS PRO Wi-Fi Motherboard. This motherboard is designed to support AMD Ryzen processors and offers a robust platform for various computing needs.

Figure 1.1: GIGABYTE B450 AORUS PRO Wi-Fi Motherboard with its retail packaging.
Key Features:
- Supports AMD 1st and 2nd generation Ryzen/Ryzen with Radeon Vega graphics processors.
- Dual Channel Non-ECC Unbuffered DDR4, 4 DIMMs.
- Integrated Intel Dual Band 802.11AC Wi-Fi & BT 4.2.
- HDMI and DVI-D ports for multiple display configurations.
- Integrated I/O shield for enhanced durability.
- Dual Ultra-Fast NVMe PCIe Gen3 M.2 slots with dual thermal guards.
- ALC1220 VB enhanced audio with WIMA audio capacitors.
- RGB Fusion with Multi-Zone LED light show design, supporting Digital LED & RGB LED strips.
- Smart Fan 5 features 6 temperature sensors and 5 hybrid fan headers with FAN STOP.
- USB 3.1 Gen 2 with USB Type-C and Type-A ports.
2. Setup and Installation
Proper installation is crucial for the stable operation of your motherboard. Always ensure your system is powered off and unplugged before handling components.
2.1 Component Overview
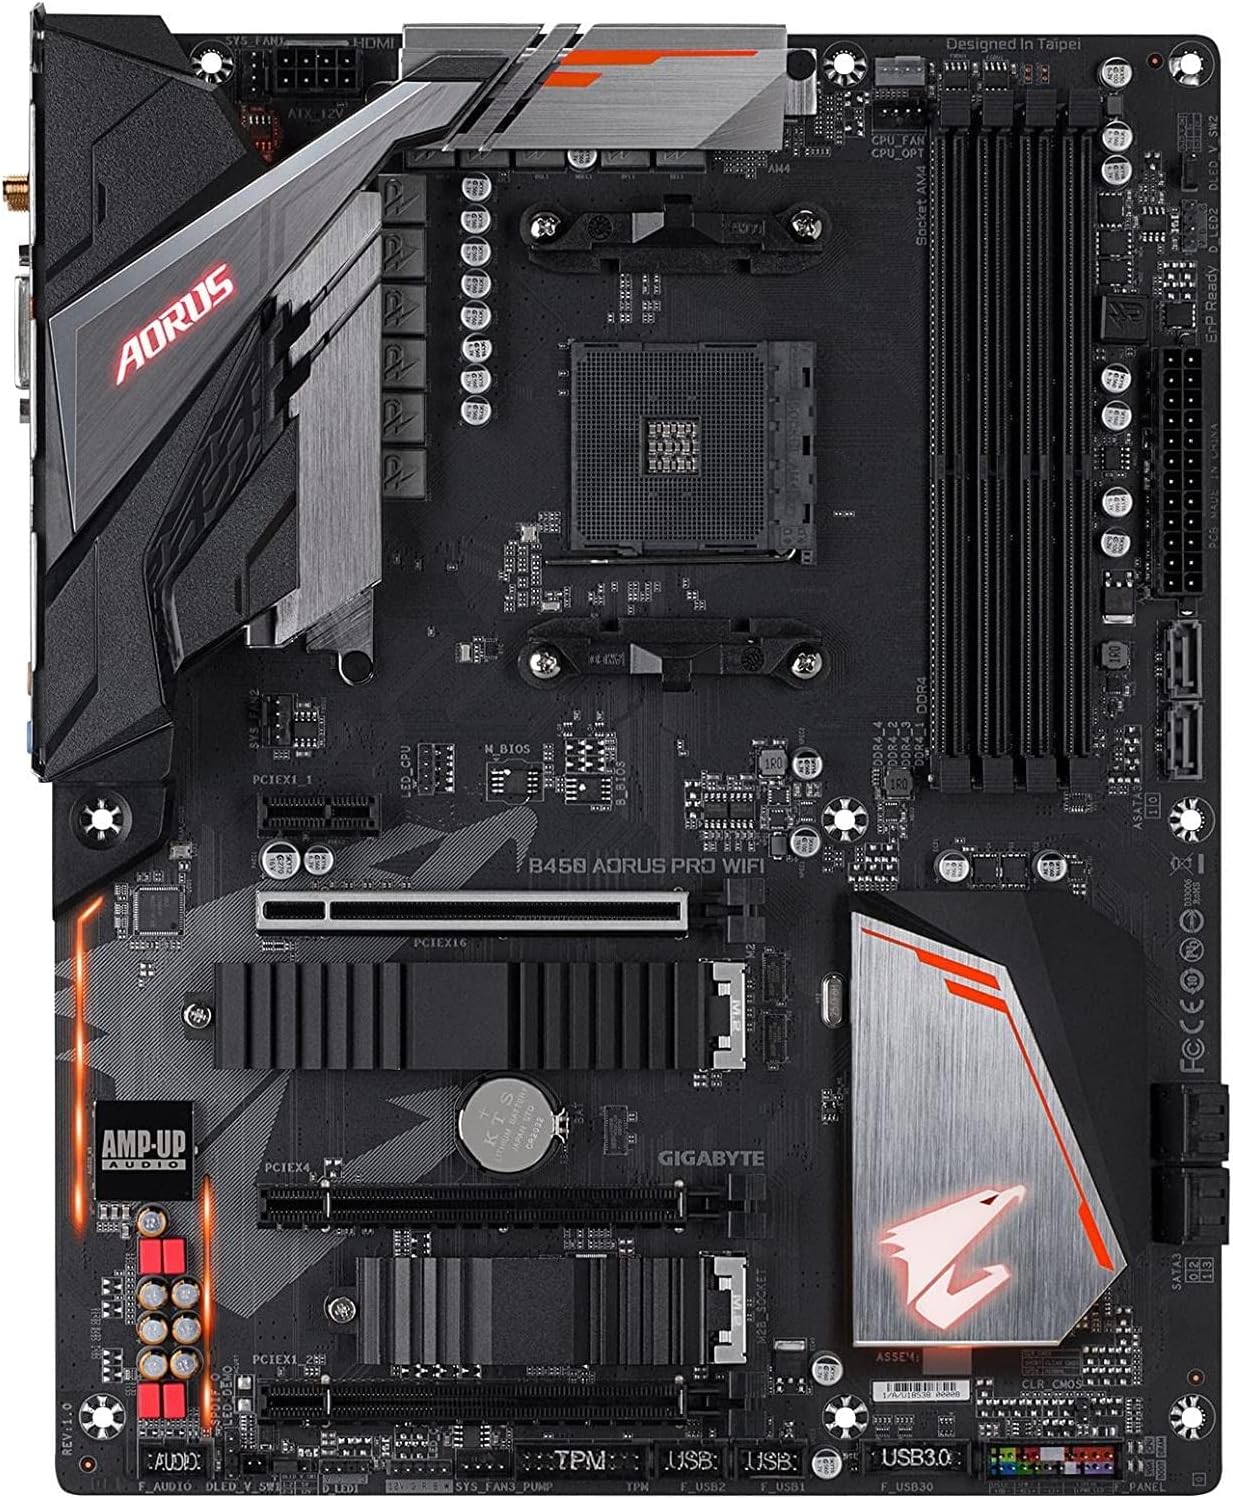
Figure 2.1: Top-down view of the motherboard, highlighting key component locations such as the CPU socket, DIMM slots, and M.2 slots.
2.2 CPU Installation
- Locate the AM4 CPU socket on the motherboard.
- Lift the load lever on the socket.
- Carefully align the triangular mark on your AMD Ryzen CPU with the mark on the socket.
- Gently place the CPU into the socket without forcing it.
- Lower the load lever to secure the CPU.
- Install the CPU cooler according to its manufacturer's instructions.
2.3 Memory (RAM) Installation
- Open the clips at both ends of the DIMM slots.
- Align the notch on the DDR4 memory module with the key in the DIMM slot.
- Insert the memory module firmly into the slot until the clips snap into place.
- For dual-channel operation, install modules in matching colored slots (typically slots 2 and 4).
2.4 M.2 SSD Installation
- Locate the M.2 slots on the motherboard, often covered by thermal guards.
- Remove the thermal guard and the M.2 standoff screw.
- Insert the M.2 SSD into the slot at an angle.
- Gently push down the SSD and secure it with the standoff screw.
- Reattach the M.2 thermal guard to ensure optimal cooling.
2.5 Power Connections
- Connect the 24-pin ATX main power connector from your power supply to the motherboard.
- Connect the 8-pin ATX 12V CPU power connector (or 4+4 pin) to the motherboard.
2.6 Rear I/O Panel Connections
Connect your peripherals to the appropriate ports on the integrated I/O shield.

Figure 2.2: The rear I/O panel features various ports including USB, HDMI, DVI, Ethernet, Wi-Fi antenna connectors, and audio jacks.
- USB Ports: Connect keyboards, mice, and other USB devices.
- HDMI/DVI-D: Connect to your monitor if using an AMD Ryzen CPU with integrated Radeon Vega graphics.
- Ethernet Port: Connect to your network via an RJ-45 cable.
- Wi-Fi Antenna Connectors: Attach the included Wi-Fi antennas for wireless connectivity.
- Audio Jacks: Connect speakers, headphones, or microphones.
3. Operating Instructions
Once your system is assembled, you can power it on and configure the BIOS/UEFI settings.
3.1 BIOS/UEFI Configuration
- To enter the BIOS setup, press the DEL key repeatedly during system startup.
- The BIOS interface allows you to configure various system settings, including boot order, fan speeds, and memory profiles.
- XMP Profile: For optimal memory performance, enable the Extreme Memory Profile (XMP) in the BIOS if your RAM supports it. This will set your RAM to its advertised speed (e.g., 3200MHz).
- Smart Fan 5: Utilize the Smart Fan 5 utility within the BIOS or through GIGABYTE's software to customize fan curves and monitor temperatures.
3.2 Wireless Connectivity (Wi-Fi & Bluetooth)
The motherboard features integrated Intel Dual Band 802.11AC Wi-Fi and Bluetooth 4.2.
- Ensure the Wi-Fi antennas are securely attached to the rear I/O panel.
- Install the necessary Intel Wi-Fi and Bluetooth drivers, typically available on the GIGABYTE support website, for full functionality in Windows 10 64-bit.
3.3 RGB Fusion
Customize the motherboard's integrated LED lighting and connected RGB/Digital LED strips using the GIGABYTE RGB Fusion software.
- Download and install the RGB Fusion 2.0 software from the GIGABYTE website.
- Connect compatible RGB or Digital LED strips to the designated headers on the motherboard.
- Use the software to select lighting effects, colors, and synchronization options.
4. Maintenance
Regular maintenance helps ensure the longevity and optimal performance of your motherboard and system.
4.1 System Cleaning
- Periodically clean dust from inside your computer case, especially around fans, heatsinks, and ventilation areas.
- Use compressed air to gently remove dust. Ensure fans are held stationary to prevent damage.
- Always power off and unplug the system before cleaning.
4.2 BIOS Updates
Updating the BIOS can improve system stability, add support for new CPUs, and fix bugs. GIGABYTE motherboards often feature Q-Flash Plus for convenient BIOS updates without a CPU or RAM installed.

Figure 4.1: Overview of the BIOS update process for GIGABYTE motherboards.
- Download BIOS File: From the GIGABYTE website, download the latest compressed BIOS update file for your specific motherboard model.
- Prepare USB Flash Drive: Uncompress the downloaded BIOS file, save it to a USB flash drive, and rename it to GIGABYTE.bin. The USB flash drive must be formatted with the FAT32/16 file system.
- Insert USB Drive: Insert the USB flash drive into the white USB port or BIOS Q-Flash port on the back panel of your motherboard. (Refer to your specific motherboard layout for exact port location).

Figure 4.2: USB flash drive prepared for BIOS update.
- Connect Power: Connect the 8-pin CPU power connector (if two, either one) and the 24-pin mainboard power connector.
Figure 4.3: Essential power connections for the BIOS update process.
- Initiate Q-Flash Plus: Press the Q-Flash Plus button on the rear panel. The system will automatically search for and match the BIOS file.

Figure 4.4: The Q-Flash Plus button, used to initiate the BIOS update.
- Monitor Flashing Process: The QFLED and the Q-Flash Plus button will flash during the BIOS matching and flashing process. This typically takes 2-3 minutes.
Figure 4.5: QFLED indicating active BIOS flashing.
- Completion: The QFLED will stop flashing when the BIOS update is complete.

Figure 4.6: Motherboard after successful BIOS update.
5. Troubleshooting
If you encounter issues with your motherboard, refer to the following common troubleshooting steps.
5.1 Common Issues and Solutions
- No Power/No Boot:
- Ensure all power cables (24-pin ATX, 8-pin CPU) are securely connected.
- Verify the power supply is switched on and functioning.
- Check front panel header connections (power button).
- No Display:
- Confirm your monitor is connected to the correct display output (motherboard or graphics card).
- If using an AMD Ryzen CPU without integrated graphics, a dedicated graphics card is required.
- Reseat the graphics card and memory modules.
- System Instability/Crashes:
- Ensure RAM is properly seated and configured (e.g., XMP enabled if supported).
- Check CPU and GPU temperatures.
- Perform a BIOS update if experiencing issues with newer CPU generations (e.g., Ryzen 5000 series may require a BIOS update).
- Wi-Fi/Bluetooth Not Working:
- Ensure Wi-Fi antennas are securely attached.
- Verify that the Intel Wi-Fi and Bluetooth drivers are correctly installed.
For more detailed troubleshooting, please refer to the official GIGABYTE User Manual PDF or contact GIGABYTE support.
6. Specifications
Below are the technical specifications for the GIGABYTE B450 AORUS PRO Wi-Fi Motherboard.
| Feature | Specification |
|---|---|
| Brand | GIGABYTE |
| Model Name | B450 AORUS PRO Wi-Fi |
| CPU Socket | Socket AM4 |
| Compatible Processors | AMD 3rd Gen Ryzen/ 2nd Gen Ryzen/ 1st Gen Ryzen/ 2nd Gen Ryzen with Radeon Vega Graphics/ 1st Gen Ryzen with Radeon Vega Graphics/ Athlon with Radeon Vega Graphics Processors |
| Chipset Type | AMD B450 |
| RAM Memory Technology | DDR4 |
| Memory Speed | 3600 MHz (Max) |
| Wireless Type | 802.11ac (Intel Dual Band Wi-Fi) |
| Bluetooth | Bluetooth 4.2 |
| Video Output Ports | 1 x DVI-D, 1 x HDMI |
| USB Ports | USB 3.1 Gen 2 (Type-C & Type-A), USB 3.1 Gen 1, USB 2.0 |
| M.2 Slots | 2 x NVMe PCIe Gen3 M.2 with Thermal Guards |
| Audio | ALC1220 VB Enhanced Audio with WIMA Capacitors |
| Form Factor | ATX |
| Dimensions (LxWxH) | 15 x 12.25 x 4.22 inches |
| Item Weight | 2.95 pounds |
| Platform | Windows, Windows 10, Windows 8, Windows 8.1 |
7. Warranty and Support
For warranty information, please refer to the documentation included with your product or visit the official GIGABYTE website. GIGABYTE provides technical support and resources to assist you with any product-related inquiries.
7.1 Official Resources
- User Manual (PDF): For comprehensive details and diagrams, download the official user manual: GIGABYTE B450 AORUS PRO Wi-Fi User Manual
- GIGABYTE Support Website: Visit the official GIGABYTE support website for drivers, BIOS updates, FAQs, and contact information.


