Introduction
This manual provides detailed instructions for the safe operation, installation, and maintenance of your Xbeauty 42-inch Electric Fireplace, Model RFH-4201LC. Please read all instructions carefully before use and retain this manual for future reference.
Important Safety Information
Always follow basic safety precautions to reduce the risk of fire, electric shock, and injury to persons.
- Read all instructions before using this fireplace.
- Do not operate any fireplace with a damaged cord or plug, or if the heater has malfunctioned or been dropped or damaged in any manner.
- Do not use outdoors.
- Avoid placing the power cord under carpeting or covering it with throw rugs, runners, or similar coverings.
- To disconnect the fireplace, turn controls to the OFF position, then remove the plug from the outlet.
- Do not insert or allow foreign objects to enter any ventilation or exhaust opening as this may cause an electric shock or fire, or damage the fireplace.
- This fireplace is hot when in use. To avoid burns, do not let bare skin touch hot surfaces.
- Keep combustible materials, such as furniture, pillows, bedding, papers, clothes, and curtains at least 3 feet (0.9 m) from the front of the fireplace.
- The top independent physical switch design has passed ETL security certification.
- The unit features Over Heat Protection. If the heater overheats, it will automatically shut off.
Package Contents
Verify that all components are present before beginning installation.
- Electric Fireplace Unit
- Remote Control
- Crystal Stone Media
- Mounting Hardware (screws, anchors)
- Instruction Manual (this document)
Specifications
| Feature | Detail |
|---|---|
| Brand | Xbeauty |
| Model Name | RFH-4201LC |
| Power Source | Corded Electric (120V outlet, 12.5 Amps) |
| Product Dimensions (D x W x H) | 3.8" x 42" x 18.1" |
| Material | Glass |
| Installation Type | Wall Mount, Recessed, or Semi-Recessed (fits 2" x 6" stud wall) |
| Heat Output | 5100 British Thermal Units (BTU) |
| Heating Modes | 750W / 1500W |
| Heating Coverage | Up to 400 square feet |
| Special Features | Timer (1-8 hours), Flame Brightness Control (5 levels), Flame Color Control (12 options), Flame Speed Control (5 levels), Heater Function, Touch Screen, Remote Control, Overheat Protection, Quiet Blower (≤40dB) |
| Item Weight | 33 Pounds |
Installation and Setup
Choosing an Installation Method
This electric fireplace supports three installation methods: recessed in-wall, semi-recessed in-wall, or wall-mounted. Ensure the chosen location is near a standard 120V outlet and allows for proper clearance from combustible materials.
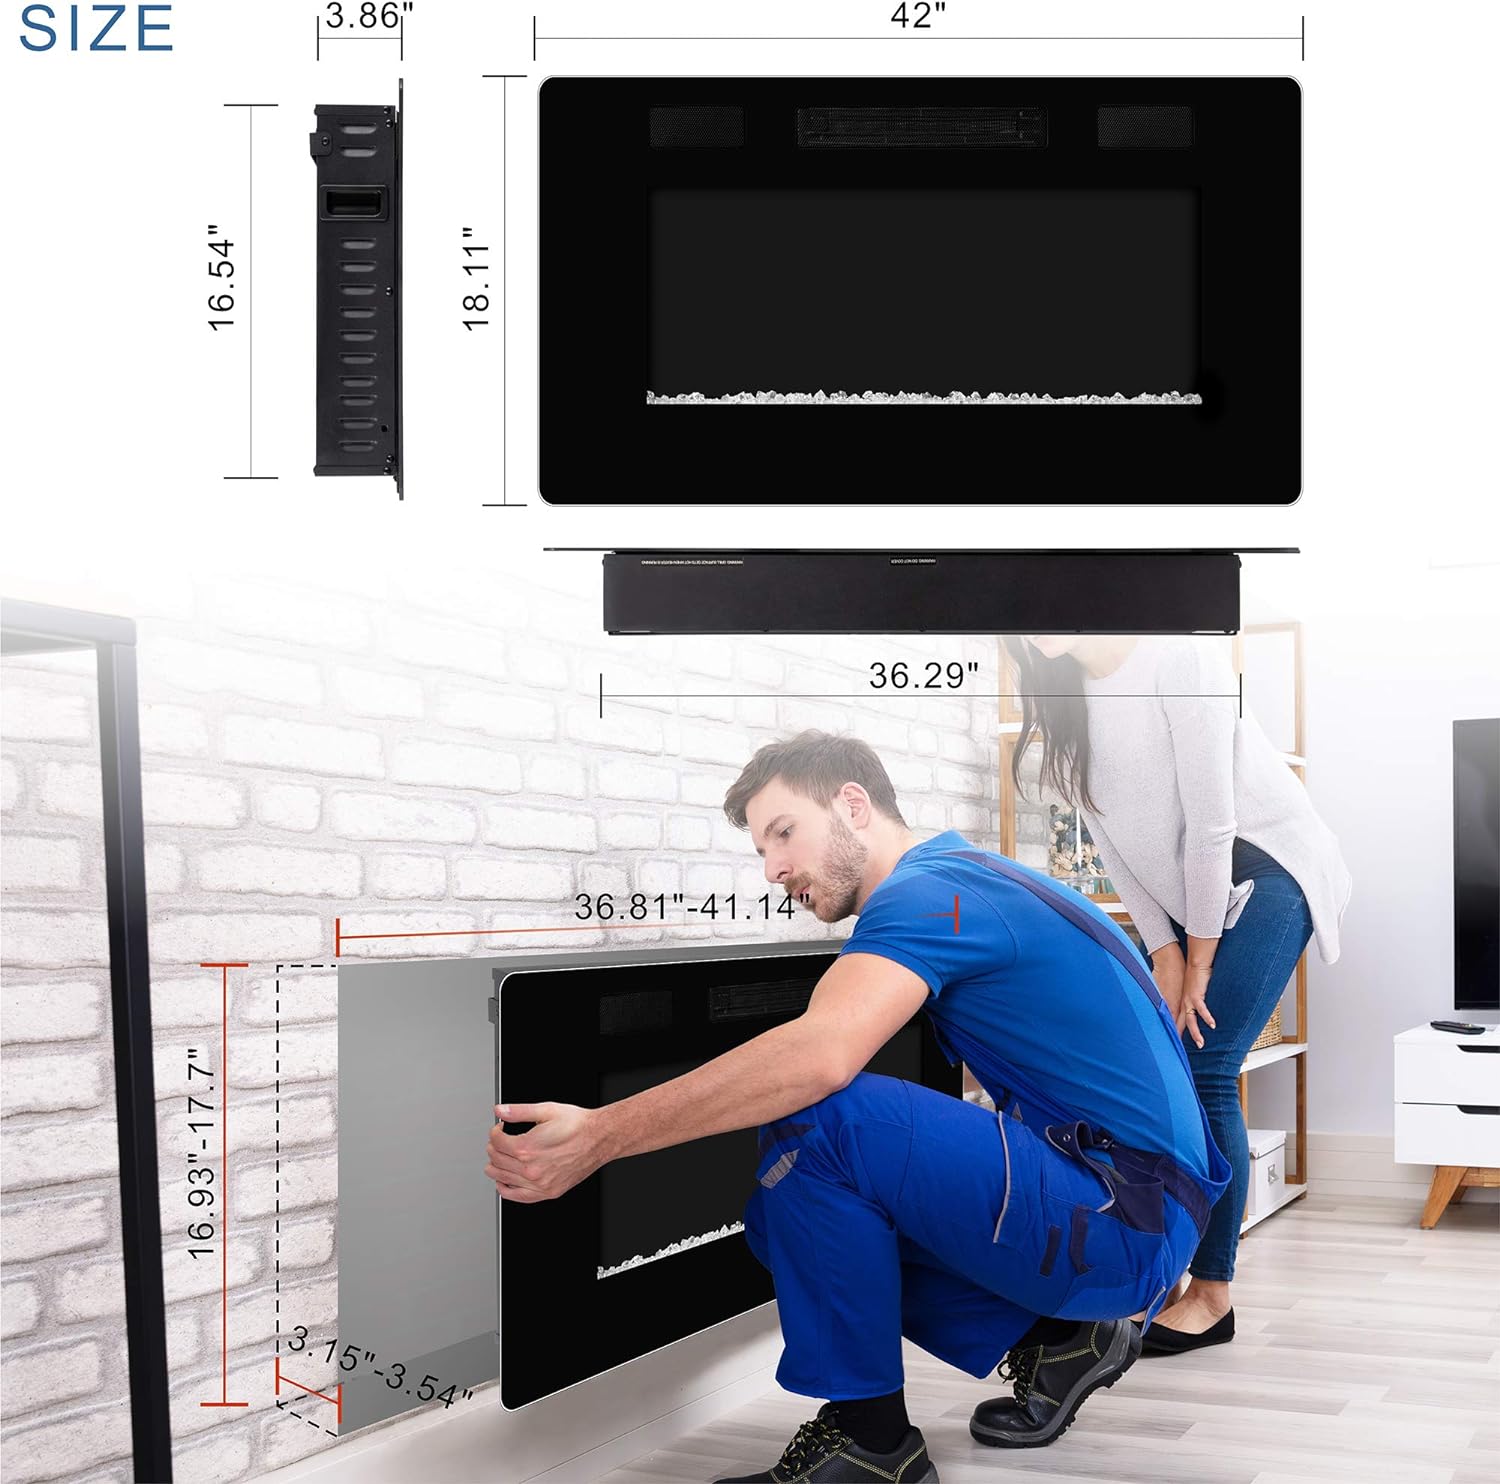
Image: Product dimensions and an example of recessed installation. The fireplace measures 42 inches wide, 18.11 inches high, and 3.86 inches deep. The diagram illustrates the required wall opening for recessed installation.

Image: Two panels illustrating the 'Recessed' installation method on the left and the 'Wall-mount' installation method on the right, showing how the fireplace integrates into different wall setups.
Recessed Installation (for 2" x 6" stud wall)
- Prepare a wall opening with dimensions of approximately 36.81-41.14 inches wide and 16.93-17.7 inches high. The depth of the unit is 3.86 inches.
- Ensure there is an 8-inch gap above the fireplace if installing under a television.
- Secure the fireplace unit into the wall opening using the provided mounting hardware.
Wall-Mounted Installation
- Select a suitable wall location, ensuring it can support the weight of the fireplace (33 lbs).
- Mark the desired mounting height and positions for the mounting bracket.
- Attach the mounting bracket securely to the wall using the provided hardware.
- Carefully lift the fireplace and hang it onto the wall bracket.
Installing Crystal Stone Media
- Carefully remove the glass frame. Locate the fixed screw in the lower-left corner and remove it. Do not discard this screw.
- Gently pull out the data cable connector. It is recommended to place the glass panel down on a soft surface before complete separation. Do not pull hard on the cable.
- Distribute the crystal stones evenly across the ember bed.
- Reattach the glass frame by aligning the two brackets with the grooves and securing the fixed screw.

Image: Exploded view of the fireplace showing the removal of the glass frame and the data cable connection. Instructions indicate removing a fixed screw and carefully disconnecting the cable.
Power Connection
Plug the fireplace into a standard 120V, 12.5 Amp grounded electrical outlet. Ensure the outlet is easily accessible.
Operating Instructions
Your Xbeauty electric fireplace can be controlled via the touch screen panel on the unit or the included remote control.
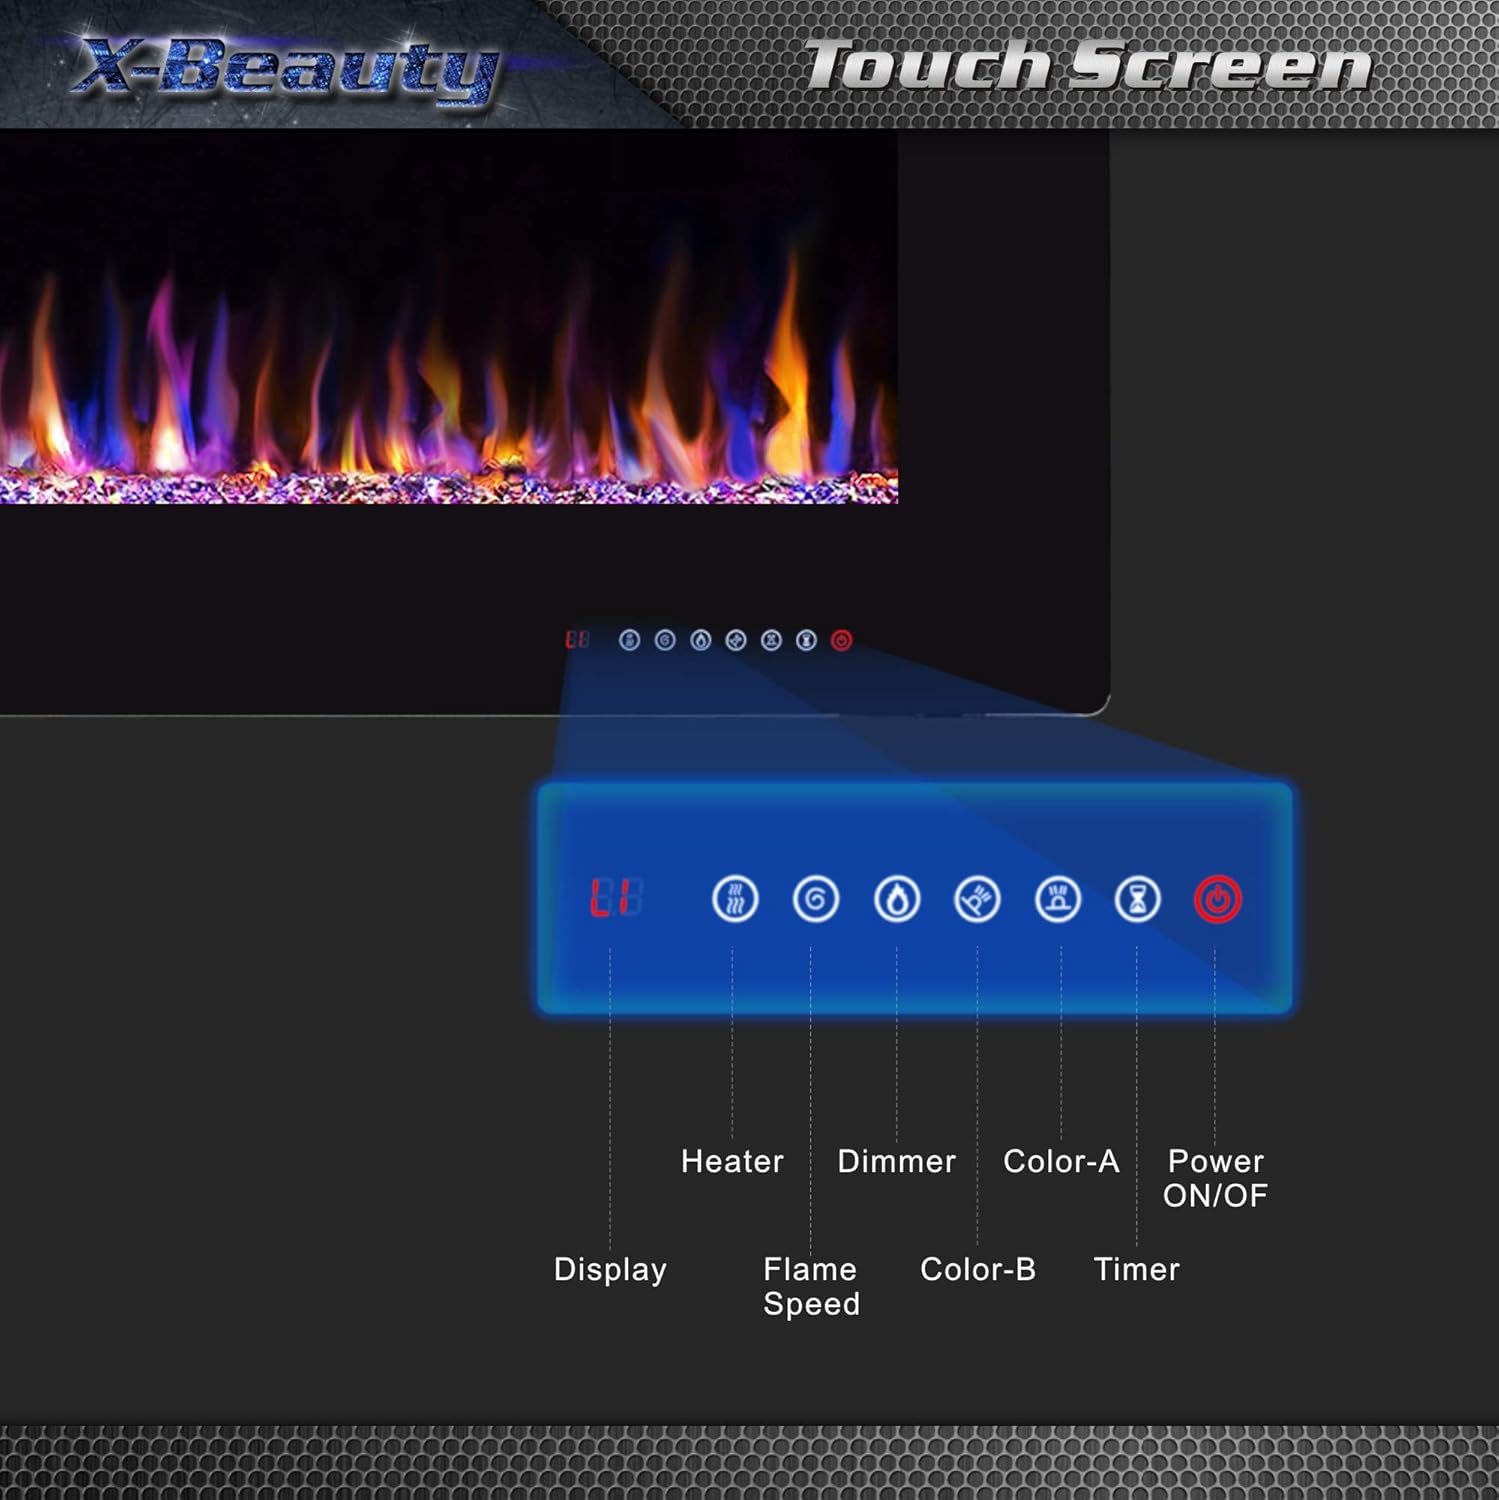
Image: Detailed view of the touch screen control panel on the fireplace, showing icons for Heater, Dimmer, Color-A, Color-B, Timer, and Power ON/OFF, along with a digital display.

Image: A split image showing a person using a remote control to operate the fireplace on the left, and the touch screen controls highlighted on the fireplace itself on the right, indicating two methods of control.
Basic Functions
- Power ON/OFF: Press the power button on the unit or remote to turn the fireplace on or off.
- Heater: Activate the heating function. Choose between 750W and 1500W heat settings. The heater operates quietly (≤40dB).
- Flame Color: Select from 12 different flame colors.
- Flame Brightness: Adjust the flame brightness through 5 levels (L1-L5).
- Flame Speed: Adjust the flame speed through 5 levels (V1-V5).
- Ember Bed Color: Select from 12 different ember bed lighting options.
- Timer: Set the operational timer for 1 to 8 hours. The fireplace will automatically shut off after the set time.

Image: A grid displaying 12 distinct flame color options, ranging from traditional reds and oranges to blues, purples, and greens.

Image: A grid displaying 12 distinct ember bed color options, showing various hues for the crystal media at the base of the fireplace.

Image: A visual representation of 5 flame brightness levels (L1 to L5), illustrating the increasing intensity of the flame effect.

Image: A visual representation of 5 flame speed levels (V1 to V5), indicating the varying rates at which the flame effect animates.

Image: A graphic illustrating the 1-8 hour timer control feature, with icons for sunrise and sunset, suggesting timed operation for convenience.
Maintenance
Regular maintenance ensures optimal performance and longevity of your electric fireplace.
- Cleaning: Always disconnect the power before cleaning. Use a soft, damp cloth to clean the exterior surfaces. Do not use abrasive cleaners or sprays.
- Glass Panel: Clean the glass panel with a soft cloth and glass cleaner. Avoid harsh chemicals that may damage the finish.
- Ventilation Openings: Keep the ventilation openings clear of dust and debris to ensure proper airflow for the heater.
- Storage: If storing the fireplace for an extended period, unplug it and store it in a dry, dust-free location.
Troubleshooting
| Problem | Possible Cause | Solution |
|---|---|---|
| Fireplace does not turn on. | No power, power cord not fully plugged in, main power switch off. | Ensure the unit is plugged into a live 120V outlet. Check the main power switch on the unit. Verify the circuit breaker. |
| No heat output. | Heater function not activated, overheat protection triggered. | Press the heater button on the remote or touch panel. If overheat protection is active, unplug the unit, wait 10-15 minutes, and plug it back in. Ensure vents are not blocked. |
| Flames are not visible or dim. | Flame effect turned off, brightness set too low. | Ensure the flame effect is active. Adjust the flame brightness setting (L1-L5). |
| Remote control not working. | Dead batteries, obstruction, remote out of range. | Replace remote batteries. Ensure no obstructions between remote and fireplace sensor. Operate remote within effective range. |
Warranty and Support
The product typically comes with a 1-year warranty. For warranty claims, technical support, or replacement parts, please contact Xbeauty customer service. Refer to your purchase documentation for specific warranty terms and contact information.
For further assistance, please visit the Xbeauty Store on Amazon.


