1. Introduction
This manual provides detailed instructions for the installation, operation, and maintenance of your BTF-LIGHTING 14-key Wireless RF RGB LED Controller. This controller is designed for use with WS2811, WS2812B, 1903 IC, and 6803 IC digital color LED pixel strips and modules. Please read this manual thoroughly before use to ensure proper functionality and safety.
2. Safety Information
- Ensure the input voltage matches the output voltage of the LED strip (e.g., DC5V WS2812B LED Strip requires a DC5V power supply).
- Insufficient power supply can cause the controller to malfunction, leading to frozen LED strip colors or unresponsive remote control.
- When lighting up multiple colors, power consumption increases. For example, 1 color (red, green, or blue) consumes approximately 0.1W/LED, 2 colors (red+green) consume 0.2W/LED, and 3 colors (red+green+blue = mixed white) consume 0.3W/LED. Ensure your power supply can handle the total load.
- If the LED strip becomes very hot during use, it may be necessary to add additional voltage to the strip to prevent overheating and ensure stable operation.
- This controller is not compatible with SK6812 RGBW LED strips due to their 4-channel configuration.
3. Package Contents
Verify that all items are present in your package:
- 1x RF LED Controller (LED2013-X)
- 1x 14-key RF Wireless Remote Control
- Connection cables

Image 3.1: The BTF-LIGHTING RF LED Controller and its accompanying 14-key remote control.
4. Setup
4.1. Connecting the LED Strip
- Connect the 3-pin output connector of the RF LED Controller to the input connector of your compatible LED pixel strip (e.g., WS2811, WS2812B). Ensure the pins align correctly.

Image 4.1: Connection diagram illustrating the RF receiver, power adapter, and LED strip light setup.
4.2. Connecting the Power Supply
- Connect a compatible DC power adapter (matching the voltage requirements of your LED strip, typically 5V or 12V) to the DC input jack of the RF LED Controller.
Video 4.1: This video demonstrates the physical connection process for the 14-key controller, connecting it to the LED strip and power supply.
4.3. Color Order Adjustment (If Colors are Inconsistent)
If the colors displayed by the LED strip do not match the colors selected on the remote (e.g., pressing Green lights up Red), follow these steps to calibrate the color order:
- Connect the LED strip and power supply. Press the Power button on the remote to turn off the LED strip.
- Long press the MENU AUTO button for 3 seconds.
- Press the R button until the LED strip displays red.
- Press the G button until the LED strip displays green.
- Press the B button until the LED strip displays blue.
- Press the Power button to turn off the LED strip and save the settings.

Image 4.2: Visual guide for adjusting the color order of the LED strip to match the remote control's color buttons.
5. Operating Instructions
5.1. Remote Control Functions
The 14-key RF remote control allows you to manage various aspects of your LED strip lighting. The remote operates using Radio Frequency (RF) technology, providing a wider control range compared to infrared (IR) remotes.

Image 5.1: The 14-key RF remote control, highlighting its various buttons for mode, speed, DIY effects, and direct color selection.
- Power Button: Turns the LED strip on or off.
- MODE + / MODE -: Cycles through 300+ kinds of chasing or static lighting effects.
- SPEED + / SPEED -: Adjusts the speed of dynamic lighting effects or the brightness of static colors.
- MENU AUTO: Activates an automatic cycle through various lighting modes. Long press for 3 seconds to enter color order adjustment mode (see Section 4.3).
- DIY + / DIY -: Selects custom play lists or effects.
- ADD DIY / DEL DIY: Adds or deletes custom DIY effects.
- W: Activates white light.
- R / G / B: Selects Red, Green, or Blue static colors directly.
Video 5.1: This video demonstrates the functionality of the RF remote controller, showcasing how to change colors and modes on an LED strip.
Video 5.2: A demonstration of the RF 14-key controller in action, showing various lighting effects and color changes.
5.2. Adjusting Pixel Number
The controller allows adjustment of the pixel number to optimize effects for different strip lengths. Refer to the specific instructions provided with your LED strip for the correct pixel count. Incorrect pixel settings may result in incomplete or distorted lighting effects.
6. Advanced Usage
6.1. Adding Voltage to Prevent Overheating
For longer LED strips or applications where the strip becomes excessively warm, adding voltage at intermediate points can help maintain consistent brightness and prevent overheating. This involves connecting additional power injection points along the strip.
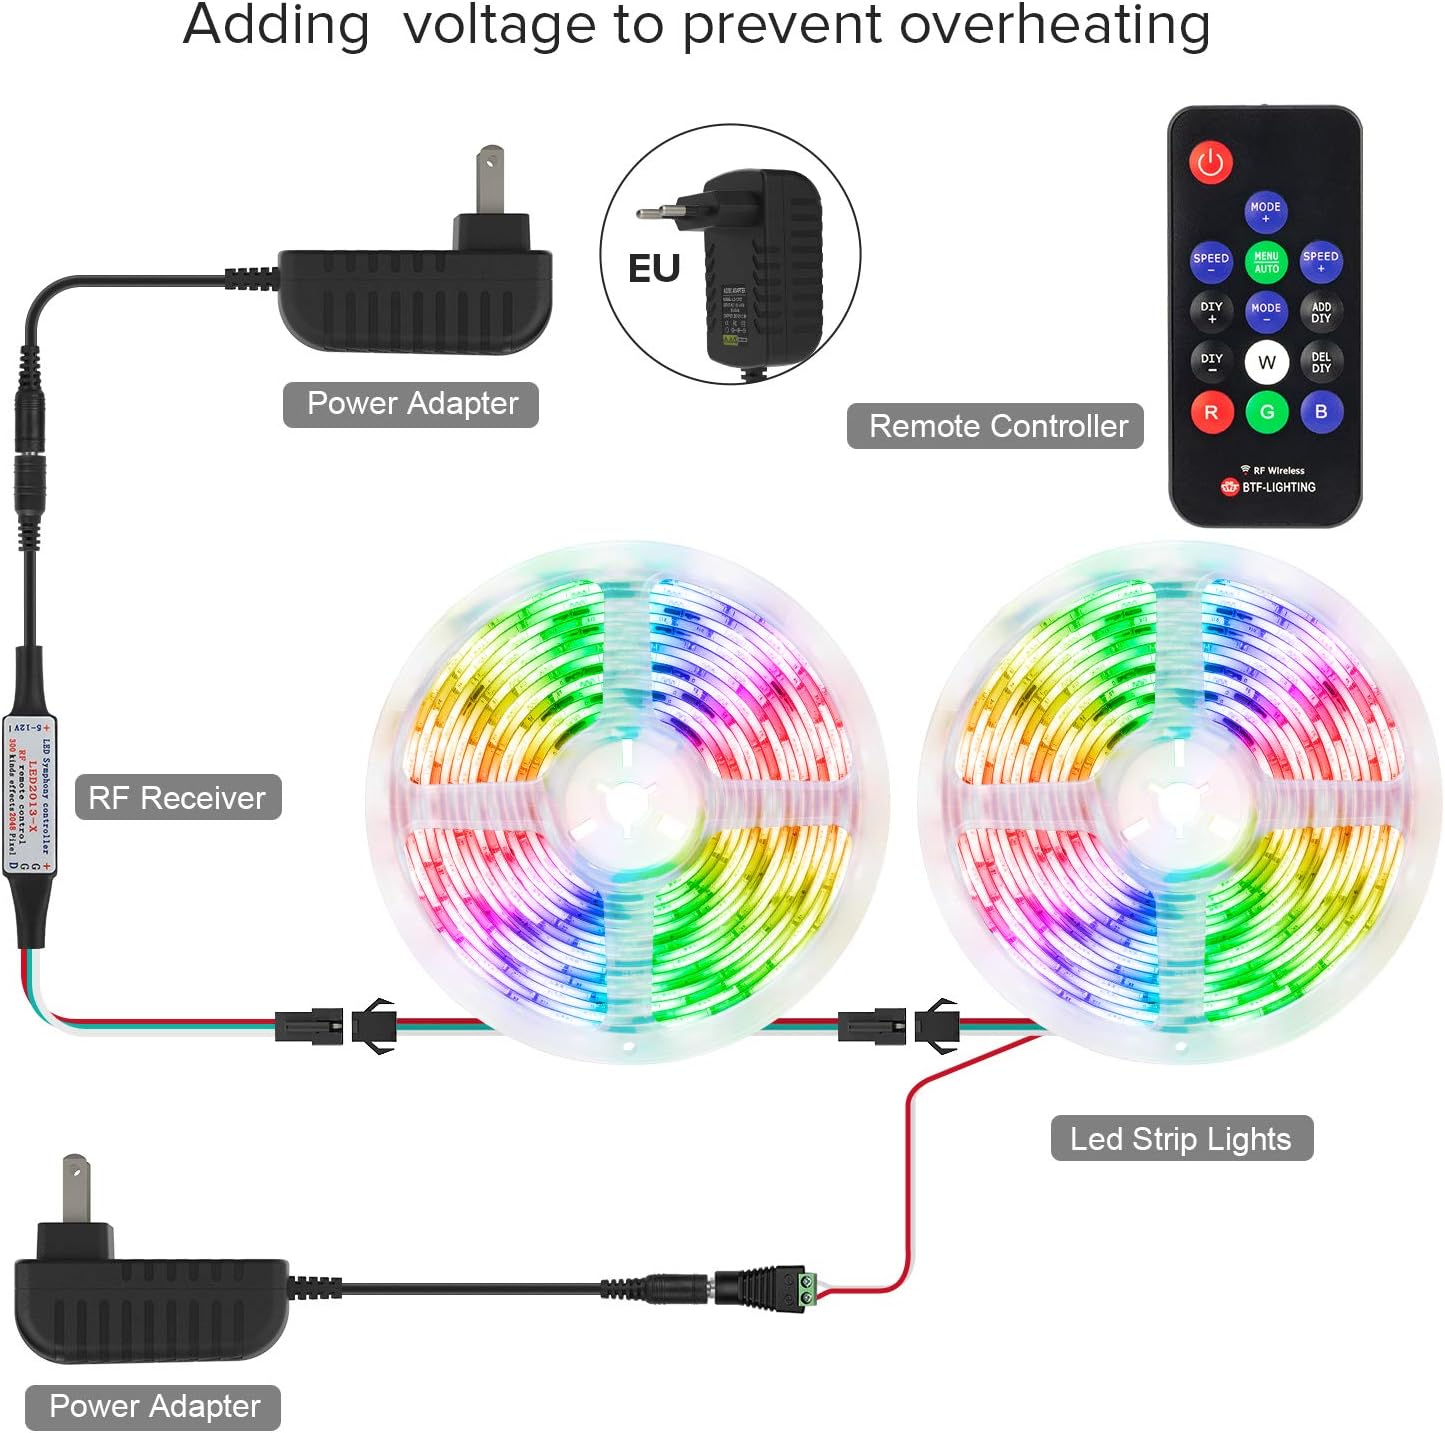
Image 6.1: Illustration of adding voltage to LED strip lights using multiple power adapters to prevent overheating, especially for longer installations.
7. Compatibility
This controller is suitable for a wide range of digital LED pixel products:
- Supported: All WS2812B products (e.g., WS2812B strip, WS2812B fairy string), WS2811 string, 1903 IC, 6803 IC. Supports all 3-pin single signal IC chip LED products.
- Not Supported: SK6812 RGBW LED strips (due to 4-channel configuration).

Image 7.1: Examples of applicable LED light strips and strings, including WS2811 and WS2812B types.
8. Troubleshooting
- Remote Not Working / Inconsistent Colors:
- Ensure the remote battery (CR2025) is installed correctly and has sufficient charge. Replace if necessary.
- Perform the Color Order Adjustment procedure described in Section 4.3. - LED Strip Frozen / Controller Unresponsive:
- This often indicates an insufficient power supply. Verify your power adapter meets the voltage and current requirements for your LED strip. Consider adding voltage injection points for longer strips (see Section 6.1).
- Ensure all connections are secure and free from damage. - Limited Remote Range:
- The remote uses RF, which generally has good range. However, thick walls or strong interference can reduce it. Ensure the controller is not obstructed by large metal objects.
- A weak remote battery can also reduce range. - Wiring Confusion:
- For custom wiring, the standard pinout is typically Red for positive voltage, White for Ground, and Green for Data. Always verify with a multimeter if unsure to prevent damage.
9. Specifications
| Feature | Specification |
|---|---|
| Model Number | RFBLACK14KEY5V12V |
| Brand | BTF-LIGHTING |
| Controller Type | RF Remote |
| Input/Output Voltage | DC 5V/12V (Input voltage = Output voltage) |
| Number of Keys (Remote) | 14 |
| Supported IC Chips | WS2811, WS2812B, 1903, 6803 (3-pin single signal) |
| Max Pixels Controlled | 1024 pixels (voltage addition recommended for high pixel counts) |
| Lighting Effects | 300+ chasing or static effects |
| Remote Battery | CR2025 button battery (not included) |
| Material | Plastic |
| Item Weight | 0.7 Ounces |
| Indoor/Outdoor Usage | Indoor use only |

Image 9.1: A visual representation of the diverse chase and static lighting effects achievable with the controller.

Image 9.2: Energy label for BTF-LIGHTING WS2811 LED Strip. For more details, visit the EPREL database.
10. Maintenance
- Keep the controller and remote clean and dry. Avoid exposure to moisture or extreme temperatures.
- Regularly check all connections for looseness or corrosion.
- Replace the remote control battery (CR2025) when its performance degrades.
11. Warranty and Support
For warranty information and technical support, please refer to the official BTF-LIGHTING website or contact your retailer. Keep your purchase receipt as proof of purchase.
For additional resources and product information, visit the BTF-LIGHTING Store on Amazon.


