1. Introduction
This manual provides essential information for the safe and efficient operation, setup, and maintenance of your Geko G80300 24-liter oil-lubricated air compressor. This product is designed for durability and solid performance, manufactured from high-quality materials. Please read this manual thoroughly before using the compressor.
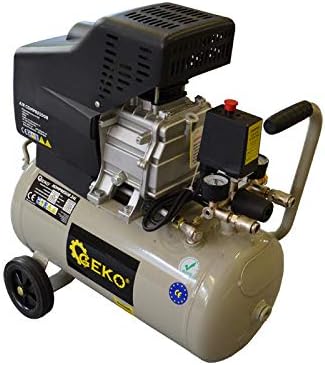
Figure 1: Geko G80300 24L Oil-Lubricated Air Compressor. This image shows the complete air compressor unit, featuring the motor housing, air tank, pressure gauges, regulator, and wheels for portability.
2. Safety Instructions
Always observe the following safety precautions to prevent personal injury and damage to the compressor.
- Electrical Safety: Ensure the power supply matches the compressor's requirements. Use a grounded outlet and avoid extension cords unless absolutely necessary and rated for the compressor's power.
- Pressure Safety: Never exceed the maximum operating pressure. Do not tamper with the safety valve. Always drain condensation from the tank regularly to prevent corrosion and tank failure.
- Personal Protective Equipment (PPE): Wear safety glasses or goggles to protect against flying debris. Use hearing protection as compressors can be noisy.
- Ventilation: Operate the compressor in a well-ventilated area to prevent overheating and accumulation of fumes.
- Moving Parts: Keep hands, hair, and clothing away from moving parts during operation.
- Hot Surfaces: The compressor pump and motor can become hot during operation. Avoid touching these surfaces to prevent burns.
- Children and Bystanders: Keep children and unauthorized persons away from the operating area.
- Maintenance: Disconnect power before performing any maintenance or repairs.
3. Components Overview
Familiarize yourself with the main components of your Geko G80300 air compressor.
- Air Tank: Stores compressed air.
- Motor/Pump Assembly: Compresses air into the tank.
- Pressure Gauges: Display tank pressure and regulated outlet pressure.
- Pressure Regulator: Adjusts the air pressure delivered to tools.
- Safety Valve: Releases excess pressure if the tank pressure exceeds a safe limit.
- Drain Valve: Located at the bottom of the tank, used to release condensed moisture.
- Oil Sight Glass: Indicates the oil level in the pump.
- Wheels and Handle: For portability.
4. Setup
Follow these steps to prepare your compressor for first use.
- Unpacking: Carefully remove the compressor from its packaging. Inspect for any shipping damage. Report any damage to the retailer immediately.
- Attach Wheels and Handle: If not pre-assembled, attach the wheels and handle using the provided hardware.
- Check Oil Level: The compressor is oil-lubricated. Before first use, and periodically thereafter, check the oil level using the oil sight glass. The oil level should be between the minimum and maximum marks. Add appropriate compressor oil if necessary.
- Air Filter Installation: Ensure the air filter is securely installed.
- Electrical Connection: Connect the power cord to a grounded electrical outlet that matches the voltage and amperage requirements of the compressor.

Figure 2: Close-up of the oil sight glass. This image highlights the transparent oil sight glass, which allows users to visually check the oil level in the compressor pump.
5. Operating Instructions
Steps for using your air compressor.
- Initial Break-in (First Use):
- Ensure the drain valve at the bottom of the tank is closed.
- Turn on the compressor. Allow it to run for approximately 15-20 minutes with the tank drain valve open (no pressure build-up) to ensure proper lubrication and break-in of moving parts.
- Turn off the compressor, close the drain valve, and allow it to cool.
- Normal Operation:
- Close the tank drain valve.
- Connect your air tool to the quick-connect coupler.
- Turn on the compressor. It will build pressure until it reaches its maximum cut-out pressure and then shut off automatically.
- Adjust the outlet pressure using the pressure regulator knob to the recommended pressure for your air tool. The regulated pressure will be shown on the outlet pressure gauge.
- When finished, turn off the compressor. Disconnect the air tool.
- Depressurize the Tank: Open the drain valve or use an air tool to release all air pressure from the tank before storing.
6. Maintenance
Regular maintenance ensures optimal performance and extends the life of your compressor. Always disconnect power before maintenance.
- Drain Tank Daily: Open the drain valve at the bottom of the tank after each use to release condensed moisture. Failure to do so can lead to tank corrosion and failure.
- Check Oil Level Weekly: Verify the oil level using the sight glass. Add or change oil as needed. Refer to the manufacturer's recommendations for oil type.
- Clean Air Filter Monthly: Remove and clean the air filter element. Replace if damaged or excessively dirty. A clogged filter reduces efficiency.
- Inspect for Leaks: Periodically check all connections and hoses for air leaks. Tighten connections as necessary.
- General Cleaning: Keep the compressor clean and free of dust and debris, especially around the motor and pump cooling fins.
7. Troubleshooting
Refer to this section for common issues and their solutions.
| Problem | Possible Cause | Solution |
|---|---|---|
| Compressor does not start | No power; Thermal overload tripped; Faulty switch | Check power connection/outlet; Reset thermal overload button; Contact service. |
| Low air pressure / Compressor runs continuously | Air leaks; Clogged air filter; Worn pump components | Check and tighten connections; Clean/replace air filter; Contact service. |
| Excessive noise or vibration | Loose components; Insufficient oil; Worn bearings | Check and tighten all fasteners; Check oil level; Contact service. |
| Moisture in air output | Tank not drained regularly; High humidity | Drain tank daily; Consider an in-line air dryer for sensitive applications. |
8. Specifications
Key technical specifications for the Geko G80300 air compressor.
| Brand | Geko |
| Model Number | G80300 |
| Manufacturer | Firma Handlowa GEKO |
| Capacity | 24 Liters |
| Max Pressure | 8 bar |
| Power Source | Electric Corded |
| Item Weight | 20 Kilograms |
| Package Dimensions | 35 x 35 x 15 cm |
| Color | Multicolor |
| ASIN | B07FR33KL1 |
| International Article Code (EAN/UPC) | 05901477113017 |
9. Warranty and Support
For warranty information or technical support, please refer to the documentation included with your purchase or contact the retailer where the product was acquired. Information regarding spare parts availability is not provided in the product specifications.


