1. Important Safety Instructions
Read and understand all safety warnings and instructions before operating this air compressor. Failure to follow these instructions may result in electric shock, fire, and/or serious injury.
- Electrical Safety: Ensure the power supply matches the compressor's requirements. Do not operate in wet conditions.
- Pressure Safety: Never exceed the maximum operating pressure of the compressor or any attached tools. Do not tamper with the pressure relief valve.
- Personal Protective Equipment: Always wear safety glasses or goggles. Hearing protection is recommended during operation.
- Ventilation: Operate the compressor in a well-ventilated area to prevent heat buildup and ensure proper air intake.
- Moving Parts: Keep hands, hair, and loose clothing away from moving parts.
- Maintenance: Disconnect power before performing any maintenance or repairs.
2. Product Overview
The Geko G80301 is a 50-liter oil-lubricated air compressor designed for various pneumatic applications. It features a robust motor and pump assembly, a large air tank, and essential controls for efficient operation.
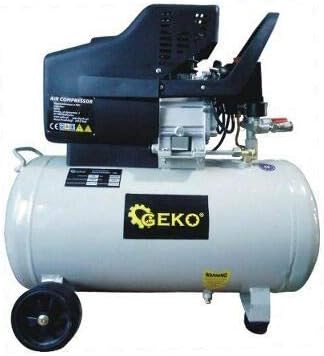
Figure 2.1: Front view of the Geko G80301 50L Oil-Lubricated Air Compressor, showing the motor, tank, wheels, and pressure gauges.
Key Components:
- Air Tank: Stores compressed air.
- Motor/Pump Assembly: Compresses air into the tank.
- Pressure Gauges: Display tank pressure and regulated outlet pressure.
- Pressure Regulator: Adjusts the output air pressure.
- Quick Coupler: For connecting air hoses and tools.
- Drain Valve: Located at the bottom of the tank for draining condensation.
- Wheels and Handle: For portability.
3. Setup and Initial Use
3.1 Unpacking and Assembly
- Carefully remove the compressor from its packaging.
- Attach the wheels and handle (if not pre-assembled) using the provided hardware.
- Install the air filter into its designated port.
3.2 Oil Level Check
This is an oil-lubricated compressor. Before first use, and periodically thereafter, check the oil level using the dipstick or sight glass. Add compressor oil if necessary, ensuring it does not exceed the maximum fill line.
3.3 Electrical Connection
Connect the compressor to a grounded electrical outlet that meets the voltage and amperage requirements specified on the product label. Avoid using extension cords unless absolutely necessary, and ensure any used cord is rated for the compressor's power draw.
3.4 First Use (Break-in Procedure)
- Ensure the drain valve at the bottom of the tank is closed.
- Turn the pressure regulator to its lowest setting.
- Turn on the compressor and allow it to run for approximately 15-20 minutes with the outlet valve open (no tools attached) to allow the internal components to break in.
- After the break-in period, turn off the compressor and drain any condensation from the tank.
4. Operating Instructions
4.1 Starting the Compressor
- Ensure the compressor is on a stable, level surface.
- Verify the power cord is securely plugged in.
- Turn the ON/OFF switch to the 'ON' position. The compressor will start to build pressure.
4.2 Adjusting Output Pressure
- Once the tank reaches maximum pressure and the motor stops, connect your air hose to the quick coupler.
- Turn the pressure regulator knob clockwise to increase the output pressure, and counter-clockwise to decrease it. Monitor the regulated pressure gauge.
- Always set the pressure according to the requirements of your air tool.
4.3 Shutting Down
- Turn the ON/OFF switch to the 'OFF' position.
- Disconnect the air hose and tools.
- Slowly open the drain valve at the bottom of the tank to release any remaining air pressure and condensation. Close the valve once the tank is empty.
5. Maintenance
Regular maintenance ensures the longevity and safe operation of your air compressor. Always disconnect power before performing maintenance.
5.1 Daily Maintenance
- Drain Condensation: Open the drain valve daily after use to remove moisture from the tank. This prevents rust and extends tank life.
5.2 Weekly/Monthly Maintenance
- Check Oil Level: Ensure the oil level is between the minimum and maximum marks on the dipstick/sight glass. Add or change oil as needed.
- Clean Air Filter: Inspect and clean the air filter. Replace if it is heavily soiled or damaged.
- Inspect Hoses and Fittings: Check for any signs of wear, cracks, or leaks in air hoses and connections.
5.3 Storage
When storing the compressor, ensure the tank is completely drained of air and condensation. Store in a dry, clean environment.
6. Troubleshooting
This section addresses common issues you might encounter with your air compressor.
| Problem | Possible Cause | Solution |
|---|---|---|
| Compressor does not start | No power; Thermal overload tripped; Faulty switch | Check power connection; Allow motor to cool and reset; Contact service. |
| Low air pressure / Slow pressure build-up | Air leaks; Clogged air filter; Worn pump components | Check connections for leaks; Clean/replace air filter; Contact service. |
| Excessive noise or vibration | Loose components; Low oil level; Worn bearings | Tighten fasteners; Check/add oil; Contact service. |
| Air leaks from drain valve | Drain valve not fully closed or damaged | Ensure valve is tightly closed; Replace valve if damaged. |
7. Specifications
| Feature | Detail |
|---|---|
| Brand | Geko |
| Model Number | G80301 |
| Manufacturer | Firma Handlowa GEKO |
| Capacity | 50 Litres |
| Weight | 25 Kilograms |
| Package Dimensions | 35 x 35 x 15 cm |
| Color | Multicolour |
| Batteries Required | No |
| International Article Code | 05901477113024 |
8. Warranty and Support
Specific warranty details for the Geko G80301 air compressor may vary by region and retailer. Please refer to your purchase documentation or contact your point of sale for information regarding warranty coverage.
For technical support, spare parts, or service inquiries, please contact the manufacturer, Firma Handlowa GEKO, or your authorized dealer. Always provide the model number (G80301) and purchase date when seeking support.


