1. Introduction and Safety Information
This manual provides essential information for the safe operation, maintenance, and troubleshooting of your LONCIN G200F 6.5 HP Gas Engine. Please read this manual thoroughly before operating the engine to ensure proper use and to prevent injury or damage.
1.1 Important Safety Precautions
- Always operate the engine in a well-ventilated area to avoid carbon monoxide poisoning.
- Keep hands, feet, hair, and clothing away from moving parts.
- Fuel is highly flammable. Refuel in a well-ventilated area with the engine off and cool. Do not smoke or allow open flames near the engine.
- Engine components can become very hot during operation. Avoid contact with hot surfaces to prevent burns.
- Always wear appropriate personal protective equipment (PPE), such as safety glasses and gloves.
- Ensure the engine is securely mounted before operation.
- Do not modify the engine. Unauthorized modifications can affect performance, safety, and void the warranty.
2. Product Overview
The LONCIN G200F is a 6.5 HP, 4-stroke, horizontal OHV gas engine designed for various applications, including replacement for Honda GX200-160 models. Its robust design ensures reliable performance and durability.
2.1 Key Features
- Single cylinder, 4-stroke, forced cooling, OHV design.
- Displacement: 196cc.
- Net power: 4.1kW/3600rpm.
- Transistorized magneto ignition system.
- Recoil starter system.
- Overhead valve (OHV) design for lower operation temperature and improved efficiency.
- Cast iron casing for enhanced lubrication and wear resistance.
- Automatic alarm and stop at low oil level for engine protection.
- Metal cam and forged crankshaft for increased reliability and durability.
- Meets EPA III and CARB Standard.
2.2 Product Components

Figure 1: Front-side view of the LONCIN G200F 6.5 HP Gas Engine. This image shows the main body of the engine, including the recoil starter, air filter housing, and fuel tank.
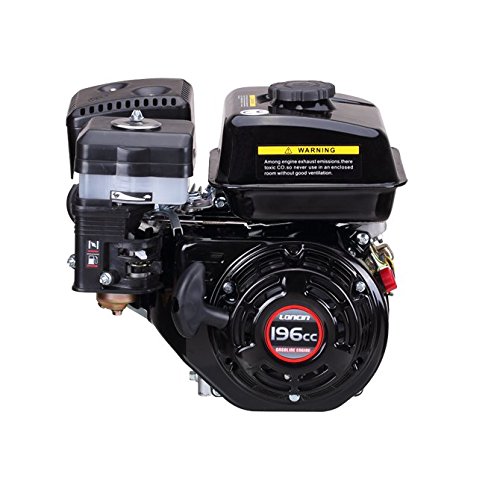
Figure 2: Side view of the LONCIN G200F engine, highlighting the recoil starter mechanism and the overall compact design.

Figure 3: Technical drawing illustrating the dimensions of the engine's 3/4" shaft, including length, diameter, and keyway specifications, crucial for proper mounting and application integration.
3. Setup and Installation
3.1 Unpacking and Inspection
Carefully remove the engine from its packaging. Inspect for any shipping damage. Report any damage to your dealer immediately.
3.2 Mounting the Engine
Ensure the mounting surface is flat, stable, and capable of supporting the engine's weight and vibration. Use appropriate bolts and washers to secure the engine firmly. Refer to Figure 3 for shaft dimensions to ensure compatibility with your application.
3.3 Adding Engine Oil
The engine is shipped without oil. Before first use, fill the crankcase with recommended engine oil (e.g., SAE 10W-30) to the upper level mark on the dipstick. Do not overfill. The engine features an automatic low oil level shut-off for protection.
3.4 Adding Fuel
Fill the fuel tank with fresh, unleaded gasoline (minimum 87 octane). Do not use E85 or mixed fuels. Ensure the fuel cap is securely tightened after refueling. Avoid spilling fuel.
4. Operating Instructions
4.1 Starting the Engine
- Ensure the engine is on a level surface.
- Open the fuel valve (if applicable).
- Move the choke lever to the "CHOKE" position (cold engine start). For a warm engine, the choke may not be necessary.
- Move the throttle lever to the "FAST" position.
- Turn the engine switch to the "ON" position.
- Grasp the recoil starter handle firmly and pull slowly until resistance is felt, then pull quickly and smoothly to start the engine. Repeat if necessary.
- Once the engine starts, gradually move the choke lever to the "RUN" position as the engine warms up.
4.2 Stopping the Engine
- Move the throttle lever to the "SLOW" or "IDLE" position.
- Turn the engine switch to the "OFF" position.
- Close the fuel valve (if applicable) for storage or extended periods of non-use.
5. Maintenance
Regular maintenance is crucial for the longevity and optimal performance of your engine. Always perform maintenance with the engine off and cool.
5.1 Engine Oil Check and Change
- Daily/Before Each Use: Check engine oil level and add if necessary.
- First 20 Hours: Change engine oil.
- Every 50 Hours or Annually: Change engine oil.
5.2 Air Filter Maintenance
- Every 50 Hours or Annually (more often in dusty conditions): Clean or replace the air filter element. A dirty air filter can reduce engine performance and increase fuel consumption.
5.3 Spark Plug Inspection
- Every 100 Hours or Annually: Inspect the spark plug. Clean or replace if fouled or worn. Ensure proper gap setting.
5.4 Fuel System
- Seasonal Storage: Drain the fuel tank and carburetor or use a fuel stabilizer to prevent fuel degradation.
6. Troubleshooting
This section provides solutions to common operational issues. For problems not listed here, contact qualified service personnel.
| Problem | Possible Cause | Solution |
|---|---|---|
| Engine will not start | No fuel Engine switch OFF Low oil level Choke not set correctly Fouled spark plug | Add fresh fuel Turn switch to ON Add oil to correct level Adjust choke Clean/replace spark plug |
| Engine runs rough | Dirty air filter Stale fuel Incorrect spark plug gap | Clean/replace air filter Drain and refill with fresh fuel Adjust spark plug gap or replace |
| Loss of power | Dirty air filter Overload Low oil level | Clean/replace air filter Reduce load Check and add oil |
7. Specifications
| Parameter | Value |
|---|---|
| Engine Type | Single cylinder, 4-stroke, forced cooling, OHV |
| Displacement | 196cc |
| Bore × Stroke | 68mm × 54mm |
| Net Power | 4.1kW / 3600rpm |
| Ignition System | Transistorized magneto ignition |
| Starting System | Recoil starter |
| Shaft Size | 3/4" (19.05mm) |
| Speed | 3600 RPM |
| Material | Cast Iron, Metal |
| Parcel Dimensions | 40 x 40 x 35 cm |
| Weight | 25.4 kg |
8. Warranty and Support
Specific warranty details are not provided within this manual. For information regarding warranty coverage, claims, or technical support, please refer to the documentation provided with your purchase or contact the manufacturer, Loncin, directly through their official website or customer service channels.
Always use genuine replacement parts to ensure the continued safe and efficient operation of your engine.


