Introduction
Thank you for choosing the HOMCOM Audi Q5 Electric Ride-On Car. This manual provides important information for the safe assembly, operation, and maintenance of your new electric vehicle. Please read it thoroughly before use and retain it for future reference. This electric ride-on car is designed to provide an engaging and fun driving experience for children, featuring realistic details, sounds, and lights.
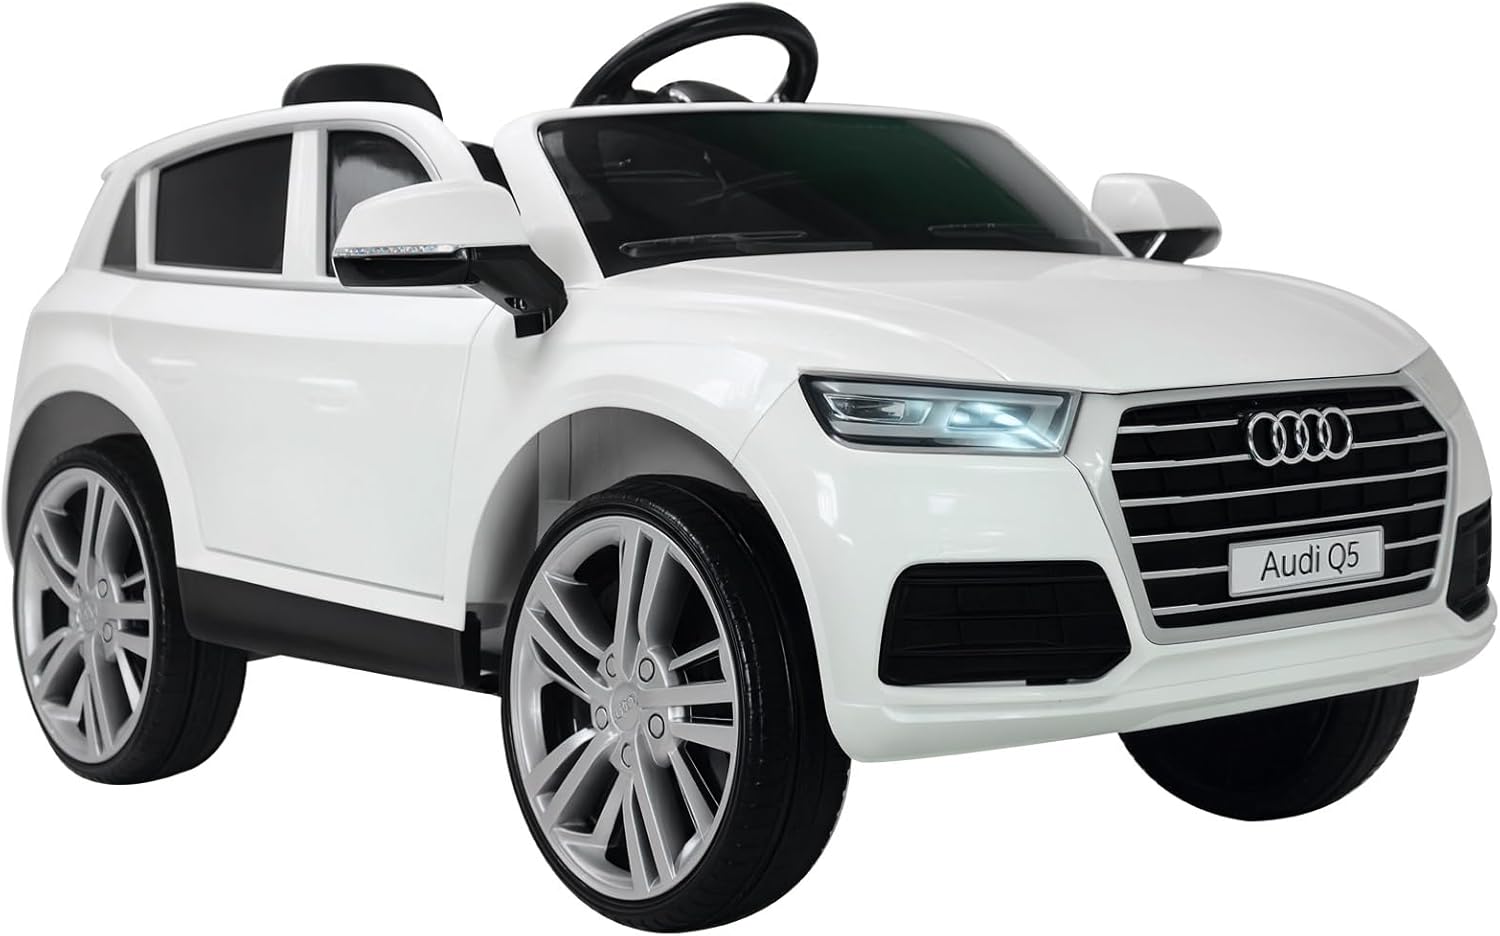
Image: The HOMCOM Audi Q5 Electric Ride-On Car in white, featuring a child at the wheel, showcasing its realistic design and functionality.
Safety Information
Your child's safety is paramount. Please adhere to the following guidelines:
- Age Recommendation: This product is suitable for children aged 36 months to 6 years. Maximum manufacturer recommended age is 72 months (6 years).
- Weight Limit: Do not exceed the maximum load capacity of 30 kg (66 lbs).
- Adult Supervision: Constant adult supervision is required at all times when the vehicle is in use.
- Operating Environment: Use only on flat, dry, and paved surfaces. Avoid slopes, uneven terrain, public roads, swimming pools, or other hazardous areas.
- Safety Harness: Always ensure the child is securely fastened with the 5-point safety harness before operation.
- Protective Gear: Encourage children to wear appropriate safety gear, such as a helmet, when operating the vehicle.
- Battery Safety: Keep the battery away from children. Do not short-circuit, puncture, or expose the battery to extreme temperatures.
- Remote Control: Parents can override manual control using the 2.4G remote control for added safety.

Image: A detailed view of the 5-point safety harness, emphasizing a key safety feature of the ride-on car.
Package Contents
Please check that all components are present and undamaged upon opening the package:
- Audi Q5 Electric Ride-On Car Body
- Steering Wheel
- Wheels (4x)
- Seat
- 2.4G Remote Control
- Charger
- Instruction Manual
- Assembly Hardware (screws, washers, etc.)
Setup and Assembly
While the product is largely pre-assembled, some minor setup is required. Follow these general steps:
- Attach Wheels: Securely attach all four wheels to the axles using the provided hardware. Ensure they are firmly in place and can rotate freely.
- Install Steering Wheel: Connect the steering wheel to the steering column. Ensure any electrical connectors for horn/music buttons are properly plugged in.
- Connect Battery: Locate the battery compartment (usually under the seat). Connect the battery terminals according to the polarity markings (+ to + and - to -).
- Install Seat: Place the seat onto the car body and secure it with the designated screws or clips.
- Initial Charge: Before first use, fully charge the battery for the recommended duration (refer to the 'Charging the Battery' section).
The car also features a foldable pull bar at the front and two small wheels at the rear for easy transport when not in use or when the battery is low.
Operating Instructions
The HOMCOM Audi Q5 offers two modes of operation: manual driving by the child and parental control via remote.
1. Dashboard Controls
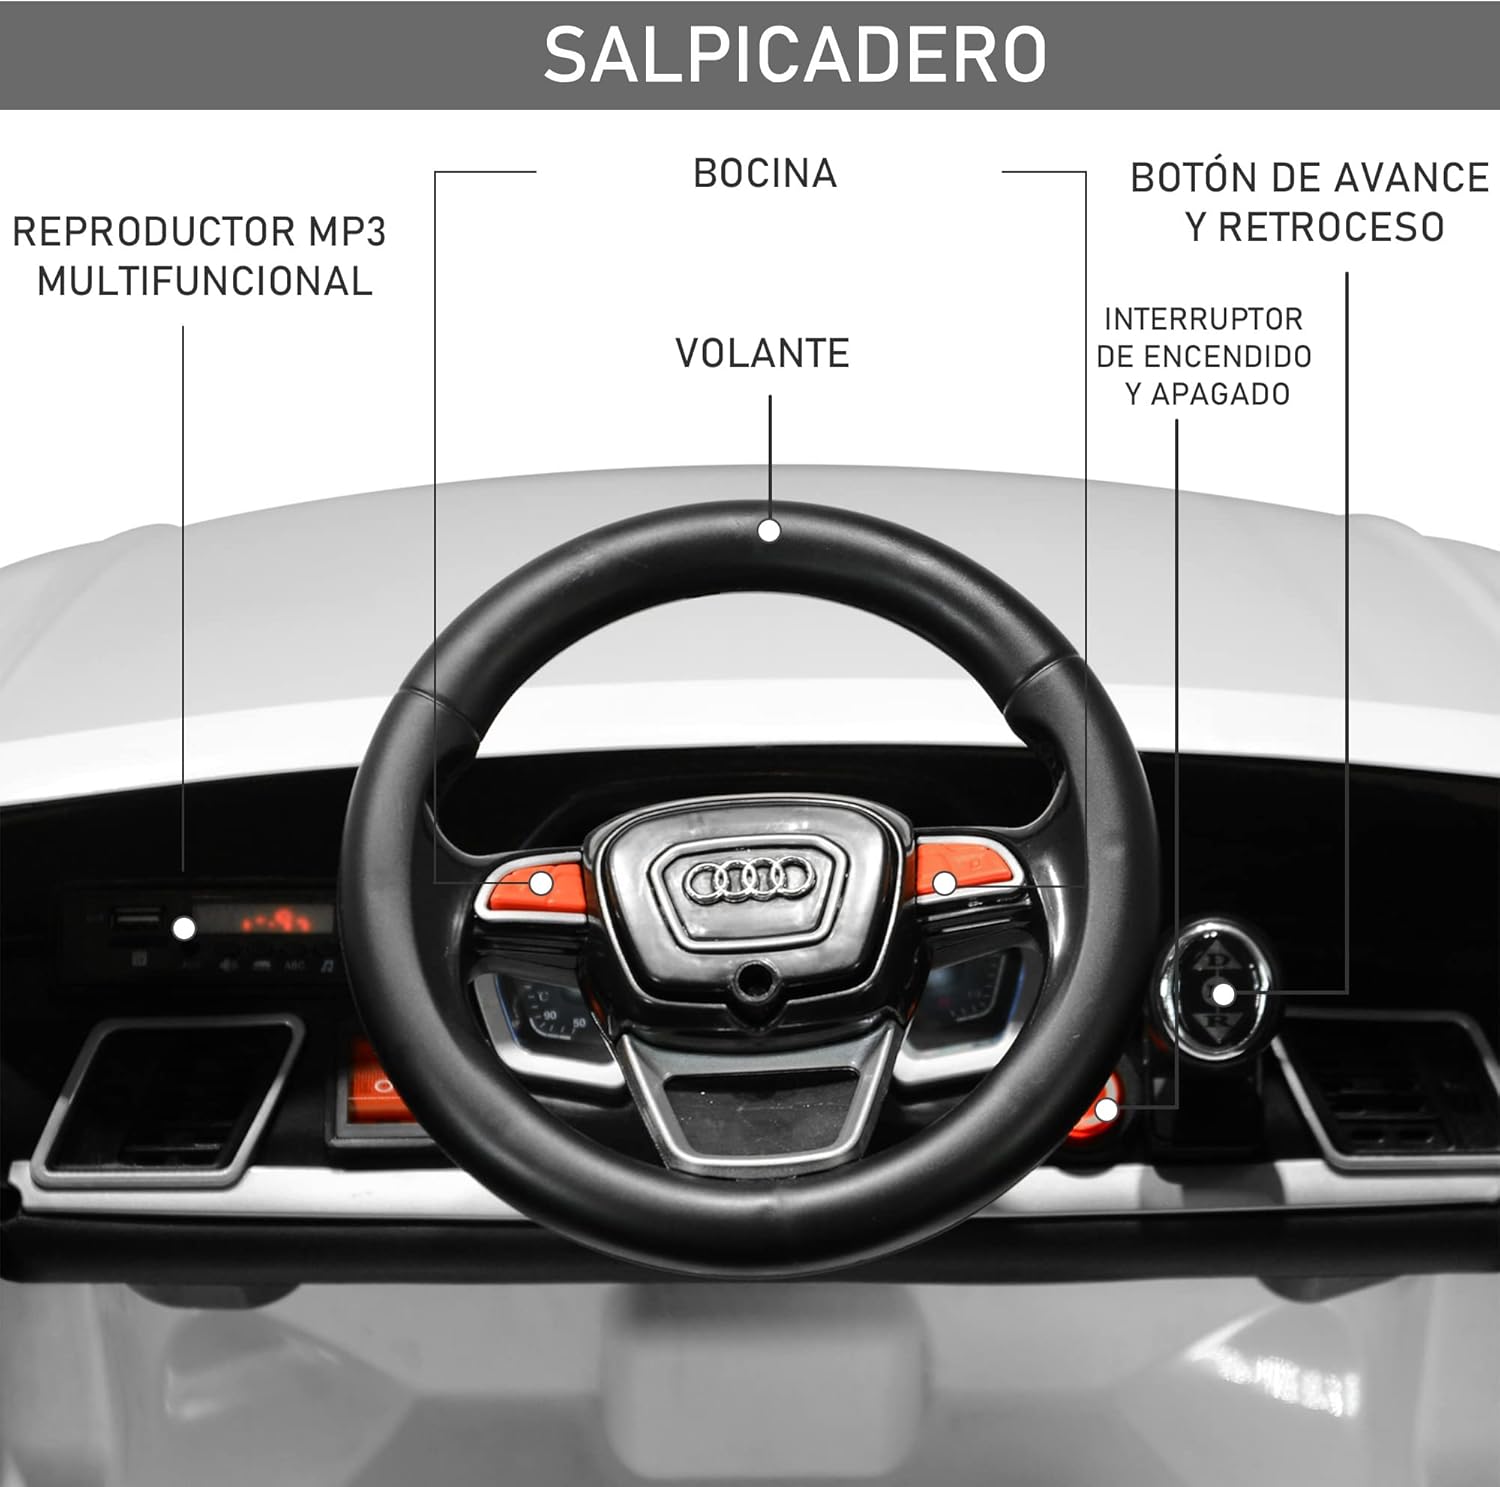
Image: The car's dashboard, highlighting the multifunctional MP3 player, horn, steering wheel, and power controls.
- Power Switch: Located on the dashboard (refer to image). Press to turn the car ON/OFF.
- Forward/Reverse Button: Controls the driving direction.
- Steering Wheel: Used for manual steering.
- Horn Button: Activates the horn sound.
- Multifunctional MP3 Player: Features a USB port, Micro SD card slot, and radio function for playing music.

Image: A detailed view of the gear shifter (P, R, D) and the red power button on the car's console.
2. Manual Driving Mode
Once the child is seated and secured with the safety harness:
- Turn on the car using the power switch.
- Select the desired direction (Forward/Reverse) using the gear shifter.
- Press the foot pedal to accelerate. Release the pedal to brake.
- Steer using the steering wheel.
3. Remote Control Operation
The 2.4G remote control allows parents to safely guide the vehicle.

Image: Illustration of the two driving modes and a clear diagram of the 2.4G remote control, detailing its functions for parental guidance.
- Pairing: Follow the remote control's specific instructions to pair it with the car.
- Forward/Reverse: Buttons to move the car forward or backward.
- Left/Right: Buttons to steer the car left or right.
- Speed Selection: Adjust the speed settings (3-7 km/h) for safety and control.
- Brake Button: Immediately stops the car.
Charging the Battery
To ensure optimal performance and battery life, follow these charging instructions:
- Locate Charging Port: The charging port is typically located on the dashboard or under the seat.
- Connect Charger: Plug the charger into a standard wall outlet, then connect the charger's plug to the car's charging port.
- Charging Indicator: The charger will usually have an indicator light (e.g., red for charging, green for fully charged).
- Charging Time: For the first charge, allow 8-12 hours. Subsequent charges typically take 8-10 hours. Do not overcharge.
- Battery Life: A fully charged battery provides approximately 1 hour of continuous use, depending on terrain and usage.
- Disconnect: Once fully charged, disconnect the charger from both the car and the wall outlet.
Only use the charger supplied with the product. Do not attempt to charge non-rechargeable batteries.
Maintenance
Regular maintenance will extend the life and performance of your electric ride-on car.
- Cleaning: Wipe the car with a soft, damp cloth. Do not use abrasive cleaners or solvents. Avoid spraying water directly onto electrical components.
- Storage: Store the car in a dry, cool place, away from direct sunlight and moisture. If storing for an extended period, charge the battery fully every 30 days to prevent deep discharge.
- Inspections: Periodically check all screws, nuts, and connections to ensure they are tight. Inspect wheels and tires for wear and tear.
- Battery Care: Do not allow the battery to completely drain. Recharge promptly after each use.
Troubleshooting
If you encounter any issues, refer to the following common problems and solutions:
| Problem | Possible Cause | Solution |
|---|---|---|
| Car does not move | Battery is low or disconnected Power switch is off Loose motor connection Remote control override active | Charge battery, check connections Turn on power switch Check motor wiring Ensure remote control is not actively controlling the car |
| Car moves slowly | Low battery Overloaded car Operating on uneven terrain | Recharge battery Reduce weight Move to a flat, smooth surface |
| Lights/Sounds not working | Loose wiring Low battery | Check all electrical connections Charge battery |
| Remote control not working | Remote batteries are dead Remote not paired | Replace remote batteries Re-pair the remote control with the car (refer to remote manual) |
If the problem persists after attempting these solutions, please contact customer support.
Specifications
Key technical details for the HOMCOM Audi Q5 Electric Ride-On Car:
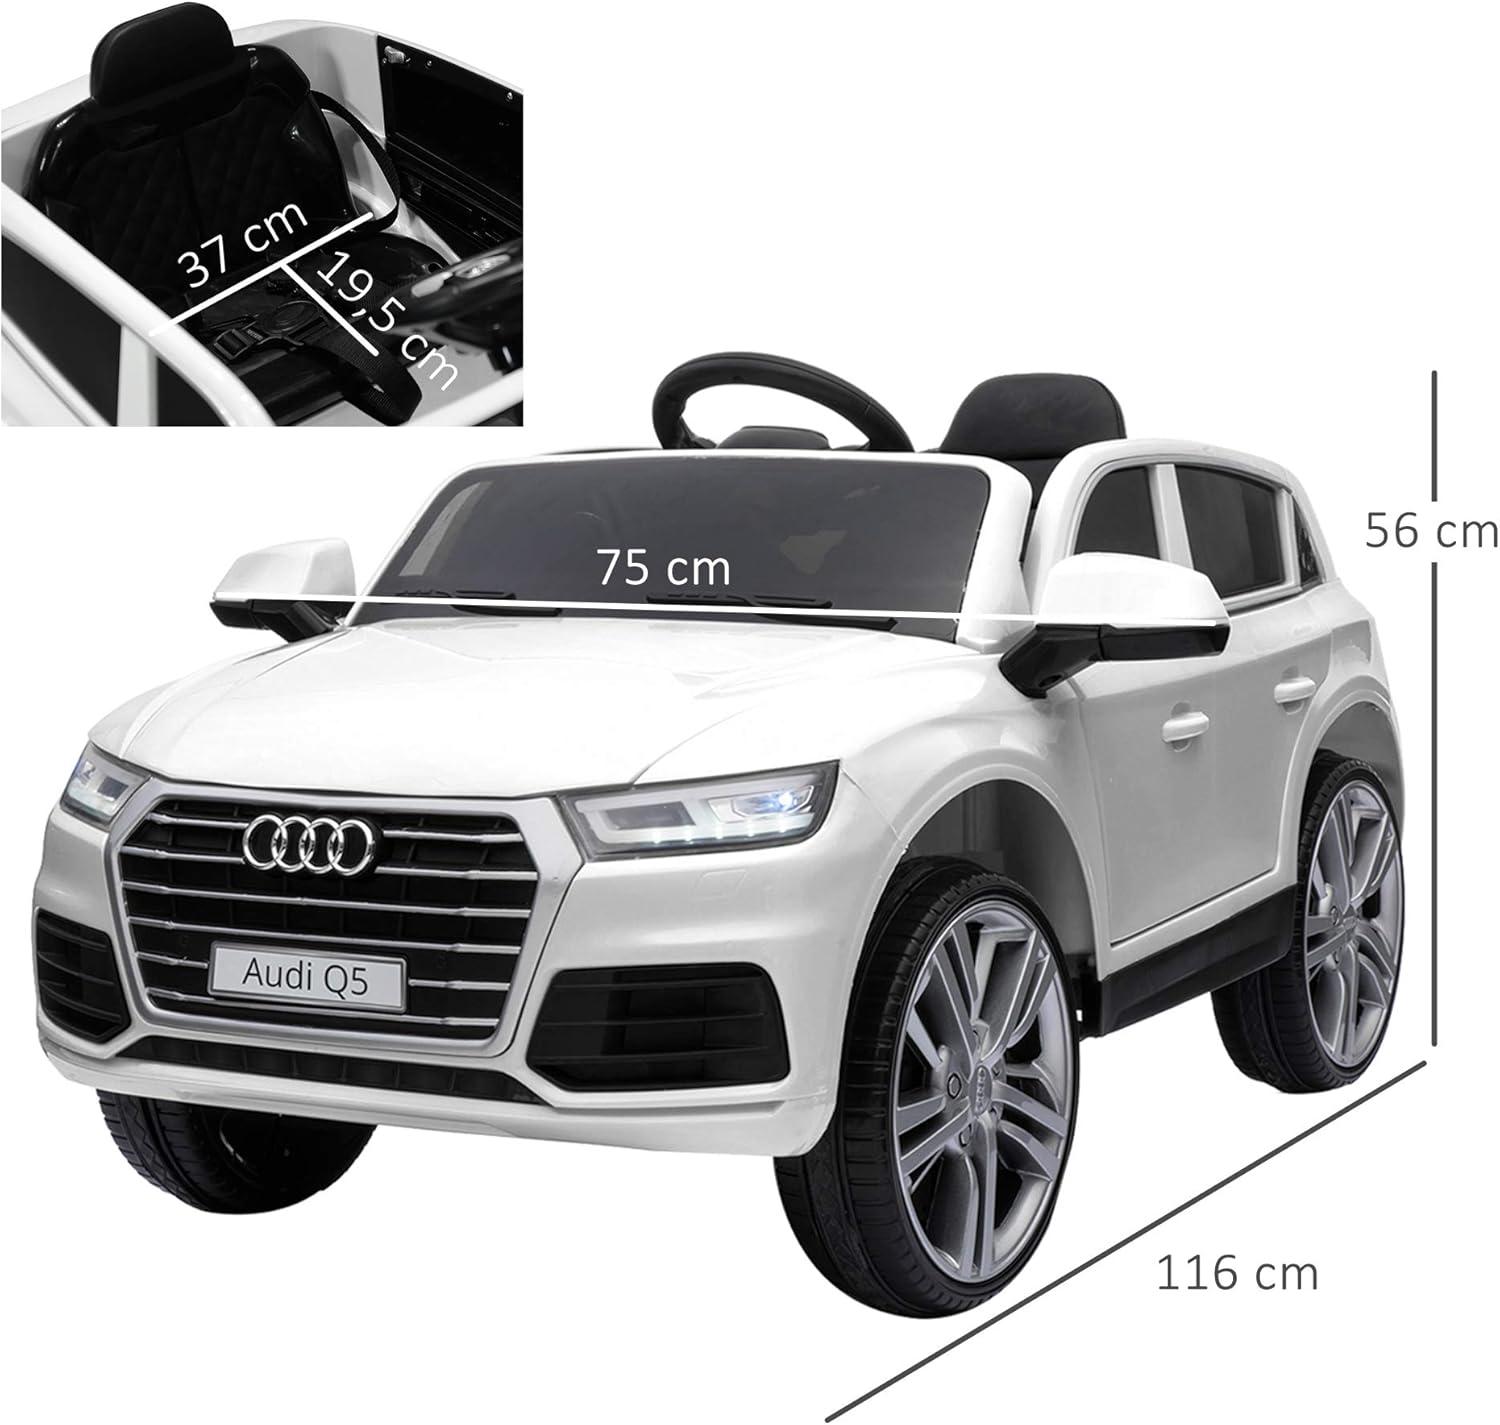
Image: Visual representation of the car's overall dimensions, including length, width, and height.
| Feature | Detail |
|---|---|
| Model Number | ES370-050WT0731 |
| Overall Dimensions (L x W x H) | 116 x 75 x 56 cm |
| Product Weight | 16.5 kg |
| Recommended Age | 36 months - 6 years |
| Maximum Load Capacity | 30 kg |
| Speed Range | 3 - 7 km/h |
| Material | Metal and Polypropylene |
| Battery Type | Rechargeable, long-lasting |
| Battery Autonomy | Up to 1 hour (after full charge) |
| Remote Control Frequency | 2.4G |
| Features | MP3 player, USB port, Micro SD slot, Radio, Lights, Sounds, 5-point safety harness, Opening doors, Foldable pull bar |
Warranty and Support
HOMCOM products are designed for quality and durability. For specific warranty information, please refer to the warranty card included with your purchase or visit the official HOMCOM website. If you require technical assistance, have questions about assembly, or need replacement parts, please contact HOMCOM customer support through their official channels. Please have your model number (ES370-050WT0731) and purchase details ready when contacting support.