1. Introduction
Thank you for choosing MEIKEE 7W 800lm Low Voltage Landscape Lights. These LED spotlights are designed to provide efficient and aesthetically pleasing illumination for your outdoor spaces, including gardens, pathways, and yards. Operating on a safe 12V-24V DC/AC low voltage system, they offer durability and flexibility for various lighting needs. This manual provides essential information for safe installation, operation, maintenance, and troubleshooting.
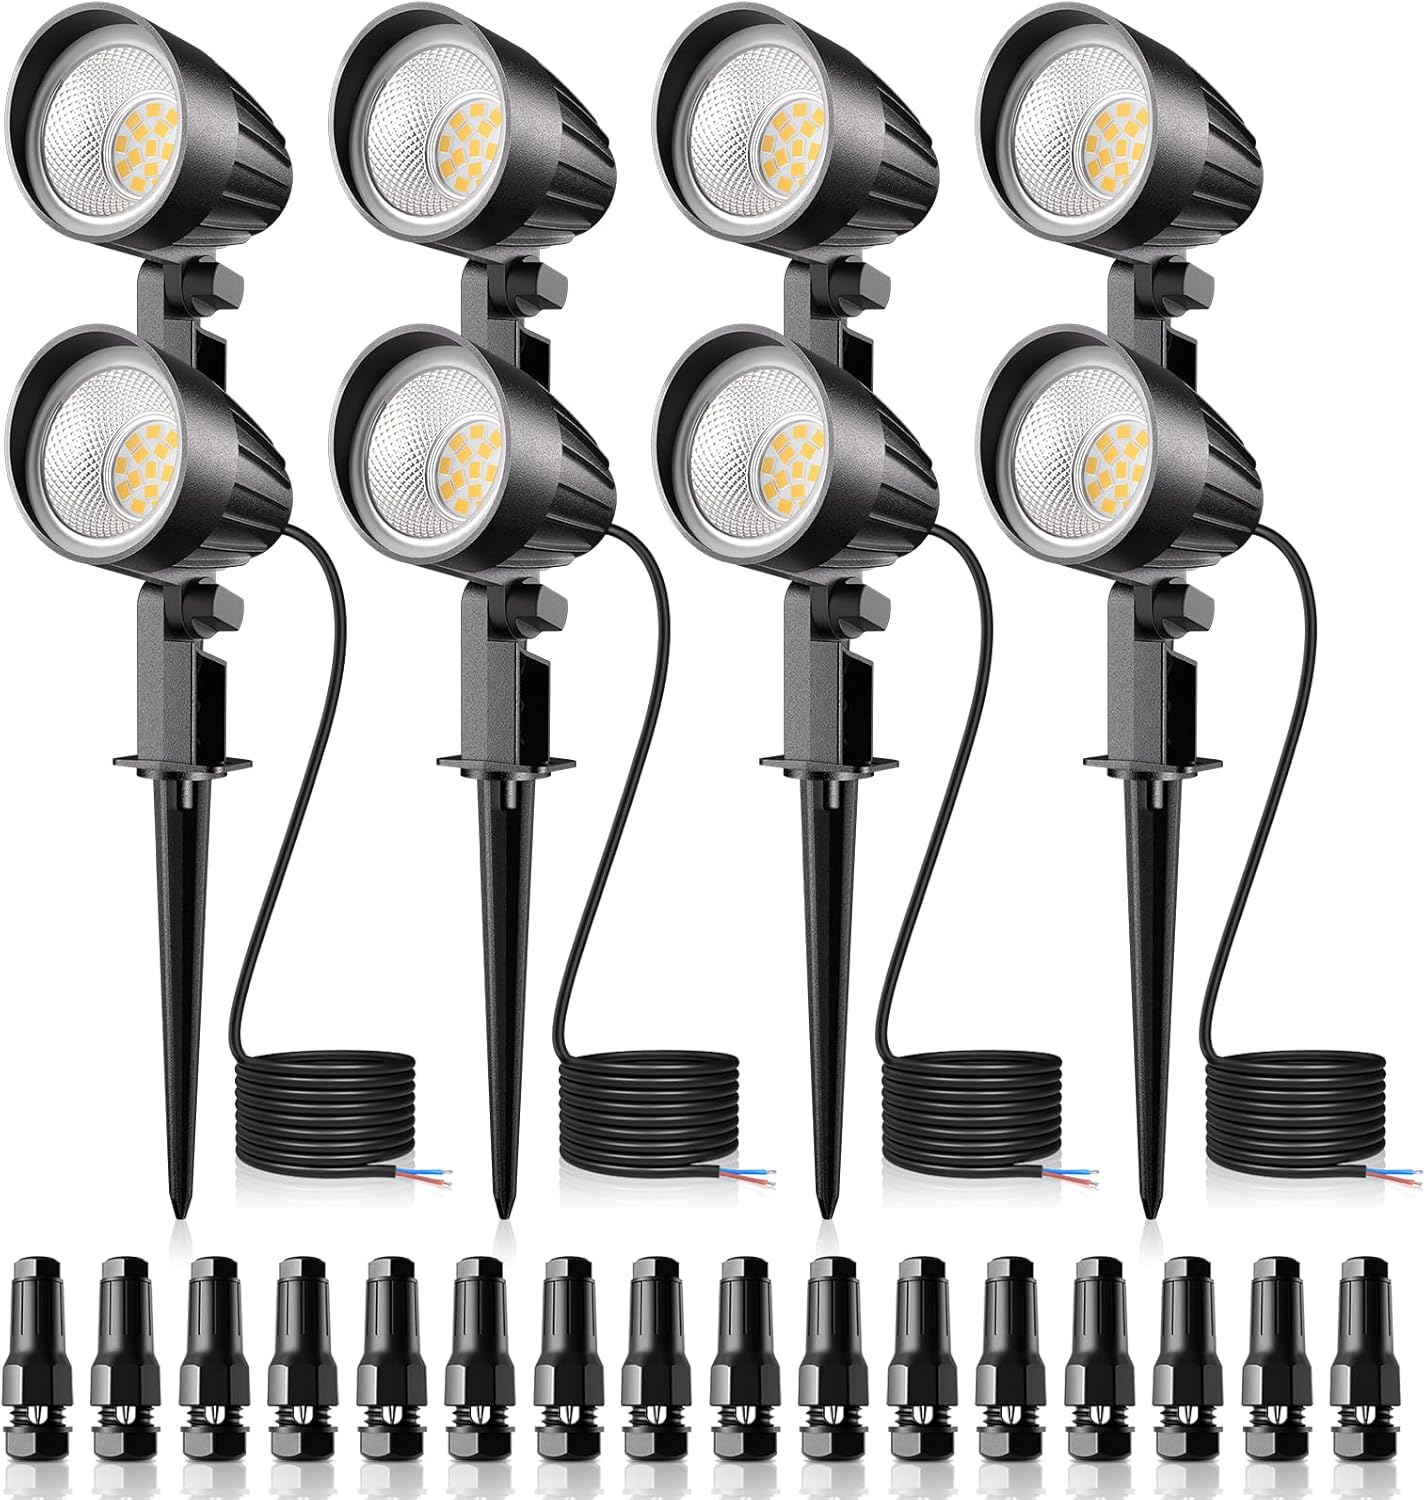
Figure 1.1: MEIKEE 7W 800lm Low Voltage Landscape Lights (8 Pack) and included connectors.
2. Safety Information
- Always disconnect power before installation, maintenance, or troubleshooting.
- These lights operate on low voltage (DC/AC 12-24V). Do not connect directly to 120V household power. A compatible low-voltage transformer is required (not included).
- Ensure all connections are secure and properly insulated to prevent electrical hazards and moisture ingress.
- Do not submerge the lights in water, despite their IP66 waterproof rating. The rating indicates protection against powerful water jets, not continuous submersion.
- Keep children and pets away from the installation area during setup.
- If you are unsure about any part of the installation, consult a qualified electrician.
3. What's in the Box
The package includes the following components:
- Landscape lights (8 units)
- Ground spikes (8 units)
- Cable connectors (16 units)
- Instruction Manual (this document)
- Screw Pack (for wall mounting)
Note: A low-voltage transformer and low-voltage wires are required for operation and are NOT included in this package.
4. Setup and Installation
These landscape lights offer two installation methods: ground-inserted and wall-mounted. Choose the method that best suits your needs.
4.1. Preparing Cable Connections
Properly connecting the lights to your low-voltage wiring is crucial for performance and safety. Use the provided cable connectors.
- Divide the power cable: Carefully separate the two halves of your main low-voltage power cable where you intend to connect a light.
- Insert cable into large cap: Thread one half of the divided power cable through the large cap of the connector.
- Screw pin part and pierce cable: Screw the pin part of the connector onto the large cap. This action will pierce the power cable, establishing the electrical connection.
- Insert light wire: Insert one of the light's wires through the small cap of the connector.
- Screw small cap into joint: Screw the small cap into the main connector joint, securing the light's wire.
- Pull test: Gently pull on the wires to ensure they are securely fastened and will not come out.
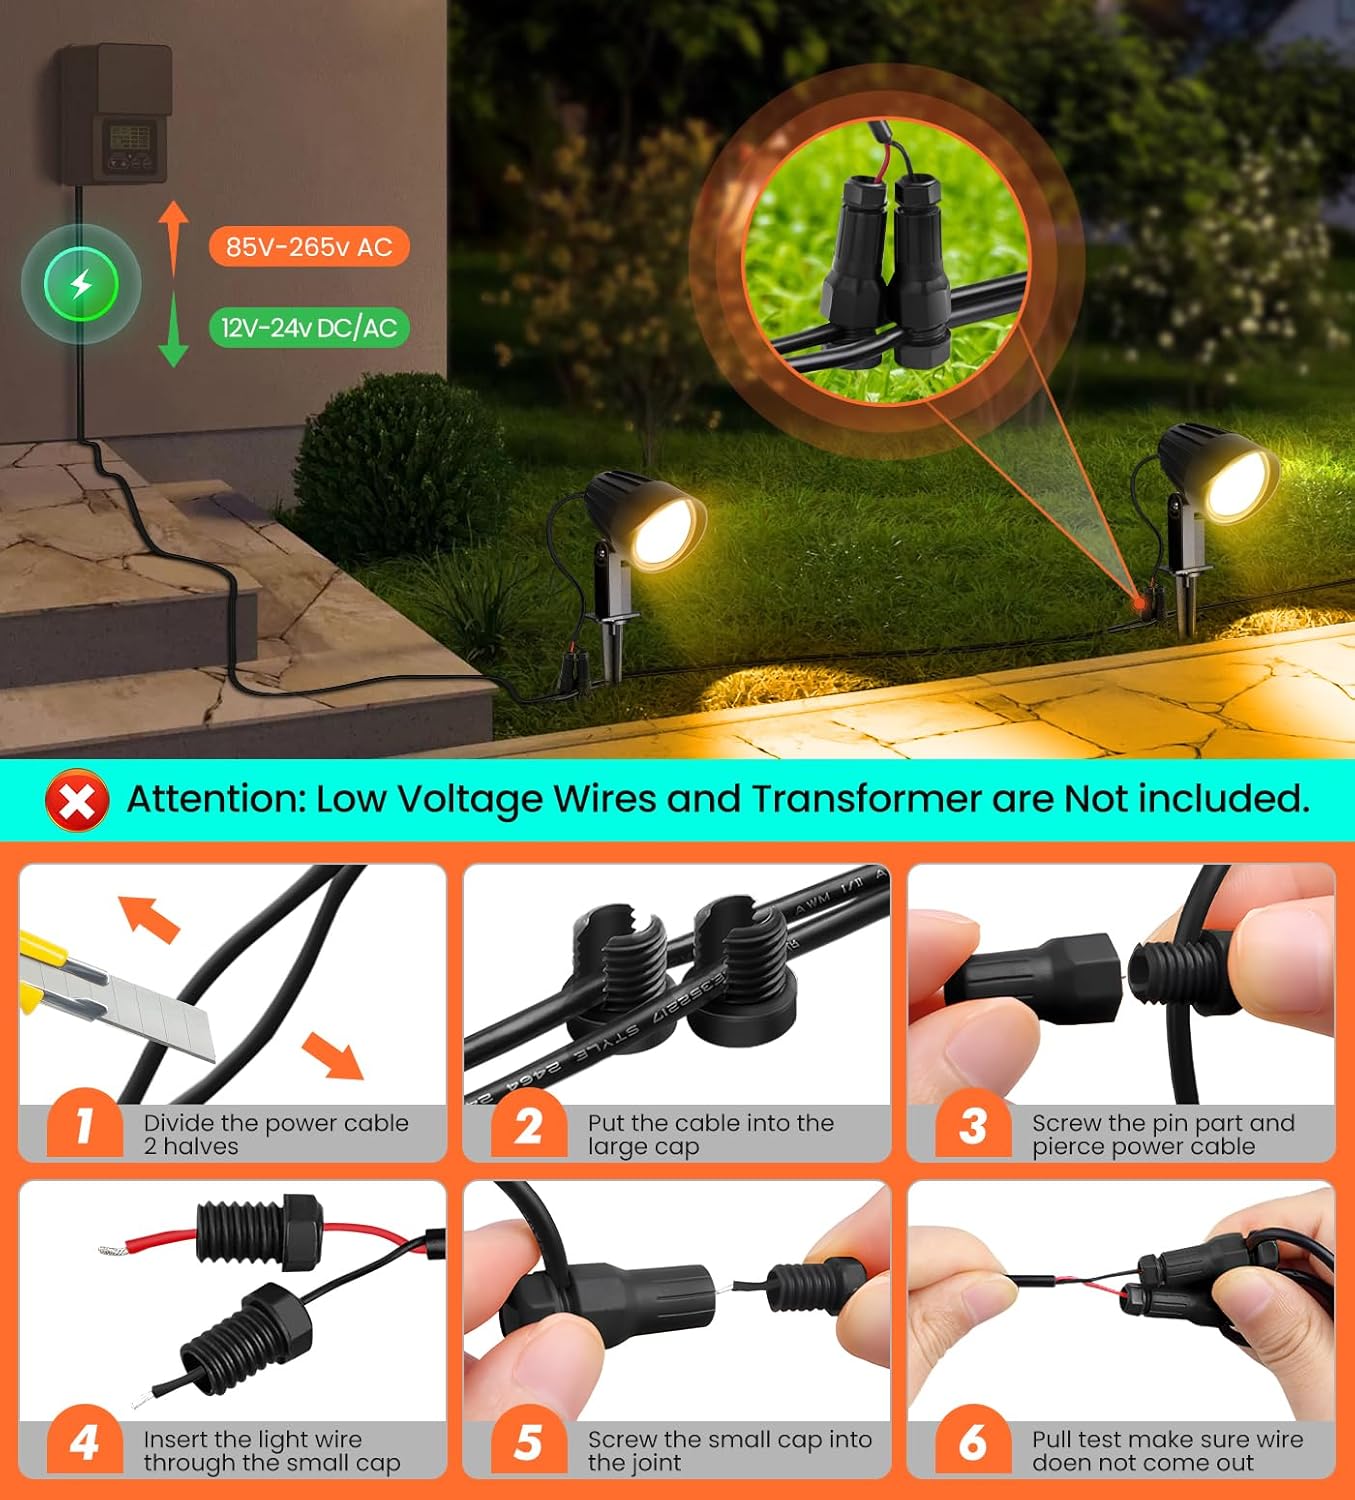
Figure 4.1: Step-by-step guide for connecting the low-voltage wires using the included connectors.
Ensure your low-voltage transformer is suitable for the total wattage of all connected lights. For example, 8 lights at 7W each require a transformer capable of at least 56W, with a recommended buffer for longevity.

Figure 4.2: Overview of a typical low-voltage landscape lighting setup. Transformer and low-voltage wires are sold separately.
4.2. Ground-Inserted Installation
- Connect Spikes: Attach the ground spike to the base of the landscape light.
- Insert into the ground: Firmly push the assembled light and spike into the desired location in the ground. Ensure the soil is soft enough to prevent damage to the spike.
- Adjust the angle: The light head can be adjusted up to 270 degrees vertically. Position the light to illuminate your desired area.
- Turn on the Light: Once all connections are secure and the transformer is powered, the light will turn on.
4.3. Wall-Mounted Installation
- Fix the holder: Position the light's mounting bracket on the wall where you want to install it. Mark the drill points.
- Punch holes in the wall: Drill holes at the marked points. Insert wall anchors if necessary (for drywall or masonry).
- Secure with screws: Use the provided screws to firmly attach the light's mounting bracket to the wall.
- Turn on the Light: Once all connections are secure and the transformer is powered, the light will turn on.
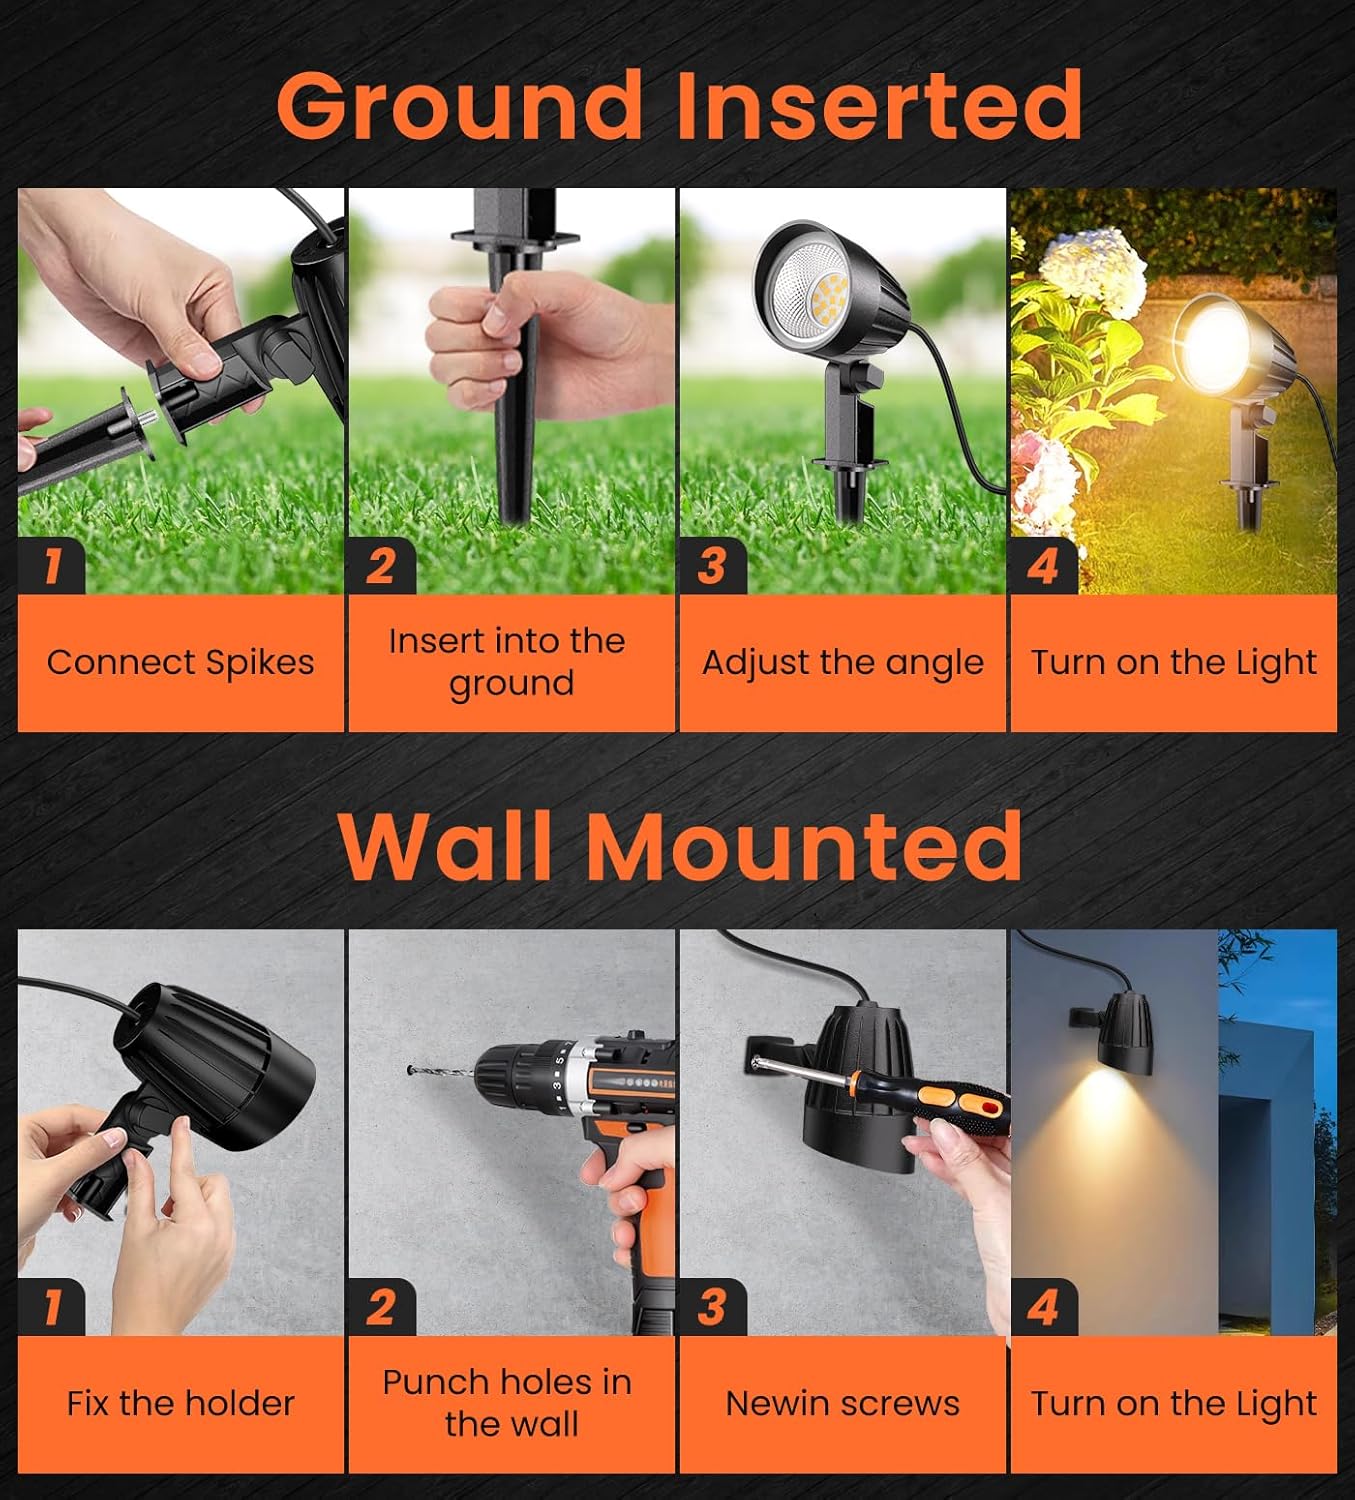
Figure 4.3: Visual guide for both ground-inserted and wall-mounted installation.
5. Operating Instructions
MEIKEE landscape lights are designed for simple operation once installed. They are controlled by the power supply from your low-voltage transformer.
- Power On/Off: The lights will illuminate when power is supplied from the low-voltage transformer. To turn them off, simply switch off the power to the transformer.
- Automatic Operation: Many low-voltage transformers include a timer or photocell feature, allowing for automatic dusk-to-dawn operation or scheduled lighting. Refer to your transformer's manual for these advanced features.
- Adjusting Light Direction: The lamp head can be rotated up to 270 degrees vertically. Loosen the adjustment screw on the side of the light fixture, pivot the head to the desired angle, and then tighten the screw to secure it.

Figure 5.1: The 270° adjustable head allows for precise light direction.
6. Maintenance
Regular maintenance ensures the longevity and optimal performance of your MEIKEE landscape lights.
- Cleaning: Periodically wipe the light fixtures with a soft, damp cloth to remove dirt, dust, and debris. Avoid abrasive cleaners or solvents.
- Connection Check: Annually inspect all cable connections for tightness and signs of corrosion. Re-tighten or re-insulate as needed.
- Waterproofing: While rated IP66 waterproof, ensure the light's lens and housing remain free of cracks or damage that could compromise the seal. The lights are designed to withstand rain and snow.
- Environmental Resilience: These lights are built to withstand various weather conditions, including heat and frost, with a working temperature range of -25°C to 40°C.

Figure 6.1: The IP66 waterproof design ensures durability in outdoor conditions.
7. Troubleshooting
If you encounter issues with your MEIKEE landscape lights, refer to the following common problems and solutions:
| Problem | Possible Cause | Solution |
|---|---|---|
| Light does not turn on. | No power from transformer, loose wire connection, faulty light. | Check transformer power. Inspect all wire connections for tightness. Test the light with a known working connection. |
| Light flickers or is dim. | Insufficient power, loose connection, voltage drop over long wire runs. | Ensure transformer wattage is sufficient for all lights. Check connections. Consider using thicker gauge wire for longer runs or reducing the number of lights on a single run. |
| Moisture inside the lens. | Compromised seal, extreme temperature changes. | While IP66 rated, condensation can occur. If persistent or significant, inspect for physical damage to the seal. Ensure proper installation and drainage around the fixture. |
| Light falls over (ground-inserted). | Loose soil, improper spike insertion. | Ensure spike is fully inserted into firm ground. Compact soil around the base if necessary. |
8. Specifications
- Brand: MEIKEE
- Model Name: landscape lights
- Part Number: DSTA07
- Power Source: Corded Electric (Low Voltage)
- Voltage: 12V - 24V (DC/AC compatible)
- Wattage: 7 Watts per light
- Brightness: 800 Lumens per light
- Color Temperature: 2700 Kelvin (Warm White)
- Light Source Type: LED (SMD LED chips)
- Material: Aluminum, Polycarbonate
- Finish Type: Powder Coated
- Water Resistance Level: IP66 Waterproof
- Adjustability: 270° Vertical Rotation
- Product Dimensions: 3.1"L x 3.1"W x 9.1"H (approx.)
- Item Weight: 3.15 pounds (for 8 pack)
- Average Life: 50,000 Hours
- Installation Type: Mount to Wall, Insert to Ground

Figure 8.1: Detailed components and dimensions of the MEIKEE Landscape Spotlight.
9. Warranty and Support
MEIKEE stands behind the quality of its products. Your MEIKEE landscape lights are covered by a 2-year warranty from the date of purchase.
- Warranty Coverage: This warranty covers defects in materials and workmanship under normal use. It does not cover damage caused by improper installation, accident, misuse, abuse, or unauthorized modifications.
- Claiming Warranty: For warranty service, please contact MEIKEE customer support. You may be required to provide proof of purchase.
- Customer Support: If you have any questions, concerns, or require assistance with your product, please contact us via Amazon's messaging system or the email address provided on your product packaging. We aim to respond within 24 hours.
For more information and to explore other MEIKEE products, please visit the official MEIKEE store on Amazon: MEIKEE Store.