1. Introduction
This manual provides comprehensive instructions for the installation, operation, and maintenance of your AMASE AUDIO Android 14 Car Stereo. Please read this manual thoroughly before using the product to ensure proper function and safety. Keep this manual for future reference.
2. Application Models
This car stereo is compatible with the following Audi and SEAT models:
- Audi A4 B6 (8E/8H) (2000-2006)
- Audi A4 B7 (8E/8H) (2004-2008)
- Audi S4 B7 (8E/8H) (2005-2008)
- Audi S4 B6 (8E/8H) (2003-2005)
- Audi RS4 (2002-2008)
- Audi RS4 B7 (8E) (2006-2008)
- SEAT Exeo (2008-2012)
Remark: If your car's dashboard has a 1 DIN structure, this head unit is not applicable.
3. Key Features
- Operating System: Real Android 14.0 system with Rockchip RK3562 Quad-core ARM Cortex-A53@2.0GHz.
- Memory & Storage: 3GB RAM and 32GB ROM.
- Display: QLED 1024x600 pixel screen.
- Connectivity: Support 4G WiFi (5GHz/2.4GHz bands) and Bluetooth 5.0.
- Smartphone Integration: Built-in Wireless/Wired CarPlay and Android Auto.
- Audio Processing: Built-in DSP (Digital Sound Processor) for enhanced sound quality.
- Navigation: Built-in Google Maps for GPS navigation.
- Multimedia: Supports 1080p movie playback.
- User Interface: Split-screen functionality, multicolor LED buttons, customizable themes.
- Additional Features: Built-in apps to support OBDII & rear camera (rear camera not included).
- Software Updates: Convenient online firmware updates for Android version and app updates.
4. What's in the Box
The package includes all necessary parts for installation and operation:
- AMASE AUDIO Android 14 Car Stereo Unit
- Power Cable (x2, one with CANBUS, one without)
- RCA Cables
- Radio Antenna Connector
- 15A Fuse
- CANBUS Decoder Box
- External Microphone
- USB Adapter Cables (x3)
- Disassembly Tools (x4)
- Radio Antenna Adapter Cable
- GPS Antenna

Figure 4.1: All accessories included with the AMASE AUDIO car stereo. This image displays various cables, adapters, and tools such as power cables, RCA cables, radio antenna connectors, a 15A fuse, a CANBUS box, an external microphone, USB adapter cables, disassembly tools, a radio antenna adapter cable, and a GPS antenna.
5. Product Overview

Figure 5.1: Front view of the AMASE AUDIO Android 14 Car Stereo, showcasing its 7-inch touchscreen display and physical control buttons.

Figure 5.2: Overview of the car stereo's high-standard configuration, highlighting Android 14, 4-core CPU, 3GB RAM, 32GB ROM, Wireless Carplay, DSP+, Dual-band WiFi (2.4G+5G), 4G Cellular Network, Bluetooth 5, Play Store, Navigation, Radio, and Touchscreen capabilities.
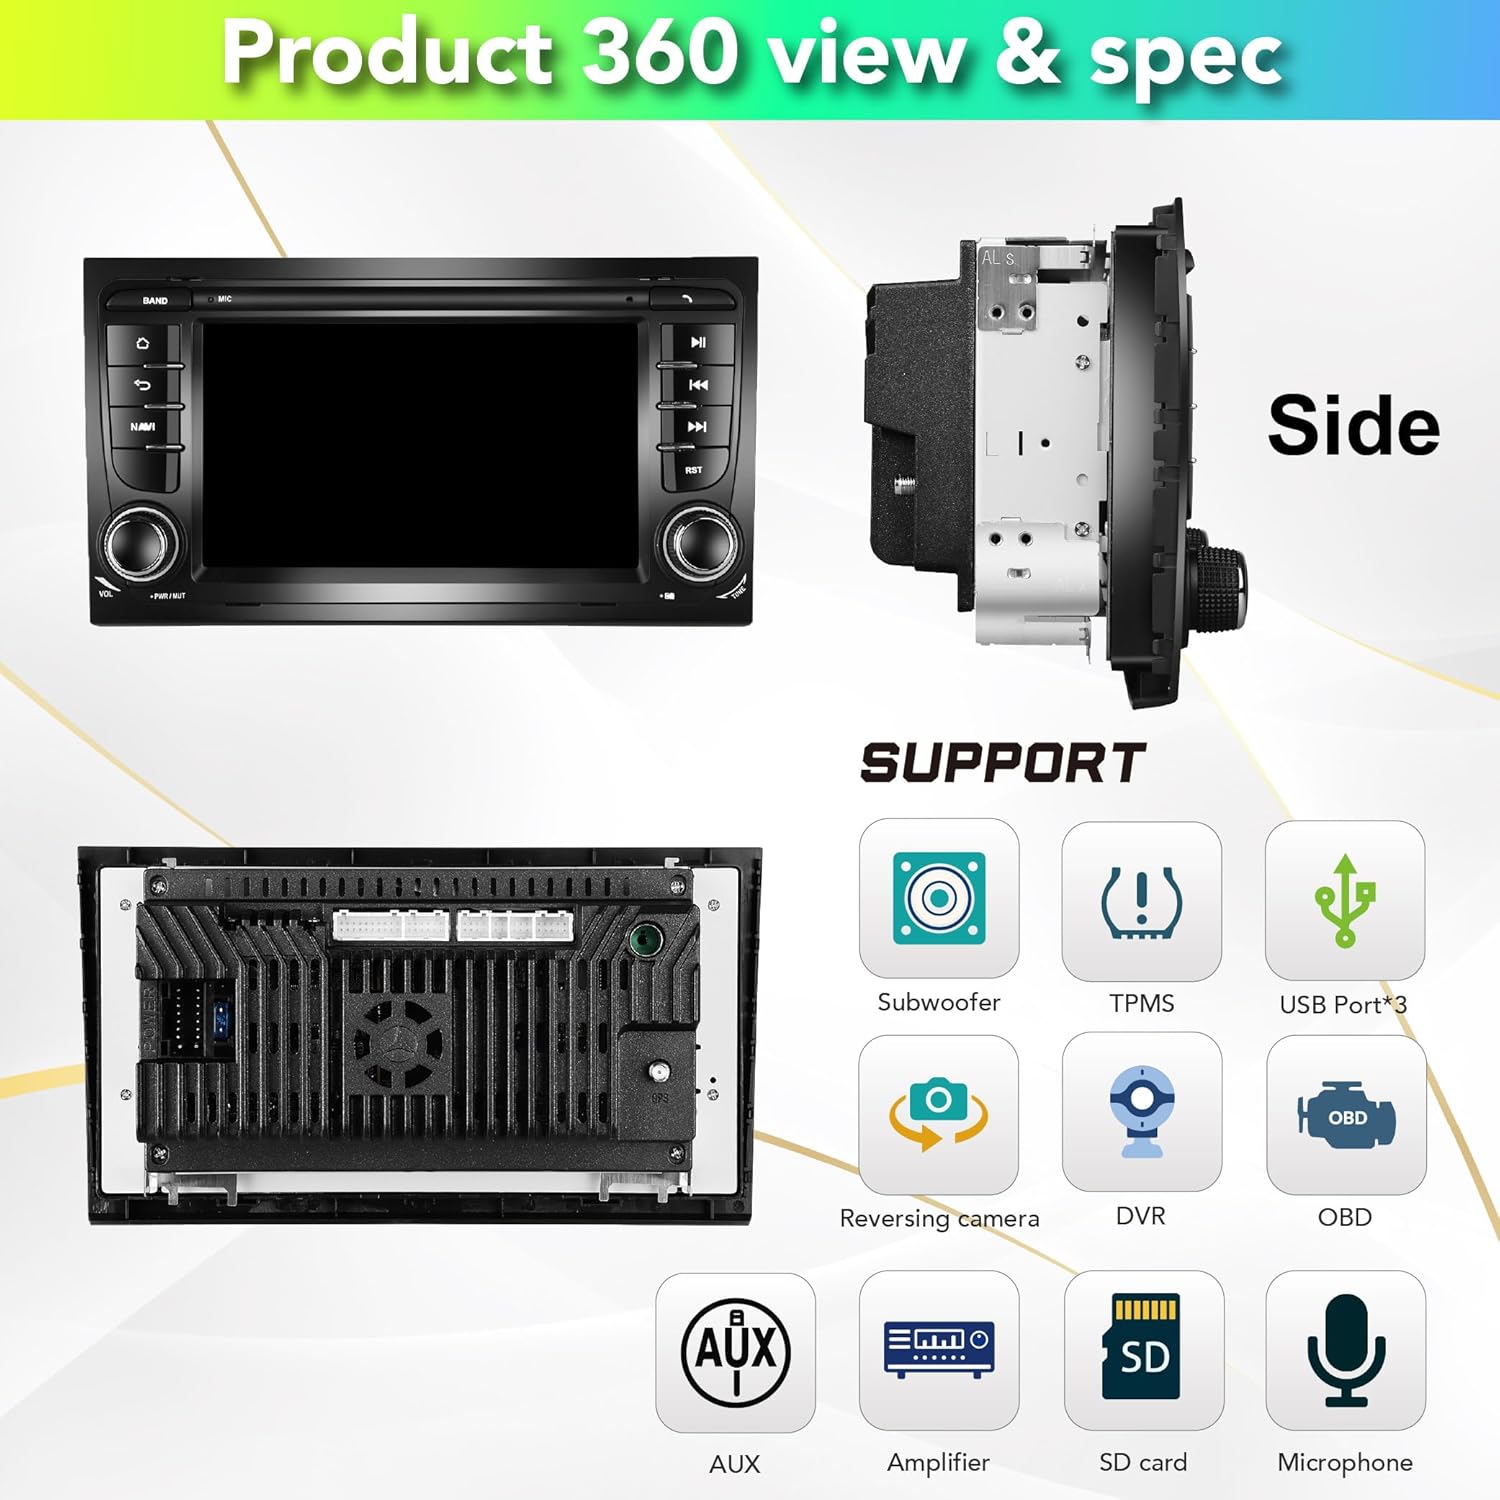
Figure 5.3: Side and rear views of the car stereo, illustrating its physical dimensions and various supported features including Subwoofer, TPMS, USB ports (x3), Reversing camera, DVR, OBD, AUX, Amplifier, SD card, and Microphone connections.
6. Setup & Installation
Installation of the AMASE AUDIO car stereo requires careful attention to wiring and proper fitment. It is recommended to have the installation performed by a qualified professional if you are not familiar with car audio systems.
6.1. Pre-Installation Check
- Ensure all components listed in Section 4 are present.
- Verify compatibility with your vehicle model (refer to Section 2).
- Disconnect the vehicle's battery before starting any electrical work.
6.2. Installation Steps
- Use the provided disassembly tools to carefully remove your factory radio unit from the dashboard.
- Connect the appropriate power cable harness (with or without CANBUS, depending on your vehicle's original setup) to the car stereo and the vehicle's wiring harness. Ensure all RCA cables are properly connected for sound output.
- Connect the GPS antenna and route it to a location with clear sky view (e.g., dashboard, under windshield).
- Connect the external microphone and route it to a suitable location (e.g., near the instrument cluster or sun visor) for optimal voice pickup.
- Connect any optional accessories such as USB adapter cables, reversing camera, or DVR.
- Before fully securing the unit, temporarily connect the battery and test all functions (power, audio, GPS, Bluetooth, etc.) to ensure proper operation.
- Once verified, carefully slide the car stereo into the dashboard opening and secure it in place.

Figure 6.1: Visual comparison showing the factory radio unit before installation and the AMASE AUDIO car stereo installed in an Audi A4 dashboard.
7. Operating Instructions
Your AMASE AUDIO car stereo runs on Android 14, offering a wide range of functionalities. The user interface is intuitive and can be customized.
7.1. Basic Navigation and UI
The main screen provides quick access to frequently used applications. You can swipe left/right to access more apps. The system supports split-screen mode for multitasking.
Video 7.1: A demonstration of the Audi A4 7-inch system display, showcasing the user interface, app collection, GPS navigation, main app settings, Bluetooth phone connectivity, Bluetooth music playback, 1080p video playback, online browsing, app downloads, panel light color settings, radio functions, default themes, and built-in OBD2 features.

Figure 7.1: Examples of the system's user interface screens, including the home screen, app drawer, radio interface, and settings menu, along with options for theme selection.
7.2. GPS Navigation
The unit comes with built-in Google Maps for navigation. Ensure the GPS antenna is properly installed for accurate positioning.
- Tap the 'Maps' icon on the home screen to launch the navigation application.
- Enter your destination using the on-screen keyboard or voice input.
- Follow the on-screen directions and voice prompts for your route.
7.3. Wireless CarPlay & Android Auto
The system supports both Wireless/Wired CarPlay for Apple devices and Android Auto for Android devices. No additional dongle or cable is required for wireless connection.
- Ensure Bluetooth is enabled on your smartphone and the car stereo.
- On your phone, search for and connect to the car stereo's Bluetooth name (e.g., "AMASE").
- Once connected, launch the CarPlay or Android Auto application on the car stereo.
- Follow the on-screen prompts to complete the setup.
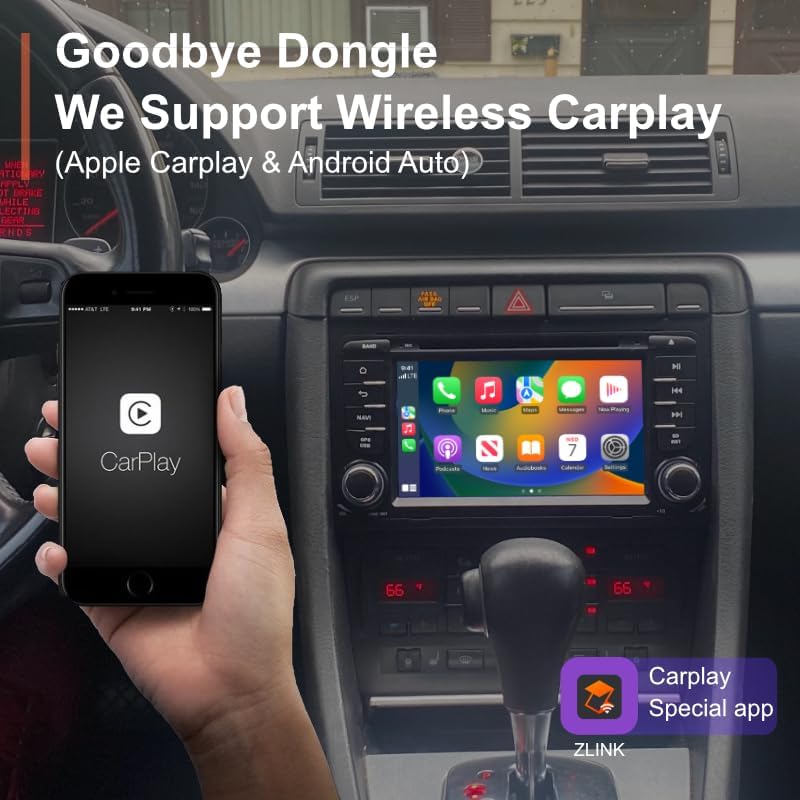
Figure 7.2: A smartphone displaying the CarPlay interface, wirelessly connected to the car stereo, demonstrating seamless integration without the need for a dongle.
7.4. Bluetooth Connectivity
Connect your smartphone via Bluetooth for hands-free calling and audio streaming.
- Go to Settings > Bluetooth on the car stereo.
- Enable Bluetooth and ensure visibility.
- On your phone, search for the car stereo's Bluetooth name and pair.
- Once paired, you can make/receive calls and play music wirelessly.
7.5. Digital Sound Processor (DSP)
The built-in DSP allows for advanced audio customization to optimize sound quality in your vehicle.
- Access the DSP settings from the app menu.
- Adjust the 15-band graphic equalizer to fine-tune frequency response.
- Utilize special sound effects like Equiloudness, Surround system enhancement, Cut Frequency, Dynamic Bass adjustment, and Subwoofer controls.
- Perform time correction to adjust sound field and time delay for optimal listening position.

Figure 7.3: The DSP interface, illustrating the 15-band graphic equalizer, options for special sound effects, and time correction settings for precise audio tuning.
7.6. Software Updates
Keep your unit up-to-date with convenient online firmware updates.
- Ensure the car stereo is connected to a stable internet connection (via WiFi hotspot).
- Navigate to Settings > System Update.
- Tap 'Check version' to see if new updates are available.
- Follow the on-screen instructions to download and install updates.

Figure 7.4: The system update screen, displaying the current software version and providing an option to check for new firmware updates.
8. Maintenance
To ensure the longevity and optimal performance of your car stereo, follow these maintenance guidelines:
- Cleaning: Use a soft, dry cloth to clean the screen and exterior. Avoid abrasive cleaners or solvents.
- Temperature: Avoid exposing the unit to extreme temperatures.
- Software: Regularly check for and install software updates to ensure system stability and access to new features.
- Connections: Periodically check all wiring connections to ensure they are secure and free from corrosion.
9. Troubleshooting
If you encounter issues with your car stereo, refer to the following common problems and solutions:
| Problem | Possible Cause | Solution |
|---|---|---|
| Unit does not power on. | Loose power connection, blown fuse. | Check power cables and connections. Inspect and replace the 15A fuse if blown. |
| No sound output. | Incorrect RCA cable connection, speaker wiring issue, DSP settings. | Ensure all RCA audio cables are correctly plugged into the unit. Check speaker wiring. Verify DSP output settings. |
| GPS not working or inaccurate. | GPS antenna not properly connected or positioned. | Ensure the GPS antenna is securely connected and placed in a location with a clear view of the sky. |
| Bluetooth connection issues. | Incorrect pairing, Bluetooth disabled. | Ensure Bluetooth is enabled on both the unit and your phone. Re-pair the devices. Clear Bluetooth cache if necessary. |
| Screen fails in colder weather. | Temperature sensitivity. | Allow the car's interior to warm up. If the issue persists, contact customer support. |
For persistent issues not covered here, please contact AMASE AUDIO customer support.
10. Specifications
- Product Dimensions: 9.33 x 6.81 x 5.12 inches
- Item Weight: 2.64 pounds
- Operating System: Android 14.0
- Processor: Rockchip RK3562 Quad-core ARM Cortex-A53@2.0GHz
- RAM: 3GB
- ROM: 32GB
- Display Size: 7 inches (18 cm diagonal)
- Display Resolution: QLED 1024x600 pixels
- Connectivity: Bluetooth 5.0, 4G WiFi (5GHz/2.4GHz)
- Audio Output Mode: Stereo
- Surround Sound Channel Configuration: 4.0
- Color: Black
- Manufacturer: Amaseaudio
11. Warranty & Support
AMASE AUDIO provides a one-year warranty for this product. This warranty covers defected parts, excluding the screen (human-damaged parts are not included).
For technical support, warranty claims, or any inquiries, please contact AMASE AUDIO customer service through the platform where you purchased the product or visit the official AMASE AUDIO store online.
Please retain your proof of purchase for warranty purposes.


