1. Introduction
This manual provides comprehensive instructions for the installation, operation, maintenance, and troubleshooting of your Seagate Barracuda 2TB 3.5-inch SATA III Internal Hard Drive (Model ST2000DM008). Designed for desktop computers, this drive offers reliable storage for your data, applications, games, and media files.

Image 1.1: Front view of the Seagate Barracuda 2TB Internal Hard Drive, showcasing its sleek design and the Barracuda branding.
2. Setup and Installation
The Seagate Barracuda ST2000DM008 is an internal hard drive designed for desktop computer systems. Proper installation is crucial for optimal performance and data integrity.
2.1. System Requirements
- Available 3.5-inch drive bay in your desktop computer.
- Available SATA data port on your motherboard.
- Available SATA power connector from your power supply unit (PSU).
- Compatible operating system (e.g., Windows, macOS, Linux).
2.2. Physical Installation
- Power Off and Disconnect: Ensure your computer is completely powered off and unplugged from the power outlet.
- Open Computer Case: Remove the side panel of your computer case to access the internal components.
- Locate Drive Bay: Identify an available 3.5-inch drive bay. Some cases may require a drive caddy.
- Mount the Drive: Carefully slide the hard drive into the drive bay. Secure it with screws or the case's tool-less mechanism.
- Connect Cables:
- Connect one end of the SATA data cable to the hard drive and the other end to an available SATA port on your motherboard.
- Connect a SATA power cable from your PSU to the hard drive's power connector.
- Close Case and Power On: Replace the computer case panel and reconnect the power cable. Power on your computer.
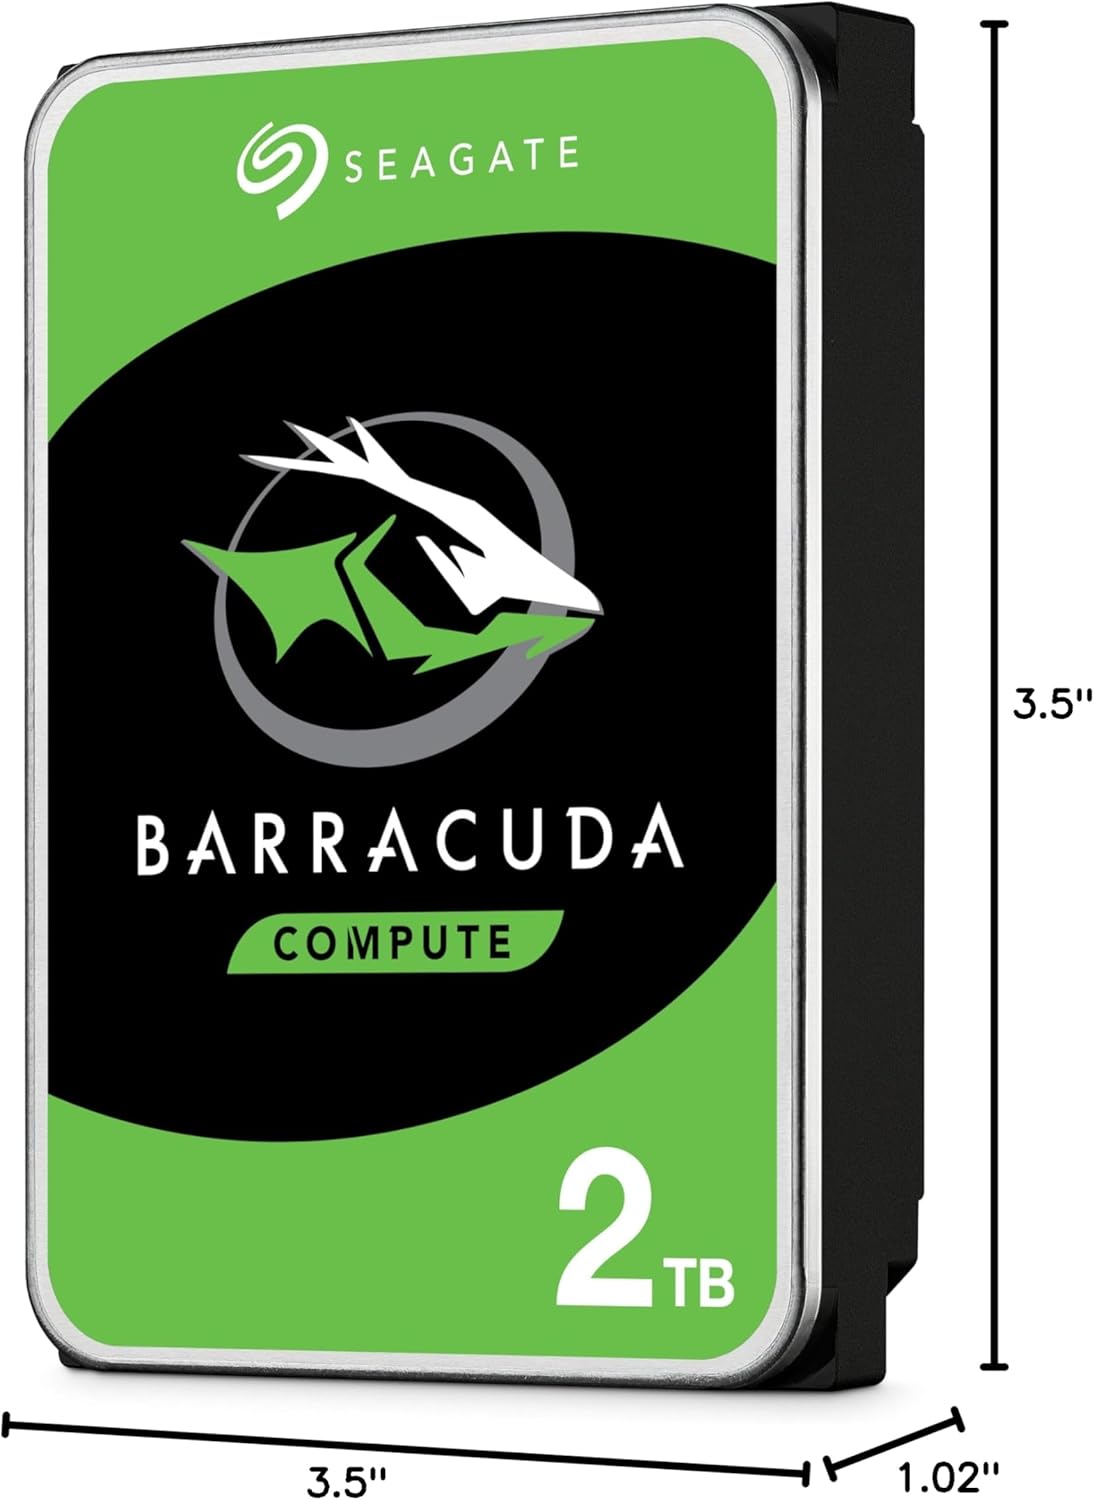
Image 2.1: Dimensions of the Seagate Barracuda 2TB Hard Drive, illustrating its 3.5-inch form factor and physical measurements for compatibility with desktop drive bays.
2.3. Software Setup (Initial Use)
After physical installation, the drive needs to be initialized, partitioned, and formatted by your operating system before it can be used for storage.
- Access Disk Management:
- Windows: Right-click on 'This PC' or 'My Computer', select 'Manage', then 'Disk Management'.
- macOS: Go to 'Applications' > 'Utilities' > 'Disk Utility'.
- Linux: Use a disk utility like GParted or the 'fdisk'/'parted' command-line tools.
- Initialize Disk: The new drive should appear as 'Unallocated Space'. You may be prompted to initialize it (e.g., MBR or GPT partition style). GPT is recommended for drives larger than 2TB.
- Create Partition(s): Create one or more partitions on the initialized disk.
- Format Partition(s): Format the partition(s) with a suitable file system (e.g., NTFS for Windows, HFS+ or APFS for macOS, Ext4 for Linux).
- Assign Drive Letter/Mount Point: Assign a drive letter (Windows) or mount point (Linux) to the new partition(s).
3. Operating the Hard Drive
Once installed and formatted, your Seagate Barracuda hard drive functions as a standard storage device within your computer system. It is designed for continuous operation in a desktop environment.
3.1. Data Storage and Access
- File Management: Use your operating system's file explorer (e.g., Windows Explorer, macOS Finder) to save, copy, move, and delete files on the drive.
- Application Installation: Install software applications directly onto the drive.
- Media Storage: Store large media files such as videos, photos, and music.
- Gaming: Install and run games from the drive to utilize its capacity.
3.2. Performance
The drive utilizes a SATA 6Gb/s interface, providing high-speed data transfer rates for typical desktop usage. Actual performance may vary based on system configuration, file sizes, and workload.

Image 3.1: Illustrates the 'Store More' capability of the Seagate Barracuda drive, highlighting its suitability for storing a large volume of games, movies, and music files.
4. Maintenance and Care
Proper maintenance helps ensure the longevity and reliability of your hard drive.
- Regular Backups: Periodically back up important data to another storage device or cloud service. This is the most critical maintenance step to prevent data loss.
- Defragmentation (for HDDs): For Windows users, regularly defragmenting the drive can help optimize performance. macOS and Linux typically handle this automatically.
- Check Drive Health: Use disk utility tools provided by your operating system or third-party software to monitor the drive's S.M.A.R.T. status and overall health.
- Keep System Cool: Ensure adequate airflow within your computer case to prevent the drive from overheating.
- Avoid Physical Shocks: Hard drives are sensitive to physical impact. Avoid moving or bumping your computer while it is operating.
- Software Updates: Keep your operating system and drivers updated to ensure compatibility and optimal performance.

Image 4.1: Depicts the 'Get Protected' feature, emphasizing Seagate Secure data protection, which contributes to the overall reliability of the drive.
5. Troubleshooting
If you encounter issues with your Seagate Barracuda hard drive, try the following common troubleshooting steps.
5.1. Drive Not Detected
- Check Cables: Ensure both the SATA data and power cables are securely connected to the drive and the motherboard/PSU.
- Check BIOS/UEFI: Verify that the SATA port the drive is connected to is enabled in your computer's BIOS/UEFI settings.
- Try Different Port/Cable: Test the drive with a different SATA data cable, power cable, or motherboard SATA port.
- Check Power Supply: Ensure your PSU has sufficient wattage and available connectors.
- Disk Management: Check Disk Management (Windows) or Disk Utility (macOS) to see if the drive is detected but uninitialized or unformatted.
5.2. Slow Performance
- Check Disk Usage: Ensure the drive is not nearly full. Performance can degrade significantly when a drive is almost at capacity.
- Defragmentation: Perform a disk defragmentation (Windows) if the drive is heavily fragmented.
- S.M.A.R.T. Status: Check the drive's S.M.A.R.T. status for any warnings indicating potential failure.
- Background Processes: Close any unnecessary background applications that might be accessing the drive.
- Driver Updates: Ensure your motherboard's SATA drivers are up to date.
5.3. Unusual Noises
- Clicking/Grinding: Unusual clicking, grinding, or scraping noises often indicate a mechanical failure. Immediately back up any accessible data and consider replacing the drive.
- Vibration: Ensure the drive is securely mounted in its bay to prevent vibrations.
If these steps do not resolve the issue, please refer to the support section or contact Seagate customer support.
6. Specifications
Key technical specifications for the Seagate Barracuda 2TB Internal Hard Drive (Model ST2000DM008).
| Feature | Description |
|---|---|
| Model Number | ST2000DM008 |
| Digital Storage Capacity | 2000 GB (2 TB) |
| Hard Disk Interface | SATA 6 GB/s |
| Form Factor | 3.5 Inches |
| Hard Disk Description | Mechanical Hard Disk (HDD) |
| Compatible Devices | Desktop Computers |
| Installation Type | Internal Hard Drive |
| Item Weight | 7 ounces (approx. 198 grams) |
| Product Dimensions (LxWxH) | 5.78 x 4.01 x 0.8 inches (approx. 14.68 x 10.19 x 2.03 cm) |
7. Warranty Information
The Seagate Barracuda ST2000DM008 Internal Hard Drive typically comes with a 2-year limited warranty from the date of purchase. This warranty covers defects in materials and workmanship under normal use.
For complete details regarding warranty terms, conditions, and limitations, please refer to the official Seagate warranty statement available on their website or contact Seagate customer support. Keep your proof of purchase for warranty claims.

Image 7.1: Highlights the 'Trusted Durability' of the Seagate Barracuda drive, backed by a 2-year limited warranty, ensuring peace of mind for users.
8. Customer Support
For further assistance, technical support, or to register your product, please visit the official Seagate support resources:
- Seagate Official Website: www.seagate.com/support/
- Seagate Brand Store on Amazon: Visit Seagate Store
You may also find helpful resources, FAQs, and driver downloads on their support pages.


