
1. Product Overview
The LIXIL Lasissa S Top-Hung Single Sliding Door is designed for interior use, offering a sleek and functional solution for dividing spaces. This model, ASUK-LAB 1820N, features a non-casing frame, a brake function for smooth operation, and comes in a Crea Ivory finish with a left-hand configuration and a Shine Nickel handle. Its dimensions are W: 1,824mm x H: 2,023mm.
Key Features:
- Size: 1820 (W: 1,824mm x H: 2,023mm) - Note: W and H are dimensions from the installation drawing.
- Handle: Shine Nickel finish.
- Function: Integrated brake mechanism for controlled closing.
- Frame: Non-casing frame, 115mm width (compatible with wall thickness 76-100mm).
- Floor Trim: Not included.
- Customization: Handle color can be changed to Iron Black or Dark Amber upon request.
2. Package Contents
Please verify that all components are present and undamaged before proceeding with installation.
- Door Panel (1)
- Top Rail and Bottom Guide (1 set)
- Frame Components (Vertical and Horizontal members)
- Handle Set (1)
- Brake Mechanism (Pre-installed or separate)
- Installation Hardware (Screws, brackets, etc.)
- Instruction Manual (This document)

Image: The LIXIL Lasissa S Top-Hung Single Sliding Door in Crea Ivory finish.

Image: Available color variations including Pure White, Crea Ivory, Crea Pearl, Crea Oak, Crea Mocha, and Crea Dark.
3. Safety Information
WARNING: Improper installation or use can lead to injury or product damage. Always follow these safety guidelines.
- Always wear appropriate personal protective equipment (PPE) such as gloves and safety glasses during installation.
- Ensure the installation area is clear of obstructions and well-lit.
- Handle large and heavy components with care. It is recommended to have at least two people for installation.
- Verify wall structure and ensure it can support the weight of the door and frame.
- Do not modify the product components. Use only original LIXIL parts.
- Keep children and pets away from the installation area.
- After installation, ensure the door operates smoothly and the brake function is working correctly.
4. Installation Guide
4.1 Pre-Installation Checklist
- Confirm product model and specifications match your order.
- Inspect all components for damage.
- Ensure the wall opening dimensions are suitable for the door and frame.
- Verify the wall thickness is compatible with the 115mm non-casing frame (76-100mm wall thickness).
4.2 Tools Required
- Measuring Tape
- Level
- Drill and appropriate drill bits
- Screwdriver (Phillips head)
- Hammer
- Utility Knife
- Pencil
4.3 Step-by-Step Installation
Follow the detailed diagrams and instructions provided with the physical product for precise installation. The following steps are a general overview:
- Prepare the Opening: Ensure the wall opening is clean, plumb, and square.
- Assemble the Frame: Connect the vertical and horizontal frame members according to the product-specific instructions. Pay attention to the frame type (non-casing) and ensure correct orientation.
- Install the Frame: Carefully insert the assembled frame into the wall opening. Use shims to ensure it is perfectly level and plumb. Secure the frame to the wall studs using appropriate screws.
- Install the Top Rail and Bottom Guide: Attach the top rail to the header of the frame and the bottom guide to the floor, ensuring they are parallel and aligned.
- Attach the Door Panel: Lift the door panel and engage the rollers with the top rail. Carefully lower the door onto the bottom guide.
- Install the Handle: Attach the Shine Nickel handle to the door panel as per the instructions.
- Adjust and Test: Adjust the door's height and alignment as needed. Test the sliding action and the brake function to ensure smooth and controlled operation.
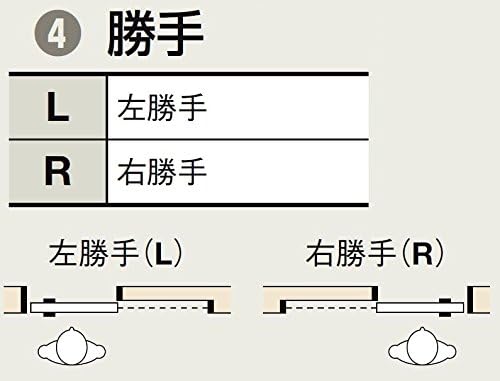
Image: Handing Diagram. 'L' indicates Left Hand (door slides to the left when viewed from the front), 'R' indicates Right Hand (door slides to the right).

Image: Frame Dimensions Table. This table shows various non-casing frame types (AA, AB, AC, AD, AE) with their corresponding frame depths (95mm, 115mm, 156mm, 171mm, 180mm) and compatible wall thicknesses (64-75mm, 76-100mm, 116-130mm, 131-145mm, 146-160mm). This product uses the 115mm frame (AB type).

Image: Detailed Technical Drawing. This diagram illustrates the cross-sectional view and various dimensions for the standard single sliding door with a non-casing frame. It includes measurements for the frame, door panel, and effective opening dimensions (W and H).
5. Operation
5.1 Opening and Closing
To open the door, gently pull the handle in the direction of the slide. To close, push the door until it reaches the closed position. Avoid slamming the door to prevent damage to the brake mechanism and frame.
5.2 Brake Function
This door is equipped with a brake function to ensure a soft and controlled closing. As the door approaches the closed position, the brake mechanism will engage, slowing the door's movement and preventing abrupt impacts. No user adjustment is typically required for this function.
6. Maintenance
6.1 Cleaning
- Wipe the door panel and frame with a soft, damp cloth.
- For stubborn stains, use a mild, non-abrasive cleaner. Avoid harsh chemicals or abrasive materials that could damage the finish.
- Clean the top rail and bottom guide periodically to remove dust and debris that could impede smooth operation.
6.2 Lubrication
The rollers and sliding mechanisms are designed for long-term smooth operation. If you notice any stiffness or squeaking, apply a small amount of silicone-based lubricant to the top rail and roller components. Do not use oil-based lubricants as they can attract dust.
6.3 Regular Checks
- Periodically check all screws and fasteners to ensure they are tight.
- Inspect the door for any signs of wear or damage.
- Ensure the brake mechanism is functioning correctly.
7. Troubleshooting
| Problem | Possible Cause | Solution |
|---|---|---|
| Door does not slide smoothly. | Debris in rail/guide; rollers are dirty or dry; misalignment. | Clean rails and guides. Lubricate rollers with silicone spray. Check frame and door for proper alignment. |
| Brake function not working. | Brake mechanism obstructed or damaged. | Inspect the brake mechanism for obstructions. If damaged, contact LIXIL support for replacement parts. |
| Door is difficult to open/close. | Misalignment; worn rollers; debris. | Check alignment. Clean and lubricate rollers. If rollers are worn, they may need replacement. |
| Door makes squeaking noises. | Lack of lubrication; loose components. | Apply silicone lubricant to rollers and rail. Tighten any loose screws. |
8. Specifications
| Attribute | Value |
|---|---|
| Brand | LIXIL |
| Model Number | ASUK-LAB 1820N |
| Door Type | Top-Hung Single Sliding Door |
| Dimensions (W x H) | 1,824mm x 2,023mm |
| Frame Type | Non-Casing Frame (115mm width) |
| Body / Frame Color | Crea Ivory (WA) |
| Handing | Left Hand |
| Handle | Shine Nickel |
| Lock | None |
| Floor Trim | None |
| Function | Brake Mechanism |
| Manufacturer | LIXIL |
| First Available Date | July 12, 2018 |
9. Warranty and Support
LIXIL products are manufactured to high-quality standards. For specific warranty details, please refer to the warranty card included with your purchase or visit the official LIXIL website. Warranty terms may vary based on region and product type.
For technical support, replacement parts, or any inquiries regarding your LIXIL Lasissa S door, please contact LIXIL customer service or your authorized dealer. Please have your model number (ASUK-LAB 1820N) and purchase information ready when contacting support.
Note: This product is made-to-order. Cancellations are not accepted after an order has been placed. Please ensure all specifications are correct before ordering.