
LoraTap SS012KS-868
LoraTap Wireless Light Switch Kit User Manual
Model: SS012KS-868
Product Overview
The LoraTap Wireless Light Switch Kit provides a convenient and flexible solution for controlling lighting and electric appliances without the need for new wiring. This kit includes a portable wireless switch and two relay receivers, offering extended control range and easy installation.

Image: The LoraTap Wireless Light Switch Kit, featuring two compact relay receivers and a round, white wireless switch with 'ON' and 'OFF' buttons.
Key Features
- Extended Control Range: Operates up to 30 meters (98 feet) indoors and 200 meters (656 feet) outdoors, effectively controlling devices even through walls.
- High Power Capacity: Each relay receiver can control loads up to 2500W (85-265V AC), suitable for various lighting and electric appliances.
- Long-Lasting Battery: The wireless switch includes an integrated CR2032 battery with a lifespan of over 10 years, supporting more than 220,000 clicks.
- Flexible Installation: The switch is removable from its magnetic base, allowing it to function as a portable remote control. The base can be fixed to a wall using the included double-sided adhesive.
- Dual Zone Control: One wireless switch can control lights in two different zones, enhancing convenience.
Setup and Installation
1. Receiver Wiring
The relay receiver must be wired between the power source and the lamp or appliance. Ensure power is off before wiring.
- Turn off the main power supply to the circuit you will be working on.
- Connect the Hot Wire (L) from the power source to the 'L' input terminal on the receiver.
- Connect the Neutral Wire (N) from the power source to the 'N' input terminal on the receiver.
- Connect the Load Wire (L) from the lamp/appliance to the 'L' output terminal on the receiver.
- Connect the Neutral Wire (N) from the lamp/appliance to the 'N' output terminal on the receiver.
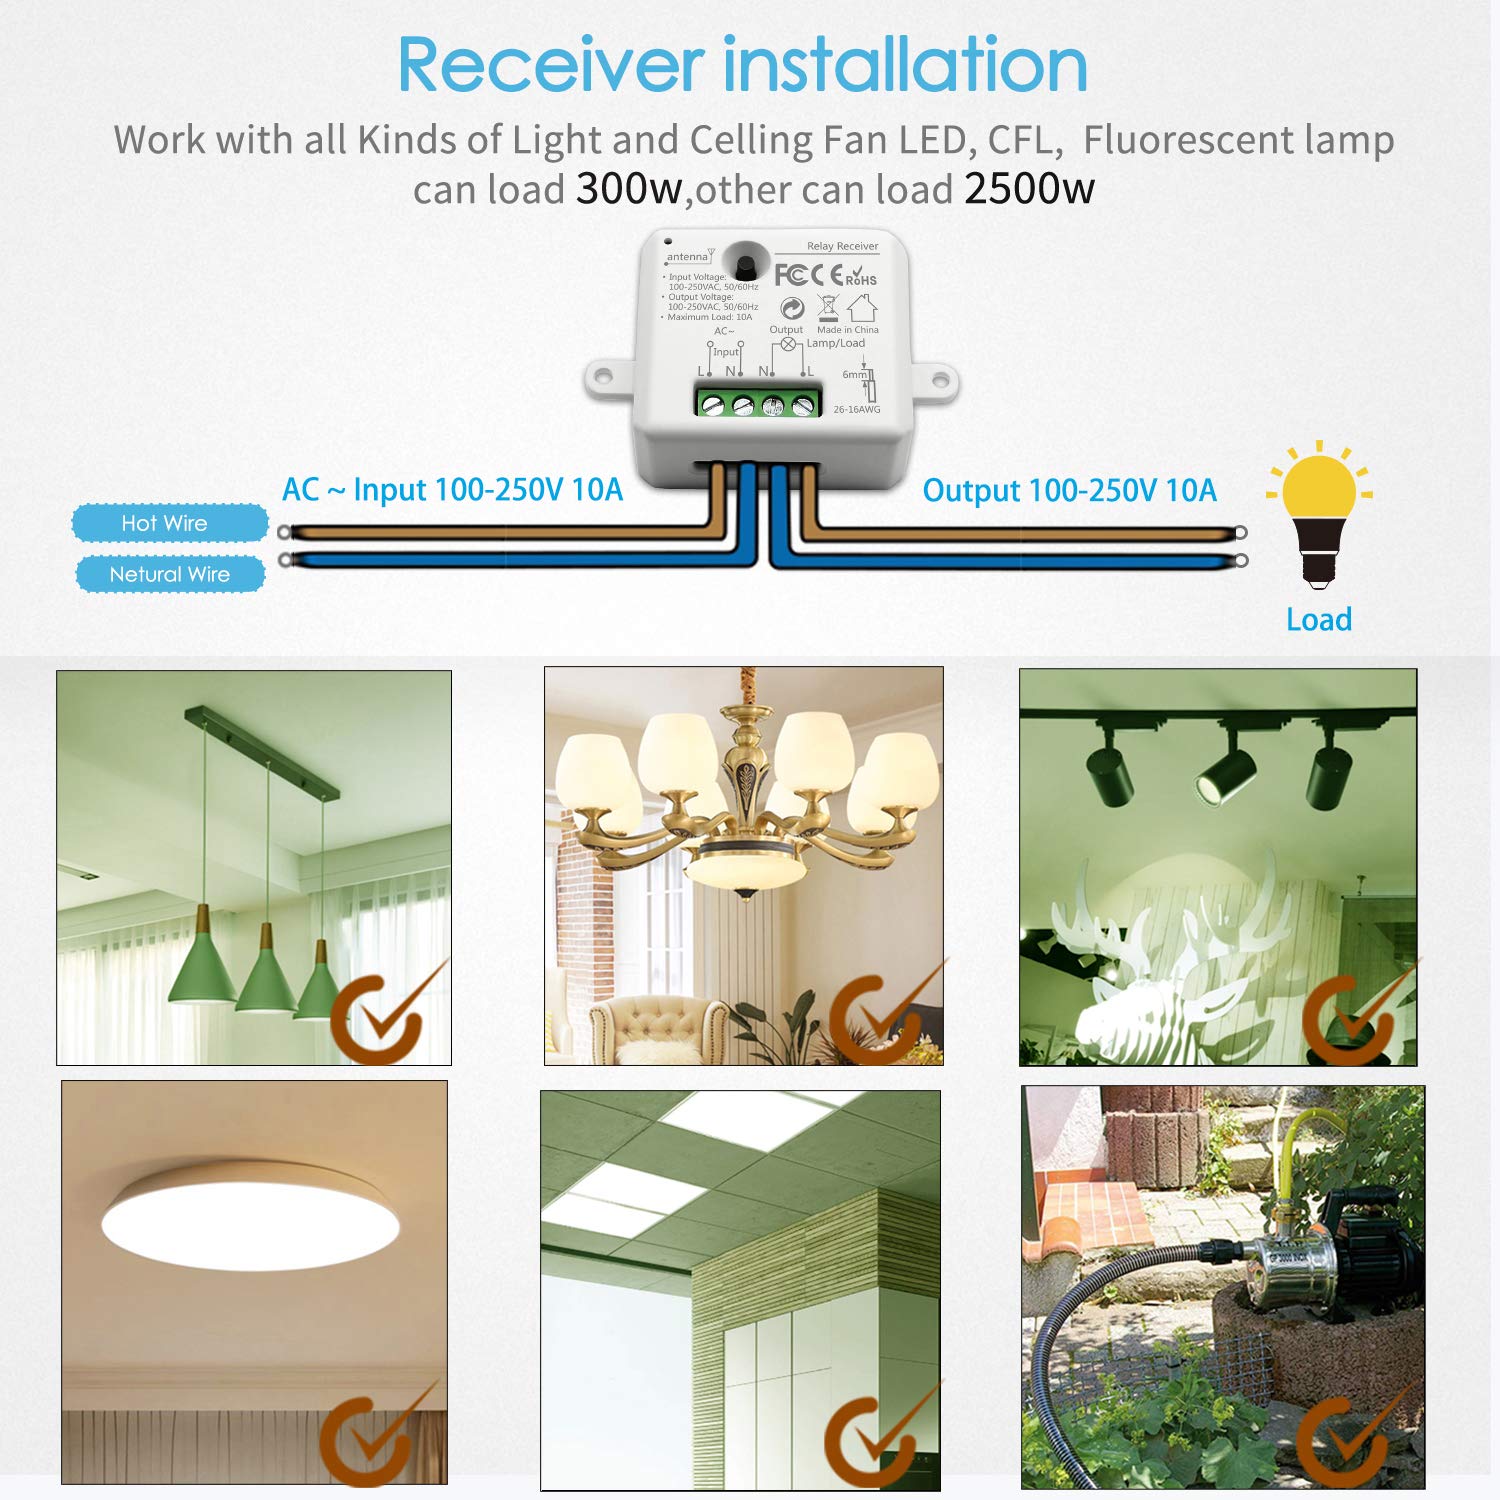
Image: A detailed wiring diagram illustrating how to connect the LoraTap relay receiver between the AC input (Hot and Neutral wires) and the load (lamp/appliance), with terminals clearly labeled.
The receiver is compatible with various loads, including LED, CFL, and fluorescent lamps (up to 300W) and other appliances (up to 2500W).
2. Wireless Switch Placement
The wireless switch can be used as a portable remote or mounted on a wall.
- Portable Use: Simply remove the switch from its magnetic base for handheld operation.
- Wall Mounting: Use the included double-sided adhesive to fix the switch's magnetic base to any desired wall surface. The switch can then be magnetically attached to or removed from this base.

Image: Demonstrates the versatility of the LoraTap wireless switch, showing it used as a handheld remote, mounted on a wall, and held by a user while reading, highlighting its magnetic base feature.
Operating Instructions
Pairing the Switch and Receiver
The switch and receiver are typically pre-paired. If re-pairing is needed or for adding additional switches/receivers:
- Ensure the receiver is powered on.
- Press and hold the pairing button on the receiver (usually a small button near the terminals) until the indicator light flashes.
- Within 5 seconds, press any button on the wireless switch. The receiver's indicator light will stop flashing, indicating successful pairing.
Basic Operation
- Press the "ON" button on the wireless switch to turn on the connected light or appliance.
- Press the "OFF" button on the wireless switch to turn off the connected light or appliance.
The kit supports controlling multiple lights or appliances with one switch, or controlling one light/appliance with multiple switches.

Image: Illustrates how a single LoraTap wireless switch can control lighting in two separate areas, demonstrating its multi-zone control capability.
Maintenance
- Cleaning: Wipe the switch and receiver with a soft, dry cloth. Do not use abrasive cleaners or solvents.
- Battery Replacement: The CR2032 battery in the wireless switch has a long lifespan (over 10 years). If the switch becomes unresponsive, the battery may need replacement. Refer to the switch's casing for instructions on opening the battery compartment.
- Environmental Conditions: Avoid exposing the devices to extreme temperatures, high humidity, or direct water contact.
Troubleshooting
| Problem | Possible Cause | Solution |
|---|---|---|
| Light/Appliance does not respond to switch. |
|
|
| Reduced control range. |
|
|
Specifications
| Feature | Detail |
|---|---|
| Model Number | SS012KS-868 |
| Brand | LoraTap |
| Operating Voltage (Receiver) | 85-265V AC |
| Maximum Load (Receiver) | 2500W (General Appliances), 300W (LED/CFL/Fluorescent) |
| Current Rating | 10 A |
| Control Range (Indoor) | 30-60 meters (98-197 feet) |
| Control Range (Outdoor) | 200 meters (656 feet) |
| Wireless Switch Battery | 1 x CR2032 Lithium Metal (included) |
| Wireless Switch Lifespan | >10 years / >220,000 clicks |
| Material | Plastic |
| Switch Type | Wireless Switch |
| Operating Mode | ON-ON-OFF |
| Dimensions (Wireless Switch) | 68mm diameter, 16mm thickness |
| Dimensions (Receiver) | 48mm x 42mm x 23mm |

Image: Illustrates the compact dimensions of both the LoraTap wireless switch (68mm diameter, 16mm thickness) and the relay receiver (48mm x 42mm x 23mm).

Image: Depicts the effective control range of the LoraTap system, showing indoor range of 30-60 meters and outdoor range of 200 meters, with illustrations of the switch and receiver.
Warranty Information
This LoraTap Wireless Light Switch Kit comes with a 5-year warranty from the date of purchase. This warranty covers defects in materials and workmanship under normal use. Please retain your proof of purchase for warranty claims.
Customer Support
For technical assistance, troubleshooting, or warranty inquiries, please contact LoraTap customer support through the retailer's platform or the official LoraTap website. Please have your product model number (SS012KS-868) and purchase details ready when contacting support.
Ask a question about this manual
Ask about setup, troubleshooting, compatibility, parts, safety, or missing instructions. Manuals+ will review the question and use this page’s manual context to help answer it.