
SRAM NX Eagle DUB Boost Crankset
SRAM NX Eagle DUB Boost Crankset Instruction Manual
Model: NX Eagle DUB Boost Crankset (SRAM-CK2941)
1. Introduction and Overview
This manual provides essential information for the installation, operation, and maintenance of your SRAM NX Eagle DUB Boost Crankset. Please read this manual thoroughly before attempting any installation or maintenance procedures to ensure proper function and safety.
The SRAM NX Eagle DUB Boost Crankset is a high-performance component designed for 12-speed mountain bike drivetrains. It features durable 6000 series forged aluminum arms, a DUB spindle for enhanced compatibility and longevity, and a direct mount X-Sync 2 steel chainring for precise chain retention.
Key Features:
- Durable Construction: 6000 series forged aluminum crank arms.
- DUB Technology: Optimized spindle design for improved bottom bracket compatibility, sealing, and contamination prevention.
- 12-Speed Compatibility: Designed for use with SRAM Eagle 12-speed drivetrains.
- BOOST 148 Spacing: Engineered for BOOST 148 frame spacing.
- X-Sync 2 Chainring: Direct mount 32-tooth steel chainring for superior chain retention and wear resistance.
- Direct Mount Interface: 3-bolt direct mount chainring for easy installation and optimal clearance.

Figure 1.1: Front view of the SRAM NX Eagle DUB Boost Crankset with 32T X-Sync 2 steel chainring.
2. Safety Information
Always wear appropriate safety gear, including eye protection and gloves, when installing or maintaining bicycle components. If you are unsure about any part of the installation or maintenance process, consult a qualified bicycle mechanic.
- Read Instructions: Always read and understand all instructions before proceeding.
- Proper Tools: Use only the correct tools for installation and adjustment. Improper tools can damage components.
- Torque Specifications: Adhere strictly to all torque specifications provided by SRAM and your bicycle manufacturer. Overtightening or undertightening fasteners can lead to component failure or injury.
- Component Compatibility: Ensure all components are compatible with each other and your bicycle frame.
- Regular Inspection: Regularly inspect your crankset and other drivetrain components for wear, damage, or loose fasteners.
3. Package Contents
Verify that all components are present and undamaged before beginning installation.
- SRAM NX Eagle DUB Boost Crankset (Left and Right Crank Arms)
- SRAM X-Sync 2 Direct Mount 32T Steel Chainring
- Crank Arm Fixing Bolt
- User Manual (this document)
Note: Bottom bracket is sold separately and must be compatible with SRAM DUB technology and your frame's bottom bracket shell.
4. Setup and Installation
This section outlines the general steps for installing your SRAM NX Eagle DUB Boost Crankset. Refer to the detailed SRAM technical manual available on the SRAM website for comprehensive instructions and torque specifications.
Required Tools:
- 8mm Hex Wrench
- Torque Wrench
- Grease (e.g., SRAM Butter, general bicycle grease)
- Threadlocker (optional, for chainring bolts if applicable)
- Bottom Bracket Installation Tool (specific to your DUB bottom bracket)
Installation Steps:
- Prepare Bottom Bracket: Ensure your DUB compatible bottom bracket is correctly installed in your frame according to its manufacturer's instructions. The bottom bracket shell should be clean and faced if necessary.
- Install Chainring: If the chainring is not pre-installed, align the 3-bolt direct mount chainring with the right crank arm. Apply a small amount of threadlocker to the chainring bolts (if applicable) and tighten them to the manufacturer's specified torque.
- Grease Spindle: Apply a thin layer of grease to the DUB spindle of the right crank arm.
- Insert Crankset: Carefully slide the right crank arm with the chainring through the bottom bracket from the drive side of the bicycle.
- Install Left Crank Arm: Slide the left crank arm onto the DUB spindle from the non-drive side. Ensure the splines are correctly engaged.
- Tighten Crank Bolt: Insert the 8mm crank arm fixing bolt into the left crank arm. Using an 8mm hex wrench and a torque wrench, tighten the bolt to the specified torque (typically 54 N·m or 478 in·lb). This is a critical step for proper crankset function and safety.
- Check for Play: After tightening, check for any lateral play in the crankset. If play is present, re-check torque and ensure all components are correctly seated.
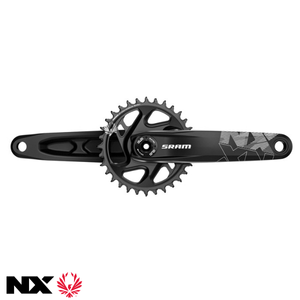
Figure 4.1: Close-up of the SRAM NX Eagle DUB Boost Crankset, highlighting the direct mount chainring interface.
5. Operating Instructions
Once installed, the SRAM NX Eagle DUB Boost Crankset operates as part of your bicycle's drivetrain. Proper operation involves smooth and efficient pedaling and shifting.
- Pedaling: Apply consistent and smooth pressure to the pedals. Avoid sudden, forceful impacts that could damage the crankset or chainring.
- Shifting: When shifting gears, ease off pedal pressure slightly to allow the chain to move smoothly between cogs. Avoid shifting under heavy load.
- Chainline: The Boost 148 spacing and 52mm chainline are designed for optimal shifting performance with compatible 12-speed Eagle drivetrains.
6. Maintenance
Regular maintenance is crucial for the longevity and performance of your crankset.
Cleaning:
- Clean the crankset and chainring regularly with a mild degreaser and a brush. Rinse thoroughly with water and dry.
- Avoid high-pressure washing directly on bearings, as this can force water and contaminants past seals.
Inspection:
- Crank Arms: Inspect crank arms for cracks, bends, or other signs of damage.
- Chainring: Check chainring teeth for excessive wear (e.g., 'shark fin' shape), bending, or damage. Worn chainrings can lead to poor shifting and chain retention.
- Bolts: Periodically check the crank arm fixing bolt and chainring bolts for proper torque.
- Bottom Bracket: Check the bottom bracket for smooth rotation and absence of play.
Lubrication:
- Keep your chain properly lubricated according to your chain manufacturer's recommendations.
- The DUB spindle and bottom bracket bearings are sealed and generally do not require external lubrication. Do not attempt to lubricate sealed bearings unless specifically instructed by SRAM.
7. Troubleshooting
This section addresses common issues you might encounter with your crankset.
Issue: Creaking Noise from Crankset Area
- Possible Cause: Loose crank arm fixing bolt.
- Solution: Re-torque the 8mm crank arm fixing bolt to 54 N·m (478 in·lb).
- Possible Cause: Loose chainring bolts.
- Solution: Check and re-torque chainring bolts.
- Possible Cause: Dry or improperly installed bottom bracket.
- Solution: Remove, clean, grease, and re-install the bottom bracket according to its manufacturer's instructions.
Issue: Poor Shifting Performance / Chain Drops
- Possible Cause: Worn chainring.
- Solution: Inspect chainring teeth for wear. Replace if necessary.
- Possible Cause: Incorrect chainline.
- Solution: Ensure the correct DUB bottom bracket spacers are used for your frame and Boost 148 spacing.
- Possible Cause: Worn chain or cassette.
- Solution: Inspect and replace chain and/or cassette if worn.
8. Specifications
| Specification | Detail |
|---|---|
| Brand | SRAM |
| Model Name | NX Eagle DUB Boost Crankset |
| Part Number | SRAM-CK2941 |
| Crank Arm Material | 6000 Series Forged Aluminum |
| Crank Arm Length | 165mm |
| Chainring | 32T X-Sync 2 Steel Direct Mount |
| Spindle Interface | SRAM DUB |
| Drivetrain Compatibility | 12-Speed Eagle |
| Boost Spacing | Yes (148mm rear hub spacing) |
| Chainline | 52mm |
| Color | Black |
| Item Weight | Approximately 1 Kilogram |
9. Warranty and Support
Limited Warranty:
SRAM products are covered by a limited warranty against defects in materials and workmanship. The specific terms and duration of the warranty may vary by region and product. Please retain your proof of purchase for warranty claims.
For detailed warranty information, please visit the official SRAM website or contact your local SRAM dealer.
Customer Support:
For technical assistance, troubleshooting, or spare parts inquiries, please contact SRAM customer support through their official website. You can also consult your authorized SRAM dealer or a professional bicycle mechanic.
SRAM Official Website: www.sram.com
Related documentsNX Eagle DUB Boost Crankset


Ask a question about this manual
Ask about setup, troubleshooting, compatibility, parts, safety, or missing instructions. Manuals+ will review the question and use this page’s manual context to help answer it.