Introduction
The DIGOO DG-TH8380 is a multifunctional wireless weather station designed to monitor indoor and outdoor temperature and humidity. It features a large LCD touchscreen display with a soft eye-care white backlight, a weather forecast function, and supports up to three outdoor sensors. This manual provides detailed instructions for setup, operation, maintenance, and troubleshooting.

Image: The DIGOO DG-TH8380 main display unit and its accompanying wireless outdoor sensor. The main unit shows time, indoor temperature and humidity, outdoor temperature and humidity, and a weather forecast icon. The outdoor sensor displays its current temperature and channel.
Package Contents
Verify that all items listed below are included in your package:
- 1 x DIGOO DG-TH8380 Wireless Touch Screen Weather Station Clock (Main Unit)
- 1 x DIGOO DG-TH8380 Wireless Outdoor Sensor
- 1 x DIGOO DG-TH8380 Full English User Manual
- 1 x USB Power Cable (Note: Charger and batteries are not included)
Specifications
| Feature | Description |
|---|---|
| Main Unit Dimensions | 14.1cm x 9.4cm x 2.2cm (5.6" x 3.7" x 0.9") |
| Display | LCD Touch Screen with Soft Eye-Care White Backlight |
| Indoor Temperature Range | 0°C ~ 50°C (32°F ~ 122°F) |
| Outdoor Temperature Range | -40°C ~ +60°C (-40°F ~ 140°F) |
| Humidity Range (Indoor & Outdoor) | 20% RH ~ 90% RH |
| Wireless Transmission Distance | Up to 100 meters (328 feet) in open area |
| Power Source (Main Unit) | 3 x AAA batteries or USB cable (batteries not included) |
| Power Source (Remote Sensor) | 2 x AAA batteries (batteries not included) |
| Mounting Options | Desktop stand or Wall-mount |
| Special Features | Touchscreen, Weather Forecast, 12/24 Hour Time, Calendar, Max/Min Temperature/Humidity Record, Low Battery Indicator, Supports up to 3 outdoor sensors |

Image: An overview showing the dimensions of the main unit (141mm x 95mm x 24mm) and various features including wall-mount capability, a table stand, battery power option, and the remote sensor.
Setup
1. Powering the Main Unit
- Open the battery compartment on the back of the main unit.
- Insert 3 x AAA batteries, ensuring correct polarity (+/-).
- Alternatively, connect the provided USB cable to the main unit and a USB power adapter (not included) for continuous power. Note: When powered by USB, the backlight will remain on. When battery-powered, the backlight activates for 20 seconds by pressing the top button.
- Close the battery compartment.
2. Powering the Outdoor Sensor
- Open the battery compartment on the back of the outdoor sensor.
- Insert 2 x AAA batteries, ensuring correct polarity (+/-).
- Close the battery compartment.
3. Pairing the Sensor(s)
The main unit will automatically search for the outdoor sensor upon initial power-up. Ensure the sensor is within range. If pairing does not occur automatically or if adding additional sensors:
- Place the outdoor sensor near the main unit during the pairing process.
- On the outdoor sensor, select a channel (1, 2, or 3) using the channel switch inside the battery compartment.
- On the main unit, press the "CH" touch button to cycle through channels until the desired sensor channel is displayed. The main unit supports up to 3 outdoor sensors.
- Allow a few minutes for the sensor to transmit data to the main unit.
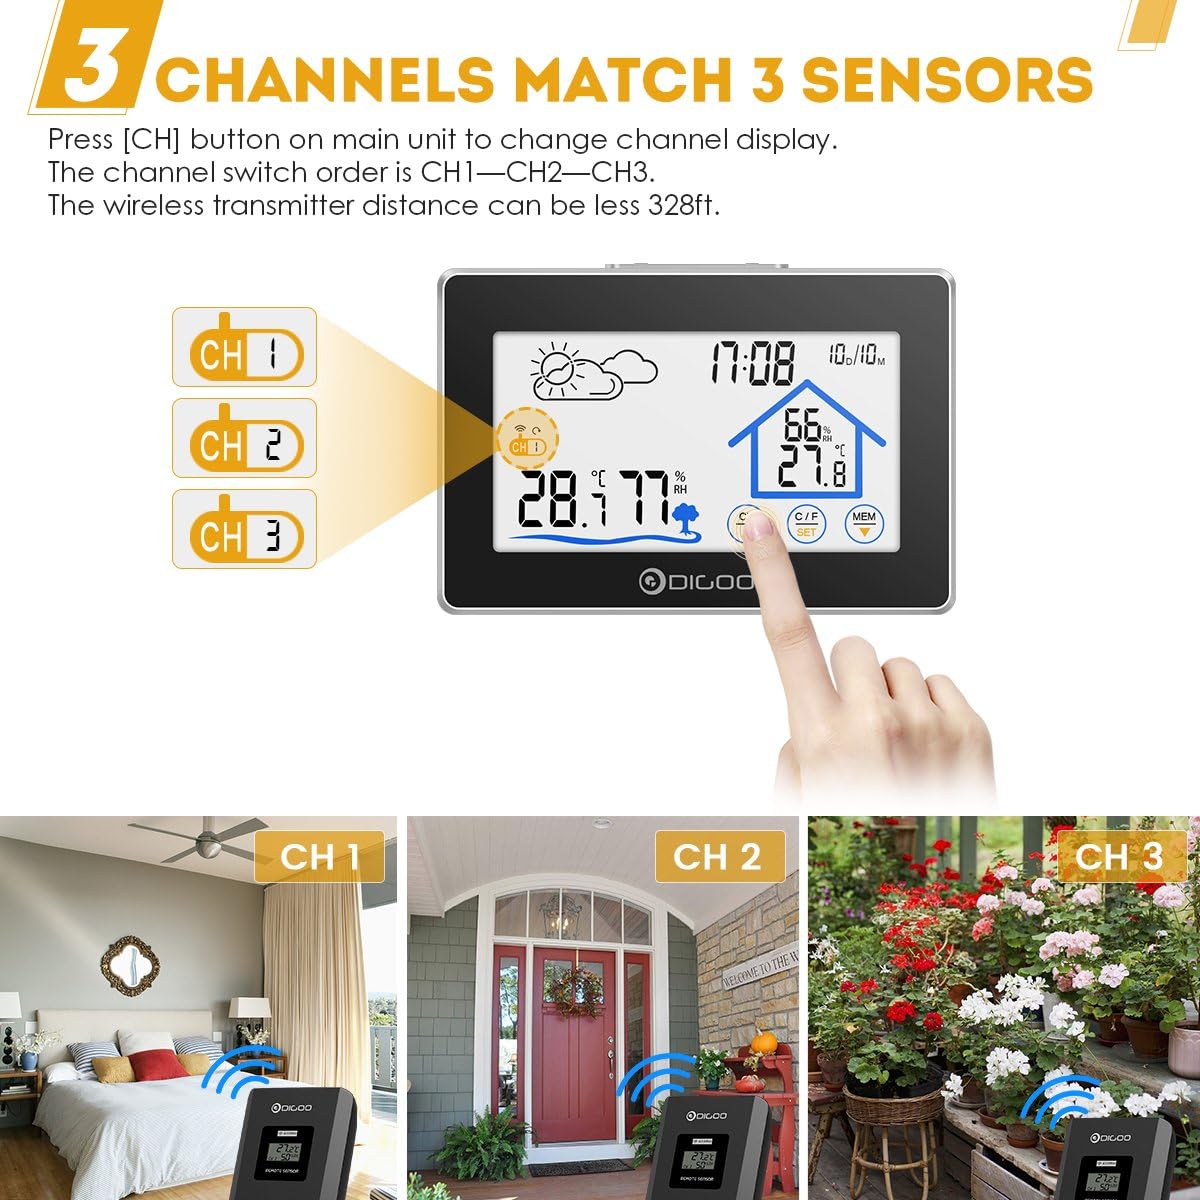
Image: The main unit display showing three channel indicators (CH 1, CH 2, CH 3) and a finger pressing the "CH" button to switch between them. This illustrates the multi-sensor capability.
4. Placement
- Main Unit: Place the main unit on a flat surface using its integrated stand or mount it on a wall using the hanging hole on the back. Choose a location away from direct sunlight or heat sources for accurate indoor readings.
- Outdoor Sensor: Place the outdoor sensor in a shaded, dry location, protected from direct rain and sunlight, to ensure accurate outdoor temperature and humidity readings. Ensure it is within the 100-meter wireless transmission range of the main unit.
Operating Instructions
Display Overview

Image: A detailed view of the main unit's LCD screen with labels pointing to key display elements: Weather Icon, Channel Display, Outdoor Temperature & Humidity, Backlight Button, Time & Date, Indoor Temperature & Humidity, and Touch Switch Buttons.
- Weather Icon: Displays current weather forecast (Sunny, Partly Cloudy, Cloudy, Rainy).
- Time & Date: Shows current time (12/24 hour format) and calendar.
- Indoor Temperature & Humidity: Displays readings from the main unit's internal sensor.
- Outdoor Temperature & Humidity: Displays readings from the currently selected outdoor sensor.
- Channel Display: Indicates which outdoor sensor channel (CH1, CH2, or CH3) is currently being displayed.
Touch Button Functions
The DIGOO DG-TH8380 features sensitive touch buttons for easy operation:
- CH (Channel) Button: Touch to switch between outdoor sensor channels (CH1, CH2, CH3).
- °C/°F (Unit) Button: Touch to toggle temperature display between Celsius (°C) and Fahrenheit (°F).
- MEM (Memory) Button: Touch to display the maximum and minimum temperature and humidity records for both indoor and outdoor readings. Press again to cycle through current, maximum, and minimum values.
- SET Button: Used for setting time and date. Press and hold to enter setting mode. Use UP/DOWN buttons to adjust values.
- UP/DOWN Buttons: Used to adjust values during setting mode.
- LIGHT Button (Top of Unit): Press to activate the backlight for 20 seconds (when battery-powered). When powered by USB, the backlight remains continuously on.
Setting Time and Date
- Press and hold the SET touch button until the time display starts flashing.
- Use the UP and DOWN touch buttons to adjust the hour.
- Press SET again to confirm the hour and move to the minute setting.
- Repeat the process for minutes, year, month, and day.
- Press SET one last time to exit the setting mode.

Image: The DIGOO DG-TH8380 main unit displaying its soft white backlight in a dimly lit room, illustrating its visibility at night.
Maintenance
- Cleaning: Wipe the main unit and sensor with a soft, dry cloth. Do not use abrasive cleaners or solvents.
- Battery Replacement: Replace batteries in both the main unit and outdoor sensor when the low battery indicator appears on the display. Ensure correct polarity.
- Storage: If storing the device for an extended period, remove all batteries to prevent leakage.
- Environmental Protection: Do not expose the outdoor sensor to direct water immersion or extreme weather conditions beyond its specified operating range.
Troubleshooting
| Problem | Possible Cause | Solution |
|---|---|---|
| No display on main unit. | Batteries are dead or incorrectly inserted; USB cable not connected or faulty. | Check battery polarity and replace if necessary. Ensure USB cable is securely connected to a working power source. |
| Outdoor temperature/humidity not displayed or inaccurate. | Sensor out of range; sensor batteries dead; incorrect channel selected; interference. | Move sensor closer to the main unit. Replace sensor batteries. Press "CH" button to select the correct channel. Avoid placing near large metal objects or strong electromagnetic sources. |
| Backlight not staying on (when battery powered). | Normal operation for battery mode. | The backlight is designed to turn off after 20 seconds to conserve battery. For continuous backlight, use USB power. |
| Weather forecast inaccurate. | Weather forecast is based on internal barometric pressure changes, not external data. | The weather station predicts weather for the next 12-24 hours based on atmospheric pressure trends. It may not always match local weather reports. Allow time for the unit to calibrate. |
Warranty and Support
DIGOO products are designed for reliability and performance. For any issues encountered during use, please refer to the troubleshooting section first.
If further assistance is required, please contact the seller or manufacturer's customer service. Information regarding warranty coverage and support channels is typically provided at the point of purchase or on the official DIGOO website.
Note: The product description mentions "Wolifui US Based Customer Service, 5 Days a Week (Business Days)" for warranty/refund inquiries. Please refer to your purchase documentation for specific contact details.


