
1. Introduction
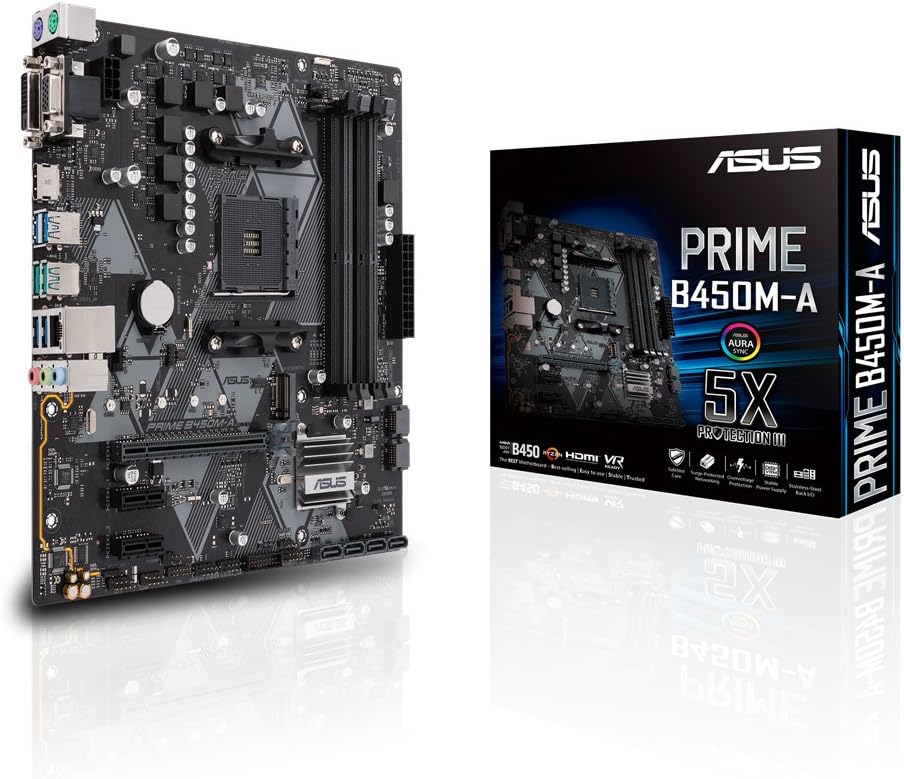
This manual provides essential information for the installation, operation, and maintenance of your ASUS Prime B450M-A motherboard. The ASUS Prime B450 Series motherboards offer a robust foundation for your PC build, designed to support AMD Ryzen processors with flexibility for future upgrades.
Key features include comprehensive cooling solutions, ultra-fast connectivity options, and multiple hardware safeguards for system protection.
2. Setup and Installation
Follow these steps for proper installation of your motherboard and its components.
2.1. CPU Installation
The ASUS Prime B450M-A motherboard supports AMD AM4 socket processors. Carefully align your AMD Ryzen CPU with the socket, ensuring the golden triangle on the CPU matches the triangle on the socket. Gently lower the CPU into place and secure it with the retention lever.
2.2. RAM Installation
This motherboard features two DIMM slots, supporting up to 32GB of DDR4 memory. Supported speeds range from 2133 MHz up to 3466 MHz (O.C.). Ensure the memory modules are correctly oriented and firmly seated in the slots until the clips lock into place.
2.3. Storage Installation
The motherboard includes an M.2 socket 3 with M Key, supporting Type 2242/2260/2280 storage devices. This M.2 slot supports both PCIe 3.0 x4 mode (up to 32Gb/s data transfer speeds) and SATA mode storage devices. Additionally, there are four Serial ATA 6.0 Gb/s connectors with RAID 0, RAID 1, and RAID 10 support for traditional hard drives and SSDs.
2.4. Expansion Cards
The board provides one PCI Express 3.0 x16 slot and two PCI Express 2.0 x1 slots for graphics cards and other expansion cards. The SafeSlot Core design fortifies the PCIe slot with solid soldering for enhanced durability.

2.5. Rear I/O Panel Connectivity
The rear I/O panel offers a variety of ports for external devices:
- Video Outputs: D-Sub Port, DVI-D Port.
- USB Ports: USB 3.1 Gen 1 Ports (blue), USB 3.1 Gen 2 Ports (teal).
- Network: LAN (RJ-45) port.
- Audio: 8-Channel High Definition Audio ports.
- Legacy Ports: PS/2 keyboard/mouse combo ports.

2.6. Internal Connectors
The motherboard includes internal headers for additional connectivity, such as 2 x Front USB 3.1 Gen 1 ports, and various fan headers including a 4-pin PWM/DC Fan header.
2.7. Motherboard Unboxing and Overview (Similar Model)
This video provides an unboxing and overview of a similar ASUS B450M series motherboard, demonstrating the components and layout. While the model shown is B450M-K, many aspects are applicable to the B450M-A.
3. Operating Your System
After successful hardware installation, you can proceed with operating your system.
3.1. BIOS/UEFI Setup
The motherboard features an intuitive UEFI BIOS for system configuration. Access the BIOS during startup by pressing the designated key (usually DEL or F2). Here, you can configure boot options, monitor system status, adjust fan speeds with FAN Xpert software, and enable features like XMP for memory optimization.
3.2. Driver Installation
Install the necessary drivers for your operating system from the provided support DVD or by downloading the latest versions from the ASUS official website. This includes chipset drivers, audio drivers, LAN drivers, and any other utility software like ASUS AI Suite 3 for system management.
4. Maintenance
Regular maintenance ensures the longevity and optimal performance of your motherboard.
4.1. Cleaning
Periodically clean dust from the motherboard and components using compressed air. Ensure the system is powered off and unplugged before cleaning.
4.2. BIOS Updates
Check the ASUS support website for the latest BIOS updates. Updating the BIOS can improve system stability, add support for new CPUs, and enhance performance. Follow the instructions provided by ASUS carefully during the update process.
4.3. ASUS 5X Protection III
The ASUS Prime B450M-A is built with 5X Protection III, employing high-quality components and circuit design for enhanced durability and reliability. This includes:
- SafeSlot Core: Fortified PCIe slot with solid soldering.
- LANGuard: Hardware-level networking protection against surges and static electricity.
- Overvoltage Protection: Circuit-protecting power design.
- DIGI+ VRM: Precision control for stable power delivery.
- Stainless-Steel Back I/O: 3X corrosion-resistance for greater durability.
5. Troubleshooting
If you encounter issues, refer to the following common troubleshooting steps:
- No Power: Ensure all power cables (24-pin ATX, 8-pin CPU) are securely connected. Check power supply functionality.
- No Display: Verify that the graphics card is properly seated and connected to the monitor. If using integrated graphics, ensure your CPU supports it and the monitor is connected to the motherboard's video output.
- System Instability: Check RAM seating and compatibility. Ensure CPU cooler is properly installed. Update BIOS and drivers to the latest versions.
- Component Not Detected: Re-seat the component (RAM, GPU, M.2 SSD, SATA drives). Check cable connections. Verify BIOS settings for component detection.
For more detailed troubleshooting, consult the comprehensive user manual available on the ASUS support website.
6. Specifications
| Category | Specification |
|---|---|
| Brand | ASUS |
| Series | Prime B450M-A |
| Item Model Number | 90MB0YR0-M0EAY0 |
| CPU Socket | Socket AM4 |
| Compatible Processors | AMD AM4 |
| Chipset Type | AMD B450 |
| RAM Memory Technology | DDR4 |
| RAM (Max) | 32 GB DDR4 |
| Memory Speed | 3200 MHz (up to 3466 O.C.) |
| Number of USB 2.0 Ports | 2 (internal headers) |
| Item Weight | 15.8 ounces |
| Product Dimensions | 9.61 x 9.61 x 1.18 inches |
| Color | Black |
| Platform | Windows 10, Windows 7 |
7. Warranty and Support
For warranty information, technical support, and driver downloads, please visit the official ASUS support website. You can find detailed warranty terms and conditions, as well as contact information for customer service.
ASUS Support Website: www.asus.com/support/