1. Introduction
Thank you for choosing the Easytry123 Replacement Remote Control. This manual provides essential information for the proper setup, operation, and maintenance of your new remote control. This remote is designed as a direct replacement for specific Daikin air conditioner models. Please ensure your original remote matches the appearance of this replacement for optimal compatibility.
Important Note: This is a replacement remote. While it replicates the primary functions of the original, some advanced or specific features of your air conditioner unit may require the original manual for full understanding or may not be fully supported by this replacement. Always refer to your air conditioner's original manual for detailed operational instructions of the AC unit itself.
2. Product Overview
The Easytry123 replacement remote control is an infrared (IR) device designed for ease of use. It features a clear LCD display and tactile buttons for controlling various functions of your compatible Daikin air conditioner.
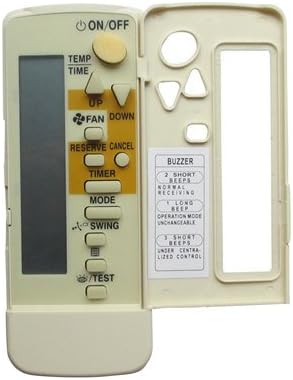
Figure 2.1: Front view of the remote control with the hinged cover open.
This image displays the front of the remote control. The top section features an LCD screen and primary function buttons such as ON/OFF, TEMP, TIME, FAN, RESERVE/CANCEL, TIMER, MODE, SWING, and TEST. A hinged cover on the right side opens to reveal additional control buttons and a label detailing buzzer indications.

Figure 2.2: Angled view of the remote control with the hinged cover open.
An angled perspective of the remote control, showing the LCD screen and main buttons on the left, and the open compartment on the right with secondary buttons and a buzzer guide.
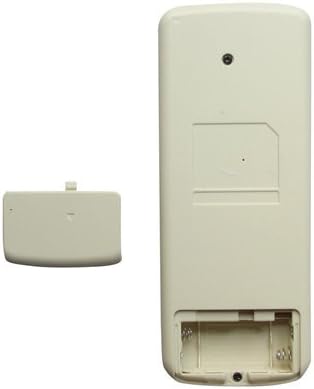
Figure 2.3: Back view of the remote control with the battery compartment open.
The rear view of the remote control, illustrating the battery compartment designed for two AAA batteries. The battery cover is shown detached next to the remote.
3. Setup
3.1 Battery Installation
Your remote control requires two (2) AAA batteries (not included) for operation. Follow these steps to install the batteries:
- Locate the battery compartment on the back of the remote control.
- Press down on the tab and slide the battery cover downwards to open it.
- Insert two AAA batteries, ensuring the positive (+) and negative (-) terminals align correctly with the markings inside the compartment.
- Slide the battery cover back into place until it clicks securely.
Note: Remove batteries if the remote control will not be used for an extended period to prevent leakage.
4. Operating Instructions
To operate your air conditioner, point the remote control directly at the indoor unit's receiver. Ensure there are no obstructions between the remote and the unit.
4.1 Basic Functions
- ON/OFF: Press this button to turn the air conditioner unit on or off.
- TEMP (Up/Down Arrows): Use these buttons to adjust the desired temperature setting.
- FAN (Up/Down Arrows): Controls the fan speed. Press to cycle through available fan speed settings (e.g., Low, Medium, High, Auto).
- MODE: Selects the operating mode of the air conditioner (e.g., Cool, Heat, Fan, Dry, Auto).
- SWING: Activates or deactivates the automatic swing function of the air deflector.
- TIMER: Used to set the on/off timer for the air conditioner. Refer to your AC unit's manual for detailed timer programming.
- RESERVE/CANCEL: Typically used in conjunction with the timer function to confirm or cancel settings.
- TEST: This button is usually for service or diagnostic purposes. Avoid pressing it during normal operation unless instructed by a qualified technician.
- TIME (Up/Down Arrows): Adjusts the time displayed on the remote or used for timer settings.
4.2 Buzzer Indications
The remote control provides audible feedback through a buzzer. The indications are as follows:
| Beeps | Indication |
|---|---|
| 2 Short Beeps | Normal Receiving |
| 1 Long Beep | Operation Mode Unchangeable |
| 3 Short Beeps | Under Centralized Control |
5. Maintenance
- Cleaning: Wipe the remote control with a soft, dry cloth. Do not use liquid cleaners or abrasive materials.
- Battery Replacement: Replace batteries when the display becomes dim or the remote's range decreases. Always replace both batteries at the same time with new ones of the same type.
- Storage: If not using the remote for an extended period, remove the batteries to prevent corrosion and store it in a cool, dry place.
- Avoid Exposure: Do not expose the remote control to direct sunlight, high temperatures, or high humidity.
6. Troubleshooting
If you experience issues with your remote control, please refer to the following common problems and solutions:
- Remote not responding or unit not receiving commands:
- Check if the batteries are installed correctly with the correct polarity.
- Replace old batteries with new AAA batteries.
- Ensure there is a clear line of sight between the remote control and the air conditioner's indoor unit. Remove any obstructions.
- Verify that the remote control is pointed directly at the air conditioner's receiver.
- Remote display is dim or blank:
- Batteries are low. Replace them with new AAA batteries.
- Some functions do not work:
- This is a replacement remote. Not all functions of your specific AC unit may be fully supported or mapped identically. Refer to your original AC unit manual.
- Ensure the remote is compatible with your exact Daikin model number.
7. Specifications
- Model Number: Easytry1112
- Brand: Easytry123
- Connectivity Technology: Infrared (IR)
- Controller Type: Button Control
- Color: Grey
- Batteries Required: 2 x AAA (not included)
- Country of Origin: China
- Compatible Daikin Models: BRC4C82, FXDQ15P7VEB, BRC7E, BRC7F, BRC7C, BRC4C155, BRC4C156, BRC4C158, FHYC125BJV1
8. Warranty and Support
For any questions regarding the operation, compatibility, or potential warranty claims for your Easytry123 Replacement Remote Control, please contact the seller directly through the platform where you purchased the product. They will be able to provide the most accurate and up-to-date support information.
Please have your purchase details and the remote control's model number (Easytry1112) ready when contacting support.