1. Introduction
Thank you for choosing the GREENCUT GLM770XE self-propelled gasoline lawn mower. This manual provides essential information for the safe assembly, operation, maintenance, and troubleshooting of your new lawn mower. Please read this manual thoroughly before using the product and keep it for future reference. Proper use and maintenance will ensure optimal performance and extend the lifespan of your equipment.
2. Safety Instructions
Always follow these safety guidelines to prevent injury and damage to the equipment.
- Read the Manual: Familiarize yourself with all controls and proper use before operating the mower.
- Personal Protective Equipment: Always wear sturdy footwear, long trousers, and eye protection. Avoid loose clothing that could get caught in moving parts.
- Clear the Area: Before mowing, remove all objects such as stones, sticks, wires, bones, and other debris from the lawn that could be thrown by the blade.
- Keep Bystanders Away: Ensure children, pets, and other people are at a safe distance (at least 15 meters) from the mowing area.
- Fuel Handling: Handle gasoline with extreme care. It is highly flammable. Refuel outdoors only, and do not smoke while refueling. Allow the engine to cool before adding fuel.
- Engine Off: Always turn off the engine and disconnect the spark plug wire before performing any adjustments, cleaning, or maintenance.
- Slope Operation: Exercise extreme caution when mowing on slopes. Mow across the face of slopes, never up and down. Avoid mowing excessively steep slopes.
- Blade Safety: Never place hands or feet near rotating parts. The blade continues to rotate for a short period after the engine is switched off.
- Maintenance: Regularly inspect the mower for damage, especially the blade. Replace worn or damaged parts with genuine GREENCUT replacements.
3. Components Overview
The GREENCUT GLM770XE lawn mower consists of several key components designed for efficient lawn care.

Figure 1: Overall view of the GREENCUT GLM770XE gasoline lawn mower, highlighting its main structure including the engine, cutting deck, wheels, and handle.
- Engine: 150cc 6hp 4-stroke OHV engine with air cooling.
- Cutting Deck: Durable steel chassis housing the 460mm double-edged blade.
- Handlebar: Foldable V-Grip handlebar with integrated controls for speed, engine revolutions, and safety brake.
- Electric Start Button: For convenient engine ignition.
- Wheels: Rigid rim wheels with shielded bearings for smooth movement. Front wheels 175mm, Rear wheels 250mm.
- Grass Collector: 55-liter capacity grass bag with a rigid cover and full basket indicator.
- Cutting Height Adjustment: Lever for adjusting cutting height in 7 positions (25-75mm).
- 4-in-1 System: Includes options for bagging, mulching, side ejection, and rear ejection.

Figure 2: Close-up showing the electric start button on the handlebar and an illustration of the 4 collection options (bagging, rear, side, mulching).

Figure 3: View of the 460mm sharp, double-edged, sharpenable blade located under the cutting deck.
4. Setup
4.1. Assembly
- Handlebar Assembly: Unfold the handlebar and secure it in place using the provided knobs or bolts. Ensure all cables are routed correctly and not pinched.
- Grass Collector Assembly: Assemble the grass bag according to the instructions and attach it to the rear of the mower.
- Check Connections: Verify that all connections, especially the spark plug wire and safety levers, are securely in place.
4.2. Fuel and Oil
The engine is shipped without oil or fuel. It is critical to add both before starting the mower.

Figure 4: Close-up of the engine area, showing the oil fill cap/dipstick and the fuel tank cap. Always ensure correct fluid levels before operation.
- Add Engine Oil: Remove the oil fill cap/dipstick. Slowly pour the recommended 4-stroke engine oil (e.g., SAE 30 or 10W-30) into the oil fill opening until it reaches the 'FULL' mark on the dipstick. Do not overfill.
- Add Fuel: Fill the fuel tank with fresh, unleaded gasoline. Do not use E85 or E15 fuel. Leave some space for fuel expansion. Securely replace the fuel cap.
4.3. Battery Charging (for Electric Start)
If your model includes an electric start, ensure the battery is charged before first use. Refer to the separate battery charger instructions for details. Connect the charger to the battery and a power outlet until fully charged.
5. Operating Instructions
5.1. Starting the Engine
- Prime (if applicable): If your engine has a primer bulb, press it 3-5 times until fuel is visible.
- Choke: Move the choke lever to the 'CHOKE' position (for cold starts).
- Safety Lever: Hold the engine safety lever (bail bar) against the handlebar.
- Electric Start: Press and hold the electric start button until the engine starts. Release the button once the engine is running.
- Manual Start: If electric start is not available or battery is low, pull the recoil starter handle firmly and smoothly until the engine starts.
- Warm-up: Once the engine starts, gradually move the choke lever to the 'RUN' position as the engine warms up.
5.2. Stopping the Engine
Release the engine safety lever (bail bar). The engine will automatically shut off.
5.3. Adjusting Cutting Height
The GREENCUT GLM770XE offers 7 cutting height positions, ranging from 25mm to 75mm.
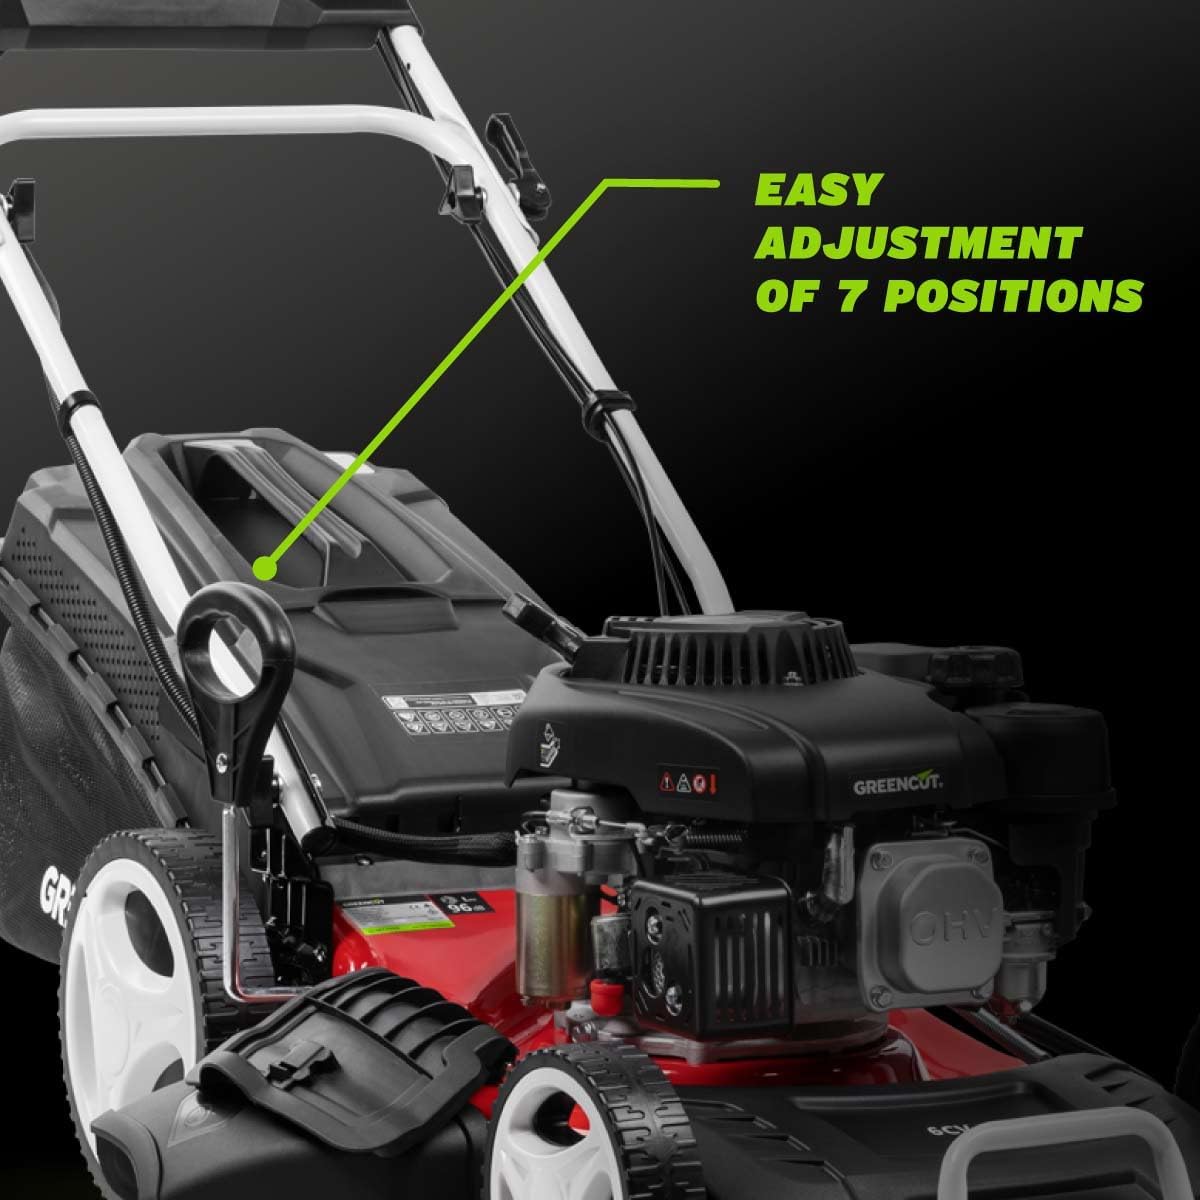
Figure 5: The lever for easy adjustment of the 7 cutting height positions, located near the wheels.
- Ensure the engine is OFF and the spark plug wire is disconnected.
- Locate the height adjustment lever on each wheel or a central lever.
- Pull the lever outwards and move it to the desired height setting. Ensure all wheels are set to the same height.
5.4. Mowing Techniques
For best results, mow when the grass is dry. Overlap cutting swaths slightly. For very tall grass, it is recommended to make two passes, setting the cutting height higher for the first pass and then lowering it for the second.

Figure 6: A user demonstrating easy handling of the self-propelled lawn mower on a lawn, illustrating typical operation.
5.5. Grass Collection and Discharge
The GLM770XE features a 4-in-1 system for grass management:
- Bagging: Attach the 55L grass collector to gather clippings. The full basket indicator will show when it needs emptying.
- Mulching: Insert the mulching plug (if included) to finely chop grass clippings and return them to the lawn as natural fertilizer.
- Side Ejection: Attach the side discharge chute to eject clippings to the side.
- Rear Ejection: Remove the grass collector and mulching plug for rear discharge.

Figure 7: Detail of the full basket indicator on the grass collector and the rear ejection option.
6. Maintenance
Regular maintenance is crucial for the longevity and safe operation of your lawn mower. Always ensure the engine is off and the spark plug wire is disconnected before performing any maintenance.
6.1. After Each Use
- Clean the Deck: Remove grass clippings and debris from the underside of the cutting deck.
- Empty Grass Bag: Empty and clean the grass collector.
- Inspect Blade: Check the blade for damage, dullness, or looseness.
6.2. Scheduled Maintenance
- Engine Oil Change: Change the engine oil after the first 5 hours of operation, then every 25 hours or annually.
- Air Filter: Clean or replace the air filter every 25 hours or more frequently in dusty conditions.
- Spark Plug: Inspect and clean the spark plug every 50 hours or annually. Replace if necessary.
- Blade Sharpening/Replacement: Sharpen the blade as needed, or replace it if it is bent, cracked, or severely damaged. Always ensure the blade is balanced after sharpening.
- General Inspection: Check all nuts, bolts, and screws for tightness. Inspect fuel lines for cracks or leaks.
6.3. Storage
For long-term storage (over 30 days), prepare the mower as follows:
- Drain the fuel tank or add a fuel stabilizer. Run the engine until it stops to consume all fuel in the carburetor.
- Change the engine oil.
- Clean the entire mower thoroughly.
- Store in a clean, dry area, away from direct sunlight and extreme temperatures.
7. Troubleshooting
This section addresses common issues you might encounter with your lawn mower.
| Problem | Possible Cause | Solution |
|---|---|---|
| Engine does not start | No fuel; Old fuel; Low oil level; Spark plug issue; Safety lever not engaged; Battery low (electric start) | Add fresh fuel; Check oil level; Clean/replace spark plug; Engage safety lever; Charge battery. |
| Engine runs rough or stalls | Dirty air filter; Stale fuel; Clogged fuel line; Incorrect spark plug gap | Clean/replace air filter; Drain and refill with fresh fuel; Clean fuel line; Adjust/replace spark plug. |
| Uneven cut | Dull or bent blade; Wheels set to different heights; Mowing too fast | Sharpen/replace blade; Ensure all wheels are at the same height; Mow at a slower pace. |
| Excessive vibration | Bent or unbalanced blade; Loose engine bolts; Debris caught under deck | Inspect and replace/balance blade; Tighten all fasteners; Clear debris. |
8. Specifications
Key technical specifications for the GREENCUT GLM770XE lawn mower.

Figure 8: Visual representation of the lawn mower's dimensions and key performance features like power, cutting width, cutting height, and grass bag capacity.
| Feature | Detail |
|---|---|
| Model Number | GLM770XE |
| Engine Type | 150cc 6hp 4-stroke OHV, Air-cooled |
| Cutting Width | 460 mm (18 inches) |
| Cutting Height Adjustment | 7 positions, 25-75 mm |
| Grass Collector Capacity | 55 Liters |
| Start System | Electric and Manual (Easy-Start) |
| Drive System | Self-propelled, Rear-wheel drive |
| Chassis Material | Steel |
| Wheel Size (Front/Rear) | 175mm / 250mm |
| Product Dimensions (L x W x H) | 77 x 55.5 x 51 cm (packaged) |
| Item Weight | 37.5 Kilograms |
9. Warranty and Support
Your GREENCUT GLM770XE lawn mower is designed for durability and performance. For warranty information, please refer to the warranty card included with your product or visit the official GREENCUT website. Keep your proof of purchase for any warranty claims.
For technical support, spare parts, or service inquiries, please contact GREENCUT customer service through the contact information provided on the official website or your retailer.


