
Rollerhouse ES2512
Rollerhouse ES2512 12V DC Electric Roller Blind Motor Instruction Manual
Model: ES2512
1. Product Overview
This manual provides instructions for the Rollerhouse 12V DC Electric Roller Blind/Shade Tubular Motor Kit, model ES2512. This hard-wired 12V DC motor is designed for DIY electric roller shade applications, commonly used in RVs, and is compatible with 1.5-inch roller pipes. It supports control via manual switches or home automation systems.
Key Features:
- 12-volt DC operation, no radio frequency (RF) functionality.
- Designed for RV blind and shade replacement or retrofit.
- Compatible with manual switches or home automation controllers.
- Easy-to-use two-wire electrical connection (positive and negative) for up/down control.
- Supports 3-state/position DC switches (up, down, and off) for individual shade control.
- Features a quiet motor with a lift capacity of 5.5 lbs.
- Includes motor and tube adapters for 1.5-inch shade tubes.
- Suitable for Roller Shades, Sheer Shades, and Solar window shades.
2. What's in the Box
The Rollerhouse ES2512 kit typically includes the following components:
- Tubular Motor
- Tube Adapters for 1.5" Shade Tube
- Wall Mounting Bracket
- Wiring for Switch Control
Note: Specific contents may vary slightly. Refer to your product packaging for exact details.
3. Product Specifications
| Specification | Value |
|---|---|
| Brand | Rollerhouse |
| Model | ES2512 |
| Speed | 34 RPM |
| Voltage | 12 Volts DC |
| Horsepower | 0.7 Watts |
| Product Dimensions | 1"W x 11.26"H |
| Material | Metal+Plastic |
| Item Weight | 0.5 Pounds (8 ounces) |
| Shaft Diameter | 1.5 Inches |
| Torque | 0.7 Nm |
| Power Consumption | 0.6A |
| Built-in Radio Receiver | No |
| Electronic Limit Setting | Yes |
| IP Protection Class | IP20 |
| Working Temperature | -10 to 60 °C |
| Cable Length | 2M |

Figure 3.1: Detailed product specifications for the Rollerhouse ES2512 motor.
4. Setup & Installation
Proper installation is crucial for the optimal performance of your Rollerhouse motor. This section guides you through the assembly and mounting process.
4.1 Understanding Motor Components and Adapters

Figure 4.1: Overview of the RV Electric Roller Shade Replacement Motor and its key specifications.
The motor kit includes various adapters to fit different tube sizes. Ensure you select the correct drive wheel and crown for your specific roller tube diameter. The motor is designed to fit a 1.5-inch roller tube with the included adapters.

Figure 4.2: Guide for accurately measuring your roller tube to ensure compatibility with the motor adapters.
It is essential to take accurate measurements of your existing roller tube to select the appropriate adapters. The kit provides options for different tube styles. Pay close attention to your tube's internal diameter.
4.2 Changing Drive Wheel and Crown Adapters
The motor comes with pre-installed adapters. If your tube requires different sizes, you will need to replace them. This process involves removing a C-clip and swapping the components.
Video 4.1: Instructions on how to remove the C-clip and replace the crown and drive adapters on the motor shaft.

Figure 4.3: Step-by-step visual guide for changing the drive wheel and crown for different aluminum tube profiles.
To change the adapters, use a pair of tweezers to disassemble the C-clip. Remove the original 1-3/16" drive fittings and insert the correct 1.5" rubber drive when your shade tube is 1.5". The color of the rubber drive (white or black) may vary.
4.3 Mounting the Motor and Shade
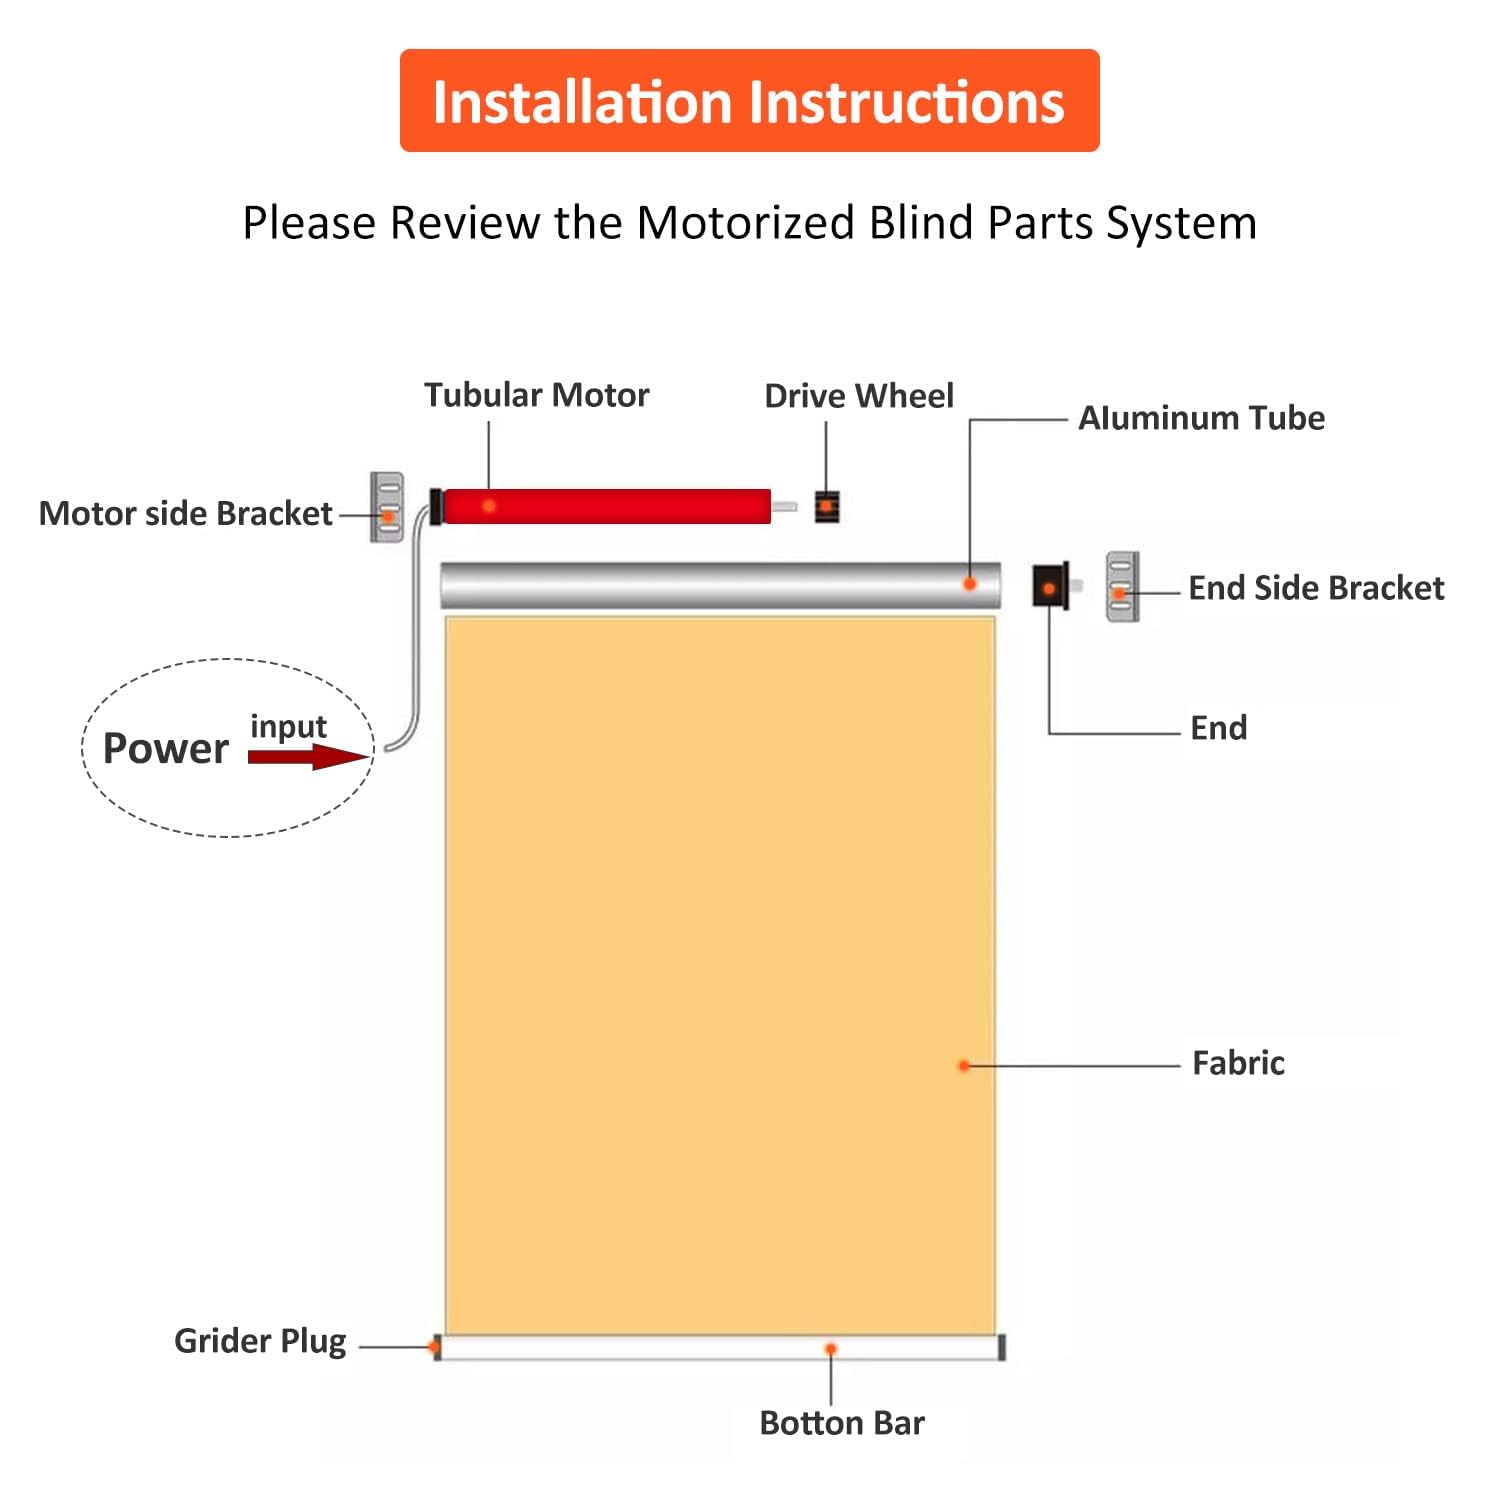
Figure 4.4: Diagram illustrating the components of a motorized blind system, including the tubular motor, drive wheel, aluminum tube, fabric, and brackets.
The motor has an 11mm slot for mounting onto a bracket. Ensure the motor is securely fastened within the roller tube and that the tube is properly seated in the mounting brackets.

Figure 4.5: Close-up view of the motor's 11mm slot for bracket mounting.
Due to the variety of RV blinds, the installation process may differ. It is recommended to consult the installation instruction booklet that came with your specific blind for detailed guidance. For replacement parts, contact the seller.

Figure 4.6: General guidance for setting up and using the motor with RV blinds.
5. Operation
The Rollerhouse ES2512 motor is controlled via a hard-wired switch or compatible home automation system. It does not feature built-in radio frequency (RF) control.
5.1 Manual Switch Control
For manual operation, connect the motor to a 3-state/position DC switch (up, down, and off). This allows you to raise, lower, or stop the shade at any desired position.

Figure 5.1: Illustration of connecting the motor to a double-throw switch for easy up-off-down control.

Figure 5.2: Diagram explaining manual switch operation. Press and hold the Up or Down button; release to stop the shade.
To use the switch-operated shade, simply press the Up or Down button. The shade will move as long as the button is held, stopping when released or when it reaches a set limit.
5.2 Home Automation Integration
The motor can be integrated with home automation systems that provide a 12V DC supply and DPDT (Double Pole Double Throw) switch control. This allows for automated control of your shades.
Video 5.1: Demonstration of connecting the motor to a DPDT switch or other home automation system with a 12V supply.
Video 5.2: Guide on how to connect an RF Shade Motor to an RF hub, such as Broadlink, for smart control.
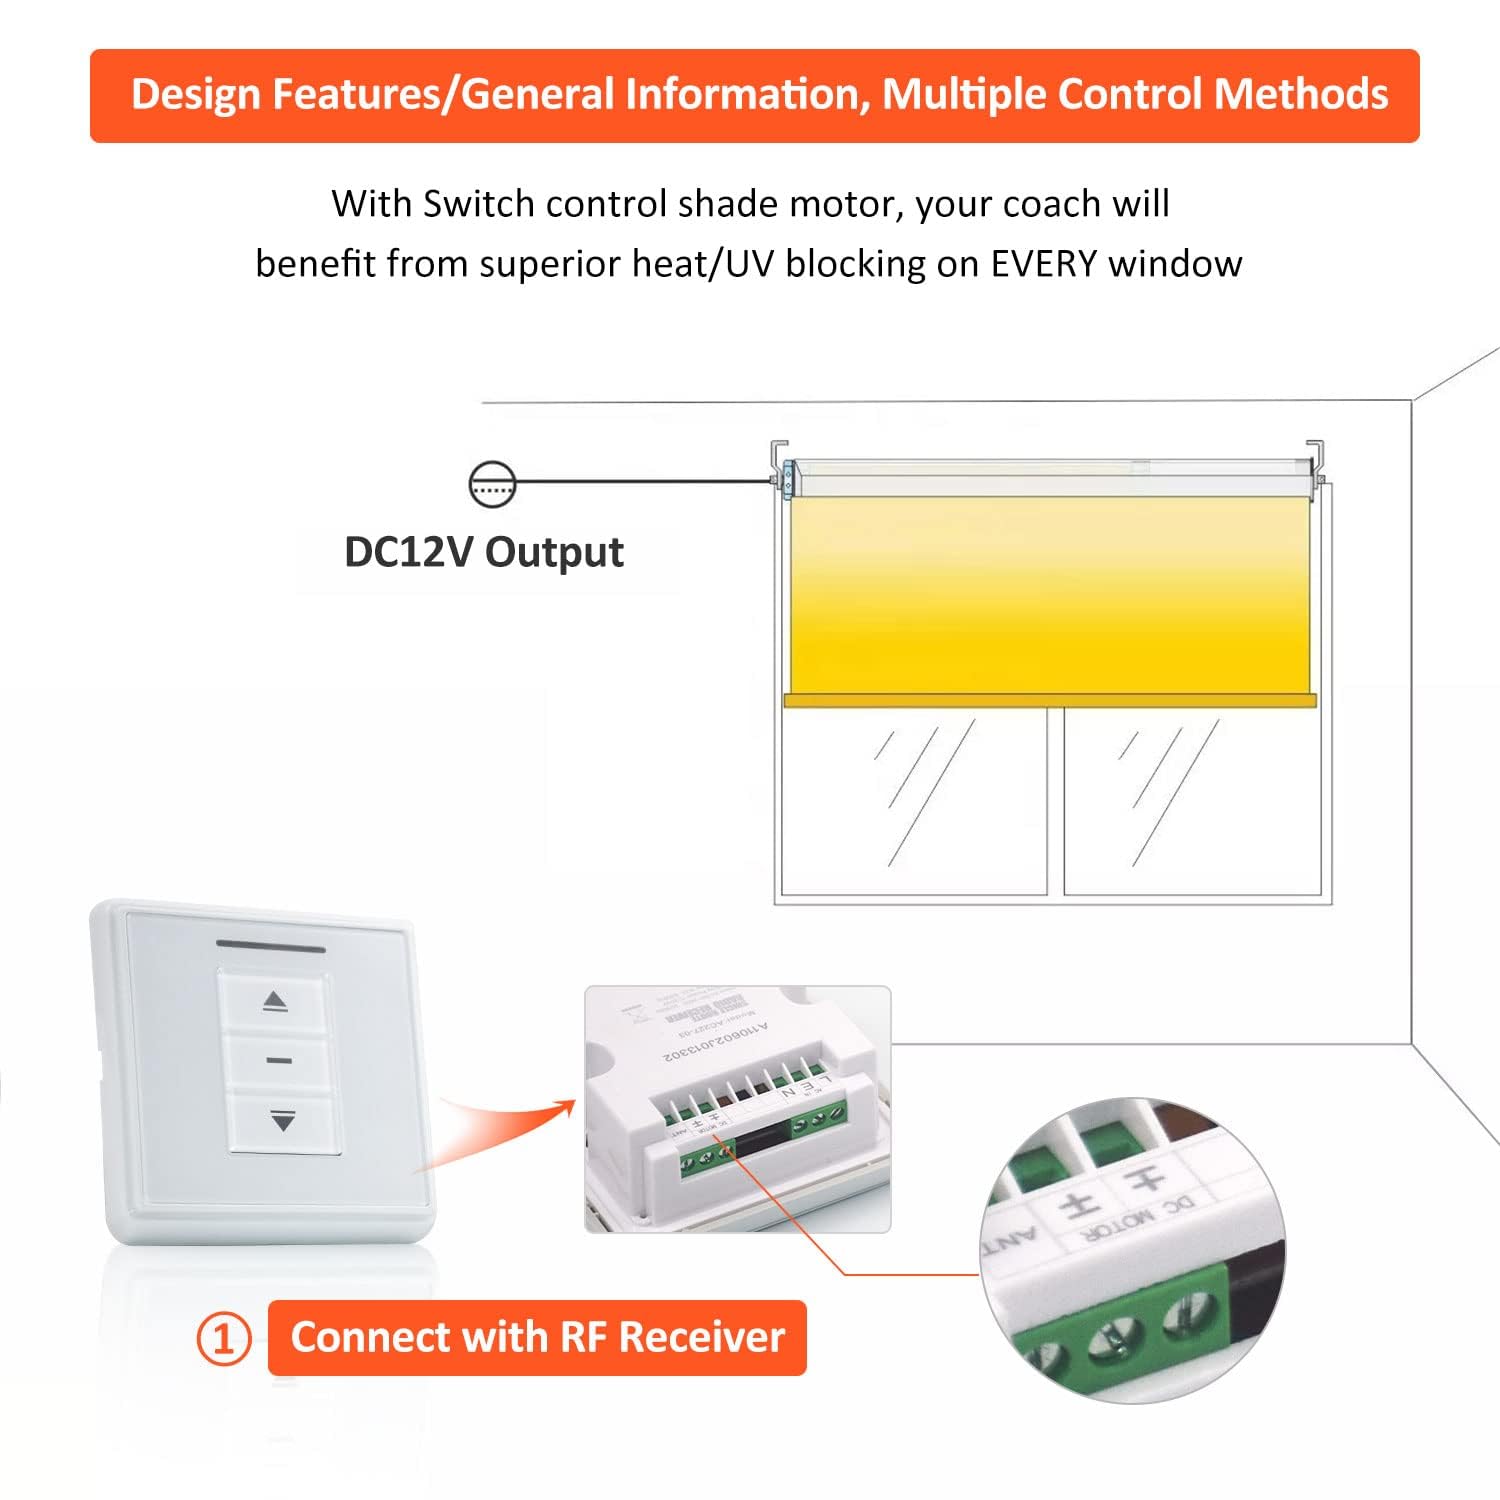
Figure 5.3: Diagram showing how to connect the motor with an RF receiver for remote control capabilities.
6. Programming Limits
The motor allows for setting upper and lower travel limits to prevent the shade from over-rolling or under-rolling. This is done using the programming key on the motor.
Video 6.1: Detailed instructions on how to set the upper and lower limits for a switch-controlled motor.
6.1 Entering Limit Setting State:
- After wiring is completed, turn on the switch (either up or down).
- Press the programming key on the motor for 5 seconds.
- The motor will beep, indicating it has entered the limit setting state.
6.2 Setting the Upper Limit:
- Press the switch UP.
- When the roller motor runs near the desired top position, press STOP on the switch.
- You can press UP and STOP again, step by step, to fine-tune the upper limit.
6.3 Setting the Lower Limit:
- Press the switch DOWN.
- So that it runs close to the desired bottom position, press STOP on the switch.
- You can repeat DOWN and STOP, step by step, to adjust the lower limits.
6.4 Confirming Limit Settings:
- After setting both upper and lower limits, press UP on the switch.
- The motor will beep, confirming that the limit setup is complete.
Note: The motor may have a pre-set default roll distance (e.g., 12 inches). If it only rolls a short distance initially, you will need to reset the limits as described above.
7. Maintenance
The Rollerhouse ES2512 motor is designed for durability and requires minimal maintenance. Periodically check the wiring connections for any signs of wear or damage. Ensure the roller tube and shade fabric are free from obstructions that could impede motor operation.
Keep the motor and associated components clean and free of dust. Avoid exposing the motor to excessive moisture or extreme temperatures outside its specified operating range (-10 to 60 °C).
8. Troubleshooting
If you encounter issues with your Rollerhouse ES2512 motor, consider the following common troubleshooting steps:
- Motor Not Responding: Check all wiring connections to ensure they are secure and correctly connected to the 12V DC power supply and switch. Verify the power supply is active.
- Shade Only Moves a Short Distance: This often indicates that the travel limits are not correctly set. Follow the "Programming Limits" section (Section 6) to reset the upper and lower limits.
- Motor Making Unusual Noises: Ensure the motor is properly seated within the roller tube and that the tube is correctly installed in its brackets. Check for any obstructions in the shade's path.
- Motor Overheating: Discontinue use immediately and check for any mechanical resistance in the shade's movement or electrical issues.
If these steps do not resolve the issue, please contact Rollerhouse customer support for further assistance.
9. Warranty and Support
For any questions, technical assistance, or warranty inquiries regarding your Rollerhouse ES2512 motor, please contact the Rollerhouse support team. They can assist with determining the correct motor size for your application and locating replacement parts.

Figure 9.1: Rollerhouse customer support is available to assist with product inquiries and technical support.
Please retain your proof of purchase for warranty claims.
Ask a question about this manual
Ask about setup, troubleshooting, compatibility, parts, safety, or missing instructions. Manuals+ will review the question and use this page’s manual context to help answer it.