Introduction
This manual provides detailed instructions for the setup, operation, and maintenance of your Alvoxcon UHF Wireless Dynamic Handheld Microphone System. Please read this manual thoroughly before using the product to ensure proper function and longevity.
Package Contents
Upon unpacking, verify that all items listed below are present and in good condition:
- Alvoxcon UHF Wireless Handheld Microphone
- UHF Wireless Receiver (1/4 inch plug)
- AA Batteries (for microphone)
- USB Charging Cable (for receiver)
- 1/4-inch to 1/8-inch TRS Adapter
- 1/8-inch TRRS Splitter Cable (for smartphones/laptops)
- User Manual
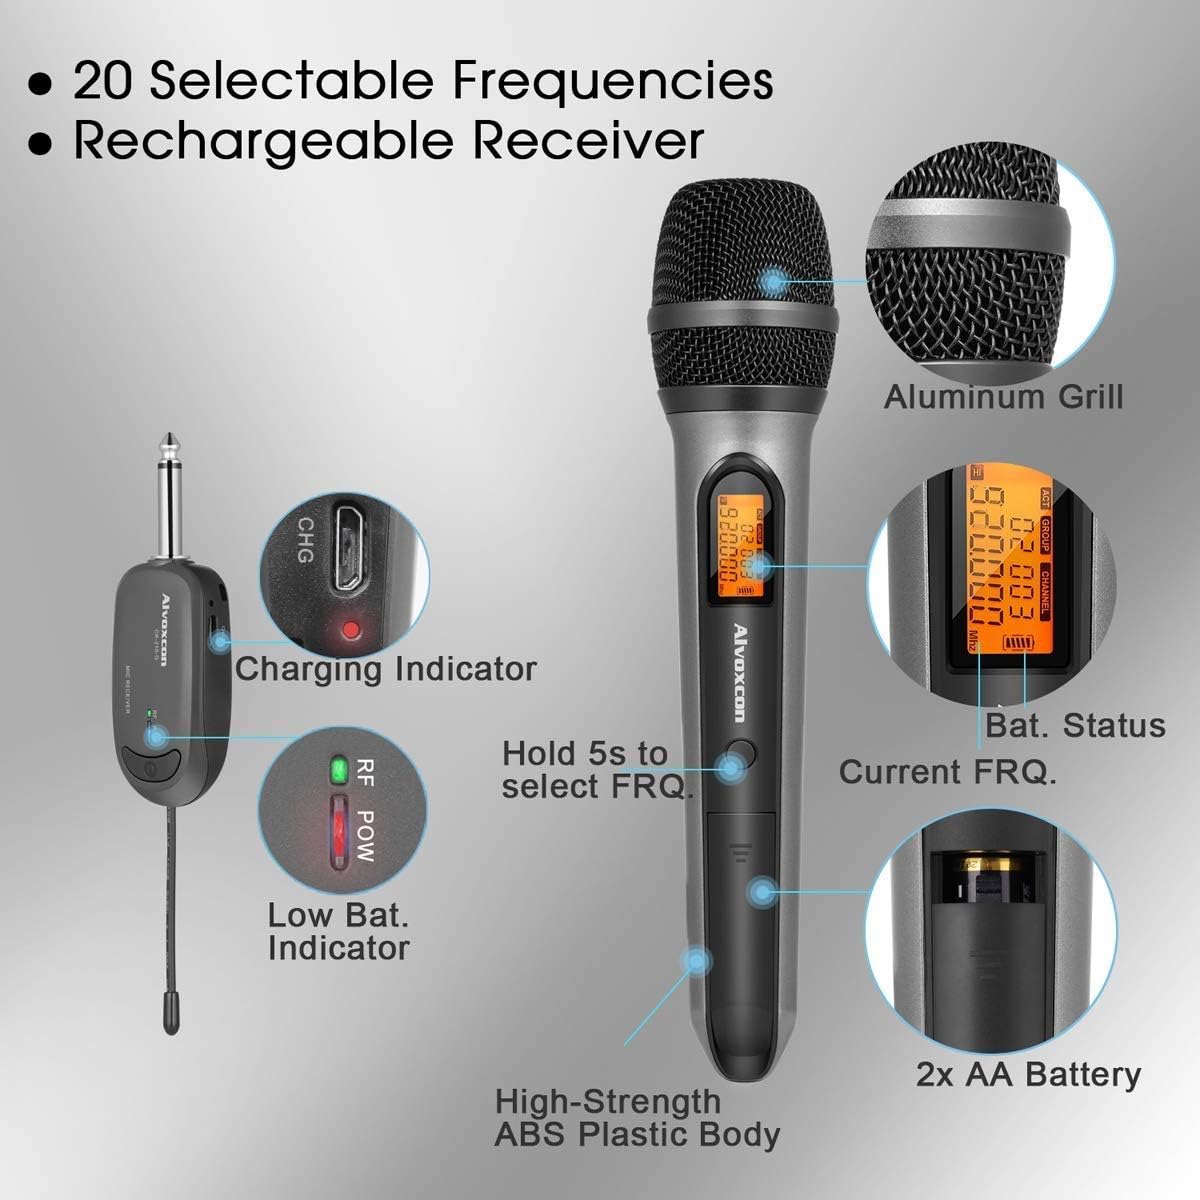
Image: All components of the Alvoxcon Wireless Microphone System, including the handheld microphone, mini receiver, AA batteries, USB charging cable, and various adapters, neatly arranged on a white surface.
Video: An unboxing and overview of the Alvoxcon single wireless handheld microphone system (CK210), demonstrating the contents of the package and initial setup steps.
Setup Instructions
1. Installing Batteries in the Microphone
- Unscrew the bottom part of the microphone to open the battery compartment.
- Insert two AA batteries, ensuring correct polarity (+/-).
- Screw the bottom part back on securely.
2. Charging the Receiver
- Connect the USB charging cable to the receiver's charging port.
- Plug the other end of the USB cable into a standard USB power adapter (not included) or a computer's USB port.
- The charging indicator light on the receiver will illuminate during charging and turn off when fully charged.
3. Connecting the Receiver to an Audio Device
The receiver features a 1/4-inch (6.35mm) plug for direct connection to devices with a 'MIC IN' jack. Use the provided adapters for other connections.
- For PA Systems, Amplifiers, Mixers: Plug the 1/4-inch receiver directly into the 'MIC IN' jack.
- For DSLR Cameras: Use the 1/4-inch to 1/8-inch TRS adapter to connect the receiver to the camera's 1/8-inch microphone input.
- For Smartphones/Tablets/Laptops (for recording): Use the 1/4-inch to 1/8-inch TRS adapter, then connect it to the 1/8-inch TRRS splitter cable. Plug the microphone icon end of the splitter into your device's headphone/microphone combo jack. Note: This setup is primarily for recording; real-time sound projection to speakers from smartphones/computers is not supported.
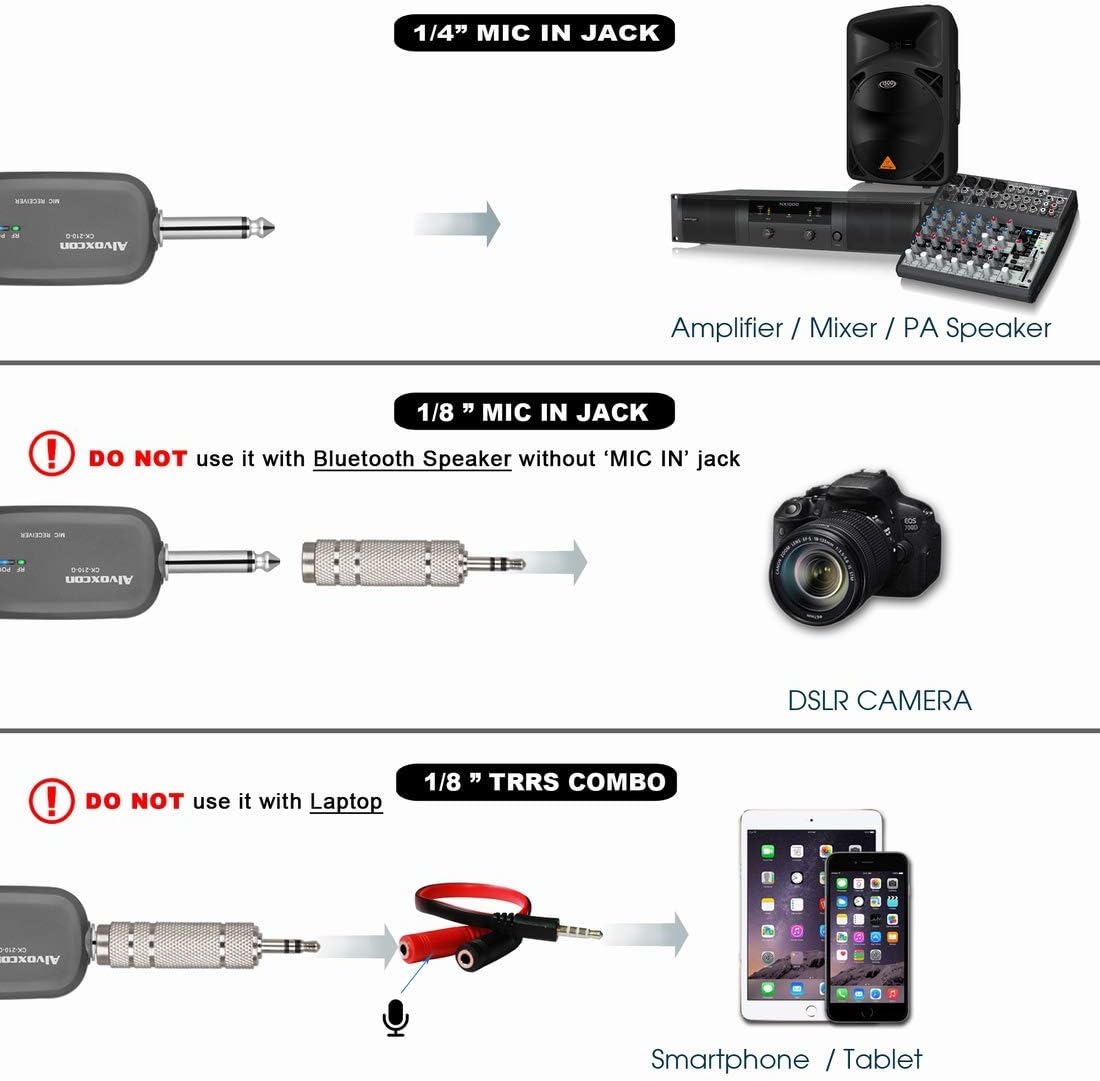
Image: Connection diagram illustrating how to connect the wireless receiver to an amplifier/mixer (1/4" jack), a DSLR camera (1/8" jack), and a smartphone/tablet (1/8" TRRS combo).
Important: Do not use with Bluetooth speakers that only have 'LINE' or 'AUX' input jacks, as this may result in insufficient sound or no sound at all. Not compatible with MacBook for real-time sound projection.
Operating Instructions
1. Powering On/Off
- Microphone: Press and hold the power button on the microphone until the display illuminates.
- Receiver: Press and hold the power button on the receiver until the indicator light turns on.
- To power off, press and hold the respective power buttons again.
2. Automatic Frequency Pairing
The system is designed for automatic frequency pairing. Once both the microphone and receiver are powered on, they should automatically connect. The RF POW indicator on the receiver will light up when a stable connection is established.
3. Selecting Frequencies (20 Selectable UHF Frequencies)
If you experience interference, you can change the operating frequency:
- On the microphone, press and hold the frequency selection button (often integrated with the power button or a separate 'SET' button) for approximately 5 seconds.
- The frequency displayed on the microphone will change. The receiver will automatically sync to the new frequency.
- Repeat this process until a clear channel is found.

Image: Close-up of the Alvoxcon wireless microphone and receiver, showing the charging indicator, low battery indicator, battery status, current frequency display, and the frequency selection button.
4. Optimal Usage
- Maintain a clear line of sight between the microphone and receiver for best performance.
- Keep the microphone within the recommended operating range of up to 30 meters (100 feet).
- Avoid placing the receiver near metal objects or other electronic devices that may cause interference.
Maintenance
1. Cleaning
- Wipe the microphone and receiver with a soft, dry cloth.
- Do not use liquid cleaners or solvents, as they may damage the finish or internal components.
2. Battery Care
- Remove batteries from the microphone if it will not be used for an extended period to prevent leakage.
- Ensure the receiver is fully charged before each use for optimal battery life.
3. Storage
- Store the system in a cool, dry place away from direct sunlight and extreme temperatures.
- Keep components in their original packaging or a protective case to prevent damage.
Troubleshooting
| Problem | Possible Cause | Solution |
|---|---|---|
| No sound from microphone |
|
|
| Static or intermittent sound |
|
|
| Receiver not charging |
|
|
Specifications
- Microphone Form Factor: Microphone System
- Connectivity Technology: UHF
- Number of Channels: 20 selectable frequencies
- Operating Range: Up to 30 meters (100 feet)
- Signal-to-Noise Ratio: 90 dB
- Microphone Power Source: 2x AA Batteries
- Receiver Power Source: Rechargeable Lithium Polymer battery
- Connector Type: 3.5 mm Jack (with adapters for 1/4 inch)
- Compatible Devices: PA systems, Amplifiers, Mixers, DSLR Cameras, Smartphones, Laptops (for recording)
- Material: Acrylonitrile Butadiene Styrene, Aluminum
- Item Weight: 195 Grams (microphone)
- Product Dimensions: 11.8 x 5.11 x 2.55 inches
- Model Number: B07DZ44TF6

Image: Diagram detailing the extraordinary audio performance features of the microphone, such as 100 ft range, near-zero latency, UHF DQPSK processing, and a large diaphragm dynamic capsule.

Image: Close-up of the microphone displaying its polar pattern and highlighting features like good signal, extended distance, noise reduction, constant frequency, high fidelity, and overall quality.
Warranty and Support
For warranty information and technical support, please refer to the official Alvoxcon website or contact their customer service directly. Contact details are typically provided in the product packaging or on the manufacturer's website.
Visit the Alvoxcon Store on Amazon for more information and product updates.
