
BIGFUN 630B1
Bigfun 61 Keys Piano Keyboard Toy User Manual
Model: 630B1
Brand: BIGFUN
1. Introduction
Thank you for purchasing the Bigfun 61 Keys Piano Keyboard Toy. This manual provides essential information for the safe and effective operation, maintenance, and troubleshooting of your new musical instrument. Please read this manual thoroughly before use and retain it for future reference.
2. Safety Information
- Do not expose the keyboard to water or excessive moisture.
- Avoid placing the keyboard in direct sunlight or near heat sources.
- Use only the specified power adapter or batteries.
- Keep out of reach of small children due to small parts and electrical components.
- Do not attempt to disassemble or repair the keyboard yourself. Refer all servicing to qualified personnel.
3. Package Contents
Verify that all items are present in the package:
- Bigfun 61 Keys Piano Keyboard Toy
- Microphone
- USB Power Cable (for mobile charger option)
- Power Adapter (if included, check product description)

Image: The Bigfun 61 Keys Piano Keyboard Toy, showing the main unit, included microphone, and USB power cable.

Image: The retail packaging box for the Bigfun 61 Keys Piano Keyboard Toy, displaying product features and branding.
4. Product Overview
The Bigfun 61 Keys Piano Keyboard Toy features a standard 61-key layout, various tones and rhythms, and recording capabilities. It is designed for beginner to intermediate skill levels.
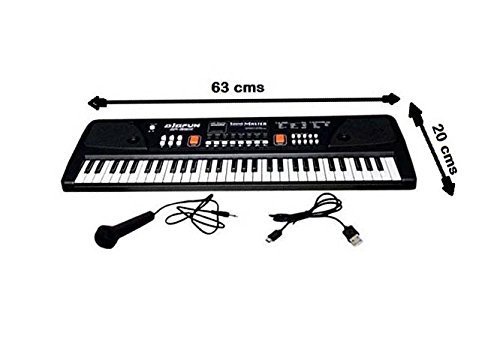
Image: Top-down view of the Bigfun 61 Keys Piano Keyboard Toy, indicating approximate dimensions of 63 cm length and 20 cm width.

Image: An angled view of the Bigfun 61 Keys Piano Keyboard Toy, highlighting the keyboard layout and control panel.
Key Features:
- 61 Keys
- USB MP3 Player
- 16 Tones
- 5 Rhythms
- Volume Control
- Recording Function
- Tempo Control
- Microphone Input (3.5mm Jack)
5. Setup
5.1 Powering the Keyboard
The keyboard can be powered in two ways:
- Using the Power Adapter/USB Cable: Connect the provided USB power cable to the keyboard's power input port. Connect the other end to a suitable USB power source (e.g., a mobile charger adapter, not included, or a computer USB port).
- Using Batteries: The keyboard can also be operated with 4 "AA" size normal batteries (not included). Open the battery compartment on the underside of the keyboard, insert the batteries observing the correct polarity (+/-), and close the compartment securely.
5.2 Connecting the Microphone
Plug the microphone's 3.5mm jack into the dedicated microphone input port on the keyboard.
5.3 Using the USB MP3 Player
To use the MP3 playback function:
- Insert an external USB flash drive (containing MP3 audio files) into the USB port located on the back side of the keyboard.
- The USB playback should start automatically by default.
- Use the volume keys on the keyboard to control the USB playback volume.
6. Operating Instructions
6.1 Power On/Off
Locate the Power button on the keyboard and press it to turn the unit on or off.
6.2 Adjusting Volume
Use the dedicated Volume Up and Volume Down buttons to adjust the overall sound output of the keyboard and the connected microphone.
6.3 Selecting Tones
The keyboard features 16 different tones. Press the "Tone" button and then use the number keys or arrow keys (if available) to select your desired instrument sound.
6.4 Selecting Rhythms
There are 5 built-in rhythms. Press the "Rhythm" button and then use the number keys or arrow keys to select a rhythm. You can adjust the tempo of the rhythm using the Tempo control buttons.
6.5 Recording Function
To record your performance:
- Press the "Record" button to start recording.
- Play your desired melody on the keyboard.
- Press the "Play" button to listen to your recorded performance.
7. Maintenance
- Cleaning: Wipe the keyboard surface with a soft, dry cloth. For stubborn dirt, slightly dampen the cloth with water and mild soap, then wipe dry immediately. Do not use abrasive cleaners or solvents.
- Storage: When not in use for extended periods, store the keyboard in a cool, dry place away from direct sunlight and extreme temperatures. If using batteries, remove them before storage to prevent leakage.
- Handling: Avoid dropping the keyboard or subjecting it to strong impacts, as this can damage internal components.
8. Troubleshooting
| Problem | Possible Cause | Solution |
|---|---|---|
| Keyboard does not power on. | No power supply; batteries are dead or incorrectly inserted; power adapter faulty. | Ensure power adapter is securely connected or replace batteries. Check battery polarity. |
| No sound from speakers. | Volume is too low; Mute function activated; internal fault. | Increase volume. Check if any mute button is pressed. If problem persists, contact support. |
| Microphone not working. | Microphone not properly connected; microphone faulty. | Ensure microphone is fully plugged into the correct port. Test with another microphone if available. |
| USB MP3 player not working. | USB drive not inserted correctly; unsupported file format; USB drive faulty. | Re-insert USB drive. Ensure files are in MP3 format. Try a different USB drive. |
9. Specifications
| Feature | Detail |
|---|---|
| Model Name | 630B1 |
| Brand | BIGFUN |
| Number of Keys | 61 |
| Connectivity Technology | USB |
| Power Source | Battery Powered (4 "AA" batteries, not included) / USB Power |
| Headphones Jack | 3.5mm Jack (for microphone) |
| Special Features | Recording, Tempo Control, USB MP3 Player |
| Skill Level | Beginner to Intermediate |
| Manufacturer | QUANZHOU AIQIAN ELECTRONIC TECHNOLOGY CO., LTD |
| ASIN | B07DYYR5MV |
10. Warranty and Support
For warranty information or technical support, please refer to the contact details provided by your retailer or the manufacturer's official website. Keep your purchase receipt as proof of purchase.
For general inquiries, you may visit the BIGFUN brand page on Amazon.
Ask a question about this manual
Ask about setup, troubleshooting, compatibility, parts, safety, or missing instructions. Manuals+ will review the question and use this page’s manual context to help answer it.