
1. Introduction
Thank you for choosing the Stanley 10880 Micro MIG Welder. This compact and portable welding machine is designed for gasless flux-cored welding on thin sheet metals. Please read this instruction manual carefully before operating the welder to ensure safe and efficient use. Keep this manual for future reference.
2. Safety Information
Welding can be dangerous. Always follow safety precautions to prevent injury or damage. Failure to follow these instructions may result in electric shock, fire, or serious injury.
- Eye Protection: Always wear a welding mask with appropriate shade protection to shield your eyes from intense light and UV radiation. The included mask is for basic protection; consider professional-grade auto-darkening helmets for extended use.
- Body Protection: Wear flame-resistant clothing, welding gloves, and protective footwear. Avoid synthetic fabrics.
- Ventilation: Ensure adequate ventilation in the work area to disperse welding fumes. Welding fumes can be harmful if inhaled.
- Electrical Safety: Ensure the welder is connected to a properly grounded power outlet. Do not operate in damp or wet conditions. Never touch live electrical parts.
- Fire Hazards: Keep flammable materials away from the welding area. Have a fire extinguisher readily available. Hot metal can cause fires.
- Work Area: Keep the work area clean and free of clutter. Ensure stable footing.
- Children and Bystanders: Keep children and unauthorized persons away from the welding area.
- Maintenance: Disconnect power before performing any maintenance or changing accessories.
3. Package Contents
Carefully unpack the box and ensure all items are present and undamaged. If any items are missing or damaged, contact your retailer.
- Stanley 10880 Micro MIG Welder Unit
- MIG Welding Torch
- Earth Clamp with Cable
- Handheld Welding Mask
- Flux-Cored Wire Spool
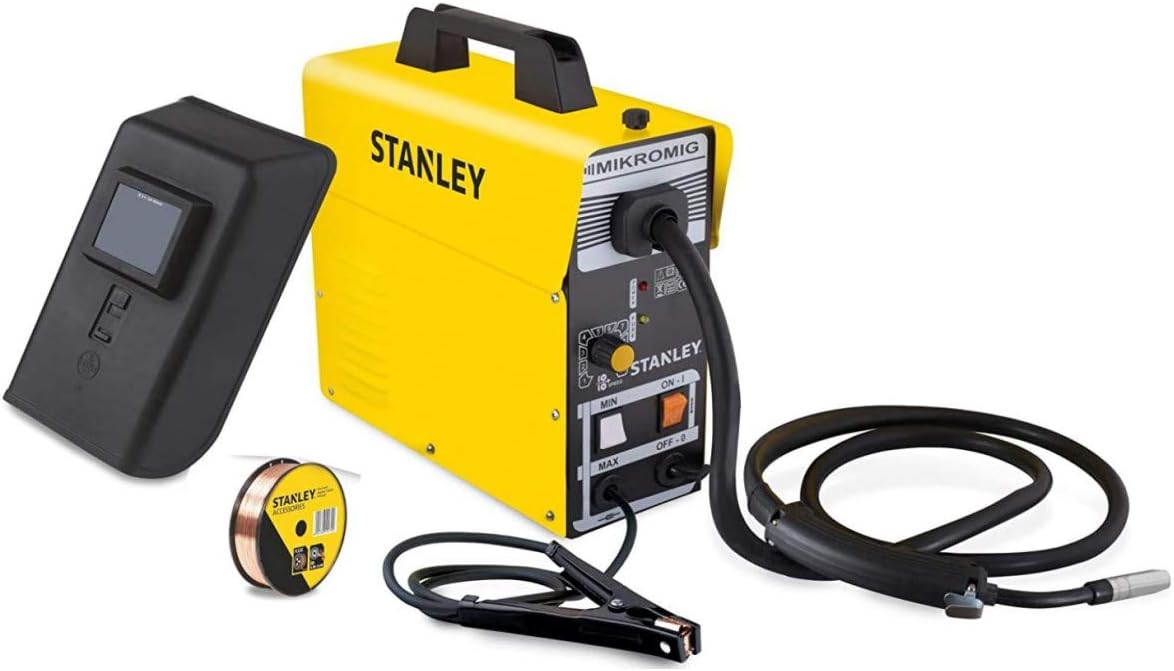
Figure 1: Stanley 10880 Micro MIG Welder and included accessories.
4. Setup
Follow these steps to set up your Stanley 10880 Micro MIG Welder for operation.
- Positioning the Welder: Place the welder on a stable, level surface in a well-ventilated area. Ensure there is sufficient space around the unit for air circulation.
- Connecting the Earth Clamp: Connect the earth clamp cable to the designated terminal on the front panel of the welder. Securely attach the earth clamp to the workpiece or a metal workbench that is in direct contact with the workpiece. Ensure a good electrical connection.
- Installing the Flux-Cored Wire:
- Open the wire feed compartment.
- Mount the flux-cored wire spool onto the spindle, ensuring it rotates freely.
- Feed the wire through the guide tube and into the drive rollers.
- Close the drive roller tension arm and adjust the tension. The wire should feed smoothly without slipping or crushing.
- With the welder powered off, manually feed the wire through the welding torch liner until it emerges from the contact tip. Trim any excess wire.
- Connecting to Power: Ensure the welder's power switch is in the "OFF" position. Plug the power cord into a suitable 230V, 50/60Hz grounded power outlet.

Figure 2: Stanley 10880 Micro MIG Welder ready for setup.
5. Operating Instructions
Before operating, ensure all safety precautions are followed and the setup is complete.
- Power On: Switch the welder to the "ON" position. The indicator light should illuminate.
- Adjust Welding Parameters:
- Welding Current (Amperage): Use the control knob to select the desired welding current between 35A and 95A. Higher current is generally used for thicker materials.
- Wire Speed: Adjust the wire speed regulator. The correct wire speed is crucial for a stable arc and good weld quality. Start with a moderate setting and adjust as needed. Too slow a speed can cause the wire to burn back to the tip; too fast can cause the wire to push the torch away from the workpiece.
- Prepare Workpiece: Clean the workpiece thoroughly to remove any rust, paint, oil, or dirt. A clean surface ensures a good electrical connection and a quality weld.
- Welding Technique:
- Put on your welding mask and protective gear.
- Position the welding torch at the starting point of the weld, holding it at a slight angle (push or pull technique depending on preference and material).
- Press the torch trigger to initiate the arc and wire feed.
- Maintain a consistent arc length and travel speed. Observe the weld puddle and adjust your technique as you go.
- Release the trigger to stop welding.
- Cool Down: Allow the welded area to cool naturally. Do not touch hot metal.
- Power Off: After completing your work, switch the welder to the "OFF" position and unplug it from the power outlet.
6. Maintenance
Regular maintenance ensures the longevity and safe operation of your welder. Always disconnect the welder from the power supply before performing any maintenance.
- Cleaning: Regularly clean the exterior of the welder with a dry cloth. Use compressed air to blow out dust and debris from the ventilation openings.
- Welding Torch: Inspect the welding torch for wear and tear. Clean the contact tip and gas nozzle (if applicable, though this is a gasless welder, debris can still accumulate). Replace worn contact tips.
- Earth Clamp: Ensure the earth clamp is clean and free of corrosion for a good electrical connection.
- Wire Feed System: Check the drive rollers for wear and ensure they are clean. Remove any wire shavings or debris that could impede wire feeding.
- Cables: Inspect all cables (power, torch, earth clamp) for cuts, fraying, or damage. Replace damaged cables immediately.
- Storage: Store the welder in a dry, clean environment, away from moisture and extreme temperatures.
7. Troubleshooting
This section addresses common issues you might encounter. For problems not listed here, contact customer support.
| Problem | Possible Cause | Solution |
|---|---|---|
| Welder does not power on | No power supply; Faulty power cord; Internal fuse blown | Check power outlet and connections; Inspect power cord; Contact service for fuse replacement. |
| No arc when trigger is pressed | Poor earth clamp connection; Wire not feeding; Contact tip blocked; Incorrect settings | Ensure good earth connection; Check wire feed system; Clean/replace contact tip; Adjust current/wire speed. |
| Wire not feeding smoothly | Wire spool tangled; Drive roller tension incorrect; Liner blocked; Worn contact tip | Untangle wire; Adjust drive roller tension; Clean/replace liner; Replace contact tip. |
| Poor weld quality (porosity, weak weld) | Dirty workpiece; Incorrect settings (current/wire speed); Improper technique | Clean workpiece thoroughly; Adjust current and wire speed; Practice welding technique. |
8. Specifications
Technical specifications for the Stanley 10880 Micro MIG Welder.
| Feature | Specification |
|---|---|
| Model Number | 10880 |
| Power Supply | 230V, 50/60Hz (Single-phase) |
| Welding Current Range | 35 - 95 A |
| Power Consumption | 1.9 KVA |
| No-Load Voltage | 17 - 23.5 V |
| Duty Cycle | 95 A at 20% |
| Protection Class | IP 21S |
| Dimensions (L x W x H) | 40 x 22 x 37 cm |
| Weight | 15 kg |
| Handle Material | Plastic |
| Special Feature | Micromig (Gasless Flux-Cored Welding) |
9. Warranty and Support
The Stanley 10880 Micro MIG Welder comes with a 2-year warranty from the date of purchase. This warranty covers manufacturing defects under normal use.
For warranty claims, technical assistance, or spare parts, please contact your retailer or the authorized Stanley service center. Keep your proof of purchase for warranty validation.
Please note that the warranty does not cover damage caused by misuse, neglect, unauthorized repairs, or normal wear and tear of consumables.