
1. Introduction
Thank you for choosing the Eventek KBS DC Regulated Power Supply. This device is designed to provide a stable and adjustable DC power source for various electronic applications, laboratory work, and testing. It features precise voltage and current regulation, a clear LED display, and multiple protection mechanisms to ensure safe and reliable operation. Please read this manual thoroughly before operating the device to ensure proper usage and to maximize its lifespan.
2. Safety Instructions
To prevent electric shock, injury, or damage to the device, always adhere to the following safety precautions:
- Ensure the power supply is connected to a grounded outlet.
- Do not operate the device in wet or damp conditions.
- Avoid opening the casing; there are no user-serviceable parts inside. Refer all servicing to qualified personnel.
- Do not block ventilation openings. Proper airflow is essential for cooling.
- Always disconnect the power cord before moving or cleaning the unit.
- Verify that the input voltage matches the local power supply specifications.
- Do not exceed the maximum output voltage or current ratings of the device.
- In case of smoke, unusual odors, or abnormal operation, immediately disconnect the power supply and contact support.
3. Product Overview
The Eventek KBS DC Power Supply is designed for ease of use and reliability. Below are key components and their functions.

Figure 3.1: Front and Rear Panel Layout. This image illustrates the various controls and connectors on the front panel, including the power switch, voltage and current adjusting knobs, output terminals, and the digital display. The rear panel shows the cooling fan, AC power input, and fuse block.

Figure 3.2: Digital Display. The large blue digital display screen shows the output voltage and current with high precision (0.01V and 0.001A). It also indicates the operating mode (CV for Constant Voltage, CC for Constant Current).
Package Contents

Figure 3.3: Package Contents. The box typically includes the Eventek KBS DC Power Supply unit, an AC power cord, and a set of test leads with alligator clips for connecting to your circuit.
- Digital Display: Shows real-time voltage and current output.
- Voltage Adjusting Knob: Multi-turn precision knob for fine voltage control.
- Current Adjusting Knob: Multi-turn precision knob for fine current control.
- Output Terminals: Red (+) for positive, Black (-) for negative, Green for ground.
- Power Switch: Turns the unit on/off.
- Cooling Fan: Automatically activates to maintain optimal operating temperature.
4. Setup
Follow these steps to set up your Eventek KBS DC Power Supply:
- Unpacking: Carefully remove the power supply and all accessories from the packaging. Inspect for any signs of damage.
- Placement: Place the unit on a stable, level surface with adequate ventilation. Ensure that the front and rear panels, especially the cooling fan, are not obstructed.
- Power Connection: Connect the provided AC power cord to the AC power input on the rear panel of the power supply, then plug the other end into a grounded electrical outlet.
- Initial Check: Before connecting any load, turn on the power switch. The digital display should illuminate, showing 0.00V and 0.00A.
- Output Connections: Use the provided test leads to connect your load to the output terminals. Connect the red lead to the positive (+) terminal and the black lead to the negative (-) terminal. The green terminal is for ground connection if required by your application.
5. Operating Instructions
The Eventek KBS power supply operates in both Constant Voltage (CV) and Constant Current (CC) modes, automatically switching between them based on the load.
Adjusting Voltage and Current
- Power On: Turn on the power switch.
- Pre-setting Voltage (No Load): Before connecting your load, rotate the Voltage Adjusting Knob to set the desired output voltage. The display will show the set voltage.
- Pre-setting Current (Short Circuit Method):
- With the power supply on and no load connected, turn the Voltage Adjusting Knob to its minimum setting (fully counter-clockwise).
- Momentarily short-circuit the positive and negative output terminals using a test lead (ensure this is done briefly and carefully, as it will draw maximum current).
- While short-circuited, rotate the Current Adjusting Knob to set the desired maximum output current. The display will show the set current.
- Remove the short circuit. The current display will return to 0.00A.
- Connecting Load: Connect your device or circuit to the output terminals.
- Operation: The power supply will now deliver the set voltage and current. If the load resistance is high, the unit will operate in Constant Voltage (CV) mode. If the load resistance is low and attempts to draw more current than the set limit, the unit will switch to Constant Current (CC) mode, and the voltage will drop to maintain the set current. The CV or CC indicator on the display will light up accordingly.
Application Examples
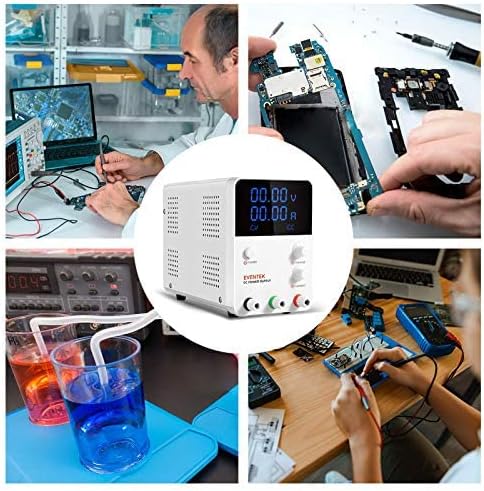
Figure 5.1: Versatile Applications. This power supply is suitable for a wide range of tasks, such as testing electronic circuits, powering small motors, electroplating experiments, and repairing various electronic devices.
6. Maintenance
Proper maintenance ensures the longevity and optimal performance of your power supply.
- Cleaning: Use a soft, dry cloth to clean the exterior of the unit. Do not use abrasive cleaners or solvents. Ensure the unit is powered off and unplugged before cleaning.
- Ventilation: Regularly check that the ventilation openings and the cooling fan are free from dust and debris. Blocked vents can lead to overheating. The intelligent temperature control system with an integrated thermal sensor helps manage fan speed and reduce noise, extending product life.
- Storage: When not in use for extended periods, store the power supply in a cool, dry place, away from direct sunlight and extreme temperatures.
- Fuse Replacement: If the unit fails to power on, check the fuse located in the fuse block on the rear panel. Replace it only with a fuse of the same type and rating.

Figure 6.1: Cooling System. The power supply features a fan cooling temperature control system with a larger diameter fan for efficient heat dissipation and lower noise levels, contributing to product longevity.
7. Troubleshooting
If you encounter issues with your power supply, refer to the following common problems and solutions:
- No Power:
- Check if the power cord is securely connected to both the unit and the wall outlet.
- Verify the wall outlet is functional.
- Check and replace the fuse if blown (located on the rear panel).
- No Output Voltage/Current:
- Ensure the output terminals are correctly connected to the load.
- Check if the voltage and current knobs are adjusted to desired levels.
- If in CC mode, the voltage may drop if the load resistance is too low for the set current.
- Check for short circuits in your load. The unit has short-circuit protection.
- Overheating:
- Ensure adequate ventilation around the unit. Clear any obstructions from the fan and vents.
- Reduce the load if operating continuously at maximum output.
- Inaccurate Readings:
- While the display is highly accurate, use a calibrated multimeter for critical measurements if necessary.
If the problem persists after attempting these solutions, please contact Eventek customer support.
8. Specifications
Technical specifications for the Eventek KBS DC Regulated Power Supply:
| Feature | Specification |
|---|---|
| Model Number | KBS |
| Output Voltage | 0-32V DC (Adjustable) |
| Output Current | 0-10.2A (Adjustable) |
| Output Power | 60 Watts |
| Voltage Display Precision | 0.01V |
| Current Display Precision | 0.001A |
| Input Voltage Range | 100-242 Volts AC |
| Cooling Method | Air Cooling (Intelligent Fan Control) |
| Max Operating Temperature | 40 Degrees Celsius |
| Protection Features | Overcurrent Protection, Overvoltage Protection, Short-Circuit Protection, Thermal Protection |
| Dimensions (Approx.) | 8.6 inches (L) x 4 inches (W) x 5.7 inches (H) |
| Weight (Approx.) | 3.0 lbs |
| UPC / GTIN | 634759897088 |
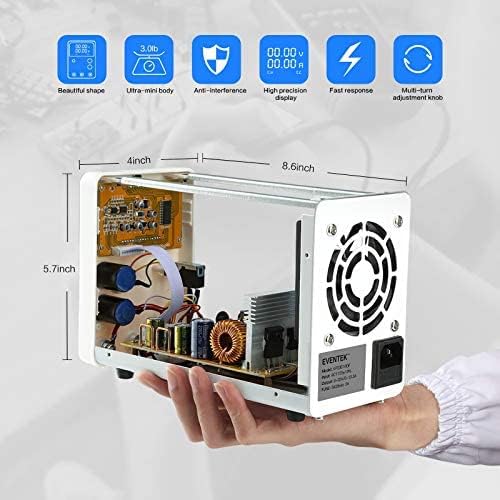
Figure 8.1: Product Dimensions and Internal Structure. This image provides an approximate size reference and shows the compact internal layout of the power supply.
9. Warranty and Support
Eventek DC power supplies are FCC certified, ensuring compliance with safety and electromagnetic compatibility standards.
- Warranty: This product comes with a 12-month warranty from the date of purchase.
- Money-Back Guarantee: A 30-day money-back guarantee is offered for customer satisfaction.
- Customer Support: For technical assistance, warranty claims, or any questions regarding your Eventek power supply, please refer to the contact information provided with your purchase or visit the official Eventek website.


