1. Introduction
Thank you for choosing the AUTO-VOX TD-2 Wireless Backup Monitor. This system provides a clear and stable view of your vehicle's rear, enhancing safety and convenience during reversing and parking. This manual provides detailed instructions for installation, operation, and maintenance to ensure optimal performance of your device.

Image: The AUTO-VOX TD-2 monitor displaying a clear rear view with active parking guide lines.
2. Key Features
- High-Quality Backup Camera: Features a 110-degree wide-angle lens for comprehensive rear visibility. IP68 waterproof design ensures durability in various weather conditions. Equipped with advanced night vision for clear images in low-light environments.

Image: Illustration of the camera's super night vision function, showing clear visibility in dark conditions compared to standard cameras.

Image: The camera unit shown with water droplets, highlighting its IP68 waterproof rating.
- Electromagnetic Wave Countermeasures: Utilizes a 2.4GHz digital signal to prevent interference from other electronic devices such as navigation systems, car TVs, and ETC devices, ensuring a stable and clear video feed.

Image: A diagram illustrating the digital signal transmission between the camera and monitor, emphasizing zero interference from other car electronics.
- Easy Installation: Wireless design eliminates the need for complex wiring. The system is pre-paired at the factory, allowing for immediate use after installation.
- Versatile Compatibility: Suitable for a wide range of vehicles including standard cars, light vehicles, trucks, RVs, combines, and heavy machinery. Offers adjustable guide lines with five different patterns to suit various vehicle heights and preferences.
- Reusable Suction Cup Mount: The included gel suction cup stand allows for flexible monitor placement and can be washed and reused multiple times to maintain strong adhesion.

Image: A detailed view of the reusable gel suction cup mount, showing its flexible design.

Image: The monitor mount demonstrating its 360-degree rotation for optimal viewing angles.
3. Setup and Installation
3.1 Package Contents

Image: All components of the AUTO-VOX TD-2 system, including the 4.3-inch monitor, backup camera, bracket, power box, power adapter, cosmetic box, instruction manual, and wiring accessories.
3.2 Camera Installation
The camera is designed for easy installation, typically near the license plate. Follow these steps:
- Connect to Reverse Light: Connect the camera's power cable to your vehicle's reverse light wiring. This ensures the camera activates automatically when you shift into reverse.
- Mount the Camera: Secure the camera in the desired location, usually above the license plate. Ensure it has a clear view of the rear.
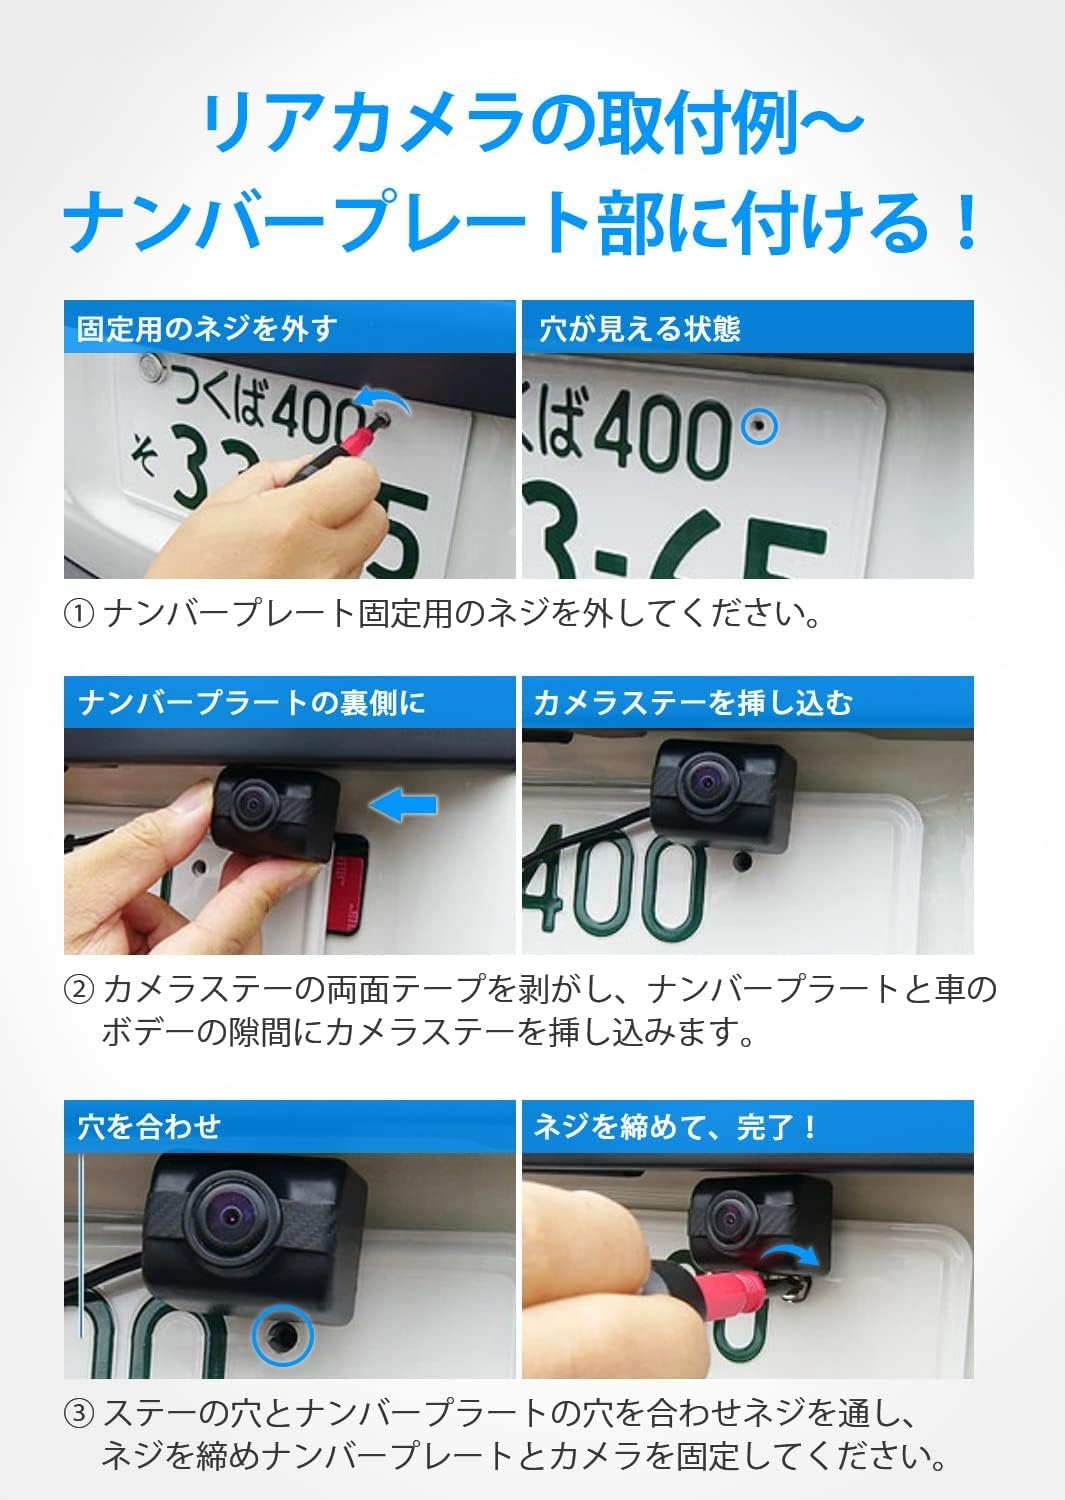
Image: Detailed steps for installing the camera by removing license plate screws, inserting the camera bracket, and re-securing.

Image: A simplified diagram illustrating the wireless connection: camera wired to the backup lamp, and monitor powered via the cigarette lighter socket.
3.3 Monitor Installation
- Attach Suction Cup: Clean the dashboard or windshield surface. Press the suction cup firmly onto the surface and engage the lever to secure it.
- Mount Monitor: Attach the monitor to the suction cup mount. Adjust the angle for optimal viewing.
- Power Connection: Plug the monitor's power adapter into your vehicle's cigarette lighter socket.

Image: The USB power adapter connected to the car's cigarette lighter socket, providing power to the monitor.
4. Operating Instructions
The AUTO-VOX TD-2 monitor features an intuitive menu for easy operation.

Image: The monitor's menu screen showing options for pairing, brightness/contrast control, mirror/normal image, guide line settings, and reset.
4.1 Menu Options
- Pair: Used for pairing the camera with the monitor. The unit is pre-paired from the factory, so this is typically not needed unless re-pairing is required.
- B/C Control: Adjusts the brightness and contrast of the display.
- Mirror/Normal: Toggles between mirror image (default for rear view) and normal image.

Image: A visual comparison demonstrating the mirror image and normal image display options.
- Guide Line: Enables or disables the parking guide lines. If enabled, you can select from five different patterns to best suit your vehicle and preference.

Image: Various adjustable parking guide line patterns displayed on a road, illustrating customization options.
- Reset: Resets all settings to their factory defaults.
5. Maintenance
To ensure the longevity and optimal performance of your AUTO-VOX TD-2 system, follow these simple maintenance guidelines:
- Cleaning the Camera Lens: Regularly wipe the camera lens with a soft, damp cloth to remove dirt, dust, or water spots that may obstruct the view. Avoid abrasive cleaners.
- Cleaning the Monitor Screen: Use a soft, lint-free cloth to clean the monitor screen. For stubborn smudges, a screen cleaner designed for electronics can be used.
- Suction Cup Care: If the suction cup loses its stickiness, rinse it with warm water and let it air dry. This will restore its adhesive properties.
- Cable Inspection: Periodically check all cables for any signs of wear, damage, or loose connections. Ensure they are securely routed and not pinched.
- Storage: If storing the device for an extended period, disconnect it from power and store it in a cool, dry place away from direct sunlight and extreme temperatures.
6. Troubleshooting
If you encounter any issues with your AUTO-VOX TD-2 system, please refer to the following common troubleshooting steps:
- No Image on Monitor:
- Ensure the monitor is properly powered on and connected to the vehicle's power source.
- Check if the camera is receiving power (e.g., when the vehicle is in reverse).
- Verify that the camera and monitor are within wireless range and there are no major obstructions.
- Try re-pairing the camera and monitor via the 'Pair' option in the menu.
- Flickering or Unstable Image:
- Ensure there are no strong electromagnetic interference sources nearby.
- Check for loose connections at both the camera and monitor.
- Relocate the monitor or camera slightly to improve signal strength.
- Image is Upside Down or Reversed:
- Adjust the 'Mirror/Normal' setting in the monitor's menu.
- Guide Lines Not Displaying or Incorrect:
- Check the 'Guide Line' setting in the monitor's menu to ensure it is enabled and the correct pattern is selected.
If the issue persists after trying these steps, please refer to the official AUTO-VOX support channels or the product's original packaging for further assistance.
7. Specifications
| Feature | Specification |
|---|---|
| Model Number | TD-2 |
| Screen Size | 4.3 inches |
| Display Type | LCD |
| Display Technology | LED |
| Video Capture Resolution | 480p |
| Lens Type | Wide-angle |
| Lux Rating | 0.1 Lux |
| Voltage | 12 Volts |
| Color | Black |
| Mounting Type | Dashboard Mount (Suction Cup Type) |
| Product Dimensions | 12 length x 17 width x 9.5 height cm |
| Package Size | 16.9 x 12.6 x 9.7 cm; 490 g |
| Battery Included | No |
| First Available Date | 2018/6/11 |
8. Warranty and Support
For information regarding product warranty, technical support, or service inquiries, please refer to the warranty card included with your product packaging or visit the official AUTO-VOX website. Keep your purchase receipt as proof of purchase for warranty claims.


