1. Introduction
This manual provides essential information for the safe and efficient use of your RICH SOLAR 100 Watt 12 Volt Monocrystalline Solar Panel. Please read this manual thoroughly before installation and operation. Proper installation and maintenance are crucial for optimal performance and longevity of the solar panel.
The RICH SOLAR 100W solar panel is designed for various off-grid applications, including RVs, trailers, campers, marine vessels, and other remote power needs. It features high-efficiency monocrystalline cells and a durable construction to withstand challenging environmental conditions.
2. Safety Information
- Always wear appropriate personal protective equipment (PPE) including gloves and eye protection during installation.
- Do not attempt to disassemble or modify the solar panel. This will void the warranty and may cause injury.
- Solar panels generate electricity when exposed to light. Handle with care and avoid touching exposed wires or terminals.
- Ensure all wiring connections are secure and properly insulated to prevent electrical shock or short circuits.
- Install the solar panel in a location with adequate ventilation and away from flammable materials.
- Consult with a qualified electrician or solar professional if you are unsure about any part of the installation process.
- Do not step on or place heavy objects on the solar panel.
3. Product Features
The RICH SOLAR 100 Watt Monocrystalline Solar Panel is engineered for reliability and performance:
- High Efficiency: Utilizes advanced 9BB (9 Busbar) monocrystalline cells for superior power generation, even in low-light conditions.
- Rugged Durability: Constructed with a robust anodized aluminum frame and 3.2mm low-iron tempered glass, certified to withstand significant wind (2400Pa) and snow (5400Pa) loads.
- Easy Installation: Features 14 pre-drilled holes for compatibility with various mounting options, including Z-brackets, ground mounts, side pole mounts, and tilt mounts.
- Weatherproof Design: Equipped with an IP65-rated junction box and IP67-rated solar connectors for protection against dust and water ingress.
- Standard Connectivity: Includes 3-foot cables with industry-standard connectors for easy integration into existing solar systems, allowing for series or parallel configurations.

Image: Detailed view of the solar panel's construction, emphasizing its durable components like the aluminum frame and tempered glass.

Image: Illustration comparing 9BB (9 Busbar) RICH Solar cells with standard 5 Busbar cells, demonstrating improved efficiency.
4. Specifications
| Attribute | Value |
|---|---|
| Maximum Power (Pmax) | 100 Watts |
| Maximum Power Voltage (Vmp) | 18.6 Volts |
| Maximum Power Current (Imp) | 5.38 Amps |
| Open Circuit Voltage (Voc) | 22.8 Volts |
| Short Circuit Current (Isc) | 5.78 Amps |
| Maximum System Voltage (Vmax) | 1000VDC |
| Dimensions (L x W x H) | 39" x 21.3" x 1.2" |
| Item Weight | 13.2 Pounds |
| Material | Aluminum, Monocrystalline Silicon, Tempered Glass |
| Efficiency | High Efficiency |
| Upper Temperature Rating | 194 Degrees Fahrenheit |

Image: Dimensional drawing of the solar panel, indicating length, width, and thickness for installation planning.
5. Setup and Installation
Proper installation is critical for the performance and safety of your solar panel. Follow these general guidelines:
5.1 Site Selection
- Choose a location that receives maximum direct sunlight throughout the day, free from shading by trees, buildings, or other obstructions.
- Consider the angle and orientation of the panel to optimize sun exposure based on your geographical location and seasonal variations.
5.2 Mounting
- Securely mount the solar panel using appropriate brackets (e.g., Z-brackets, tilt mounts) that are compatible with the panel's pre-drilled holes.
- Ensure the mounting structure is strong enough to support the weight of the panel and withstand wind loads.
- Maintain adequate clearance beneath the panel for airflow to prevent overheating, which can reduce efficiency.
5.3 Wiring Connections
- Connect the solar panel to a compatible charge controller. The charge controller regulates the voltage and current from the solar panel to charge your battery safely.
- Use appropriate gauge wiring for your system to minimize power loss. The panel comes with 3-foot cables with standard connectors.
- Ensure correct polarity (+ to + and - to -) when making connections. Incorrect polarity can damage the panel, charge controller, or battery.
- For multiple panels, they can be wired in series to increase voltage or in parallel to increase current, depending on your system requirements and charge controller specifications.
- All connections should be tight and protected from environmental elements.
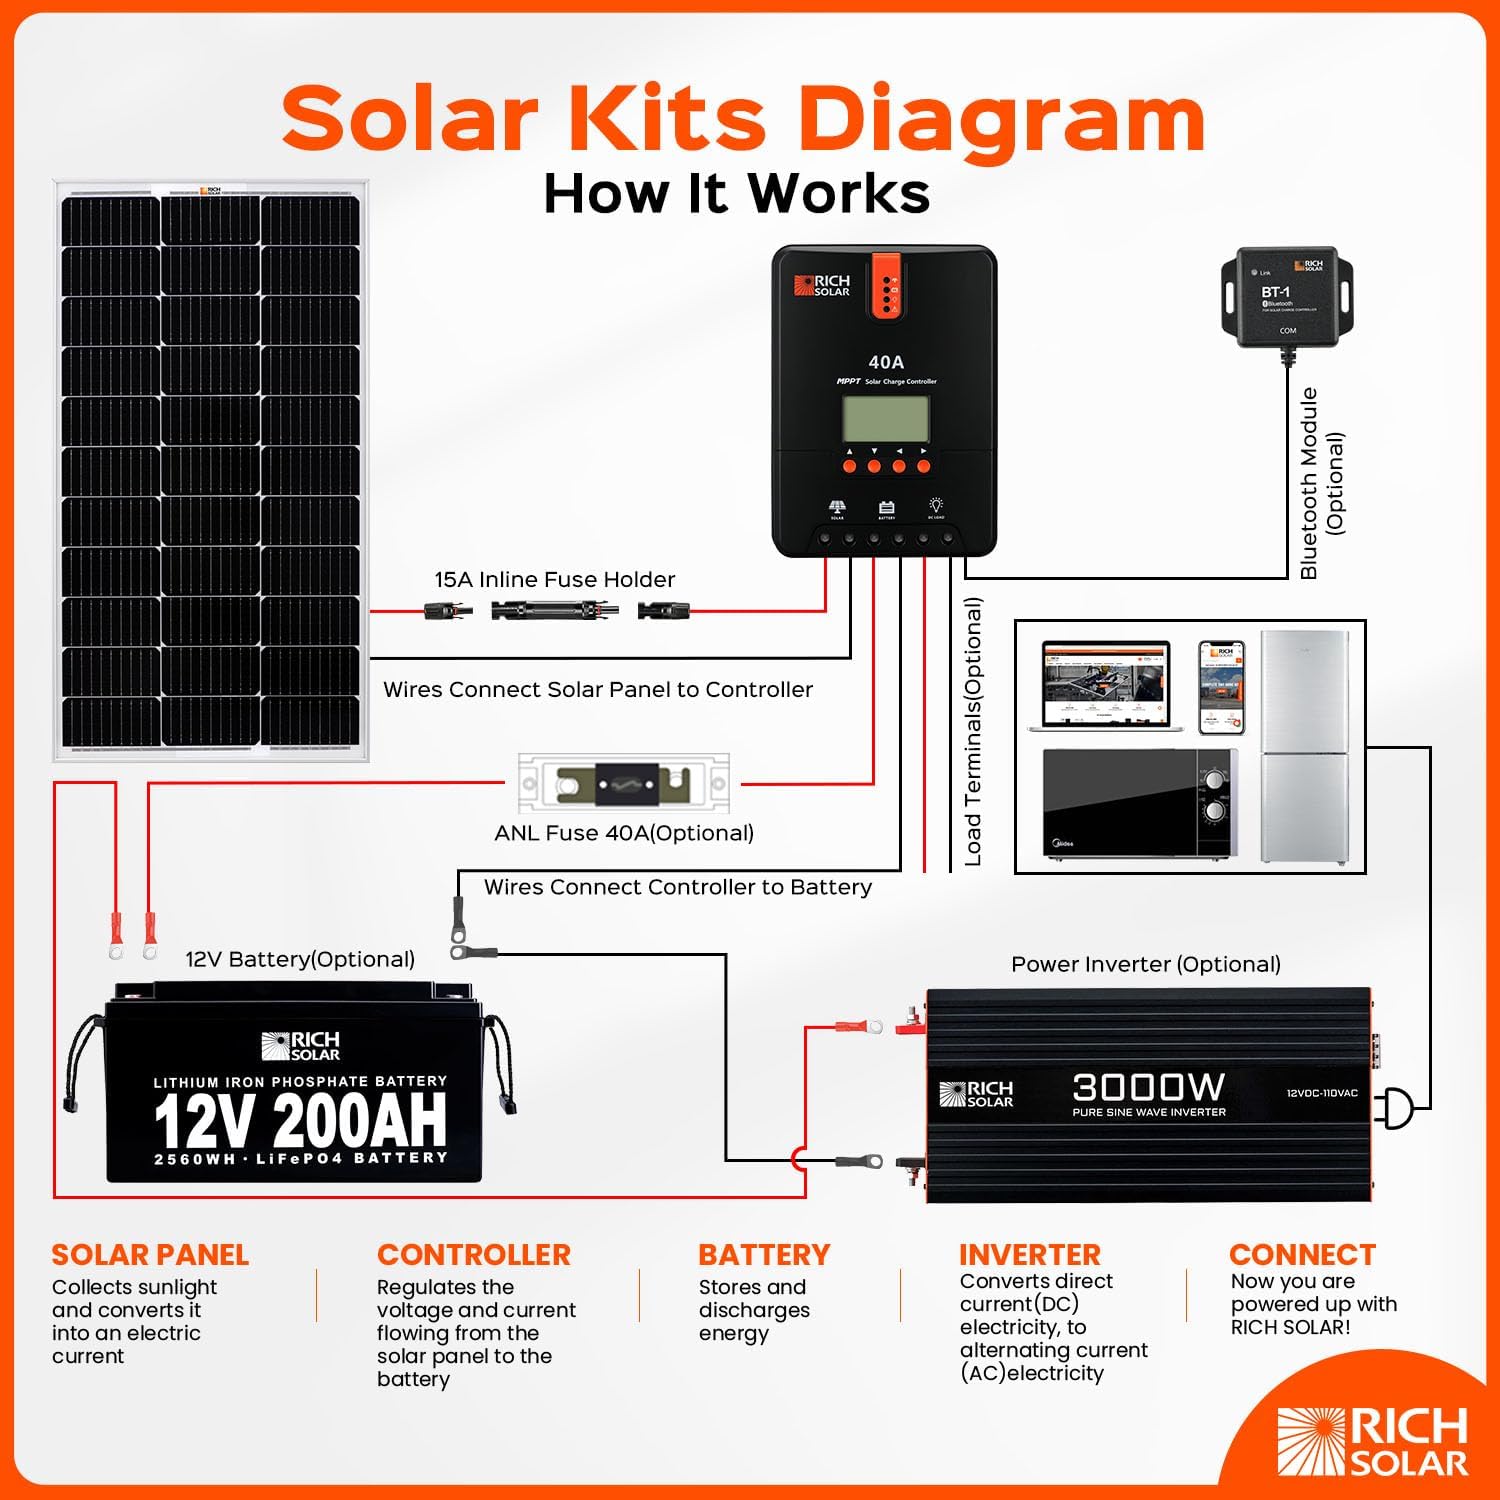
Image: A solar kit diagram demonstrating how the solar panel connects to a charge controller, battery, and inverter for a complete off-grid system.
6. Operating Instructions
Once installed, your RICH SOLAR panel will begin generating electricity when exposed to sunlight. The charge controller will manage the power flow to your battery bank.
- Monitor your charge controller's display (if applicable) to ensure proper charging and system health.
- Ensure your battery bank is compatible with the solar panel's voltage output (12V system).
- Avoid shading the panel, as even partial shading can significantly reduce power output.
- For optimal performance, ensure the panel is clean and free from debris.

Image: Examples of the solar panel in use for RV, camping, and cabin off-grid power applications.
7. Maintenance
Regular maintenance helps ensure the longevity and efficiency of your solar panel:
- Cleaning: Periodically clean the surface of the solar panel with a soft cloth and water to remove dirt, dust, leaves, and other debris. Avoid abrasive cleaners or harsh chemicals.
- Inspection: Regularly inspect the panel for any physical damage, such as cracks in the glass, loose frames, or damaged cables.
- Connections: Check all electrical connections for tightness and corrosion. Ensure wiring is not frayed or exposed.
- Shading: Trim any vegetation that may grow and cause shading on the panel.
8. Troubleshooting
If you experience issues with your solar panel, consider the following common troubleshooting steps:
- Low or No Power Output:
- Check for shading on the panel surface.
- Clean the panel surface if it is dirty.
- Verify all electrical connections are secure and correct (polarity).
- Inspect cables for damage or breaks.
- Ensure the charge controller is functioning correctly and is compatible with the panel and battery.
- Battery Not Charging:
- Confirm the solar panel is producing power (measure voltage at the panel's output).
- Check the charge controller's status indicators.
- Verify battery connections and health.
- Overheating:
- Ensure adequate airflow around the back of the panel.
- Verify the panel is not installed in an enclosed space without ventilation.
If problems persist after performing these checks, contact customer support.
9. Warranty Information
The RICH SOLAR 100 Watt Monocrystalline Solar Panel comes with a comprehensive warranty:
- 25-year limited warranty for power output.
- 5-year limited warranty for material and craftsmanship.
Please retain your proof of purchase for warranty claims. For detailed terms and conditions, refer to the official RICH SOLAR warranty documentation or contact customer support.
10. Customer Support
For technical assistance, warranty inquiries, or additional product information, please contact RICH SOLAR customer support. You can find contact details and further resources on the official RICH SOLAR website or through your retailer.
Visit the RICH SOLAR Store for more products and support.


