1. Introduction
Thank you for choosing the Zerone LP-838 Small Power Amplifier. This manual provides essential information for the safe and efficient operation of your device. Please read these instructions thoroughly before use and retain them for future reference.
2. Product Overview
2.1 Key Features
- Compact and portable design.
- RCA and 3.5mm audio input compatibility.
- High-power audio amplifier chip for 2.1 channel output.
- Adjustable Treble, Bass, and Volume controls.
- Durable all-aluminum alloy shell for electromagnetic interference reduction.
2.2 Component Identification
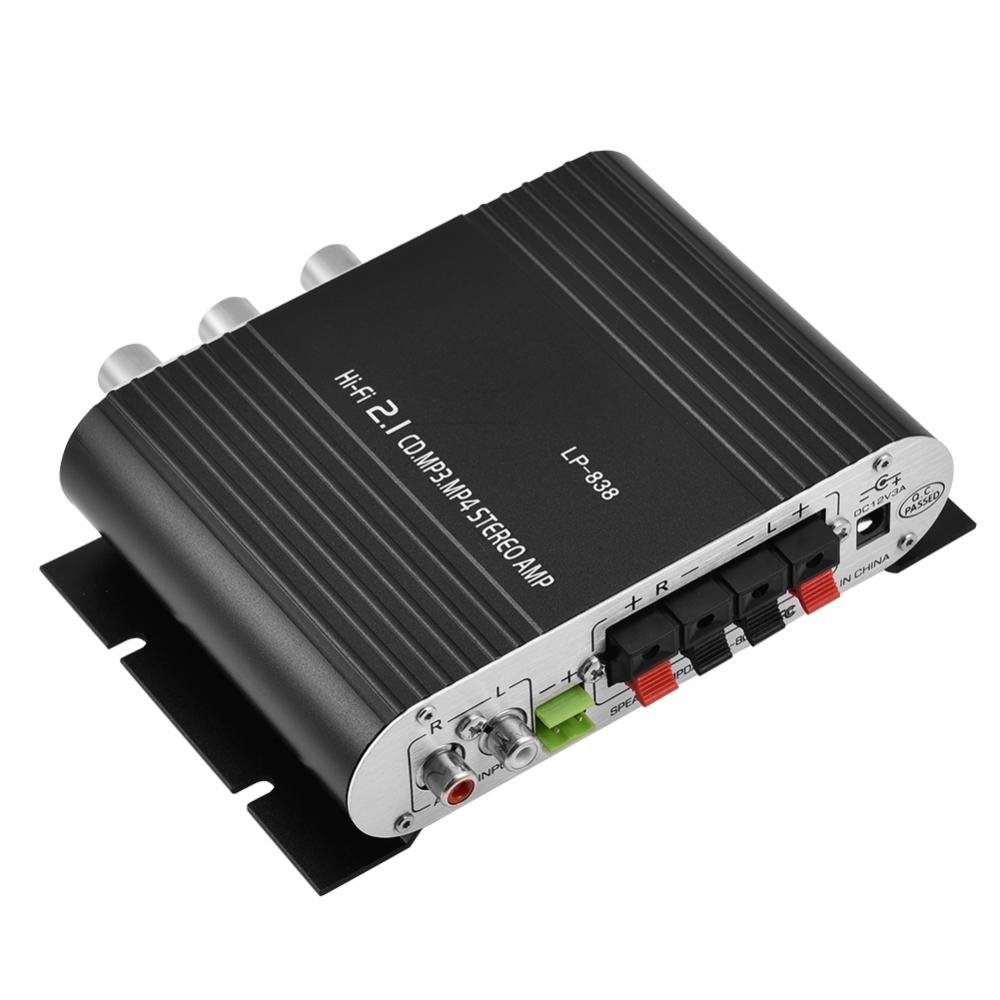
Figure 1: Front Panel Controls and Inputs
This image displays the front panel of the LP-838 amplifier. From left to right, it features a power switch, a bass volume knob, a 3.5mm MP3 input jack, and three rotary knobs for Treble, Bass, and Master Volume control. The unit also supports RCA audio input, as indicated by the text overlay.
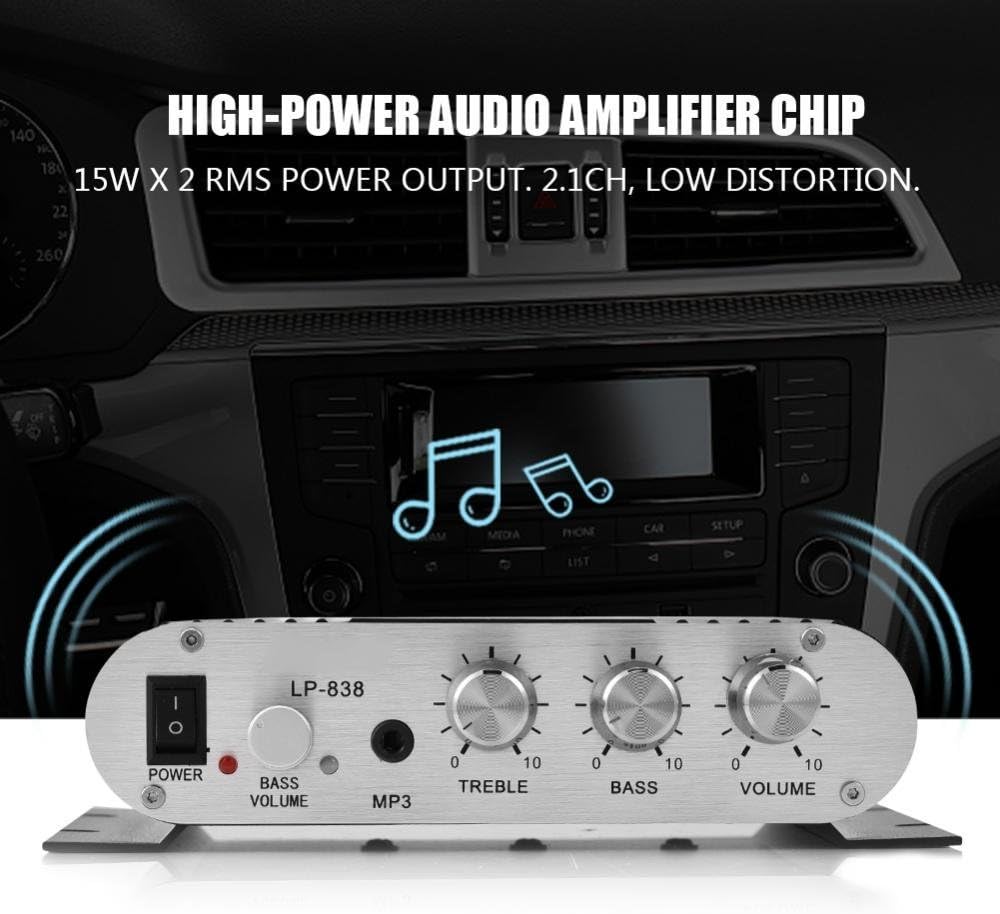
Figure 2: Rear Panel Connections
This image shows the rear panel of the LP-838 amplifier. On the left are the RCA audio input jacks (red for right, white for left). In the center are the spring-clip speaker terminals for connecting left and right speakers. On the right is the DC 12V/3A power input jack and a 'Q.C. PASSED' stamp, indicating quality control.
Front Panel:
- POWER Switch: Toggles the amplifier on/off.
- BASS VOLUME Knob: Adjusts the bass level of the audio output.
- MP3 Input: 3.5mm jack for connecting portable audio devices.
- TREBLE Knob: Adjusts the high-frequency response.
- BASS Knob: Adjusts the low-frequency response.
- VOLUME Knob: Controls the overall output volume.
Rear Panel:
- AUDIO INPUT (RCA): Red and white RCA jacks for connecting audio sources (e.g., DVD players, computers).
- SPEAKER OUTPUTS (+R -R +L -L): Spring-clip terminals for connecting passive speakers. Ensure correct polarity (+ to + and - to -).
- DC 12V/3A Input: Power input jack for connecting the external power adapter (not included).
3. Setup
- Connect Speakers: Connect your passive speakers to the SPEAKER OUTPUT terminals on the rear panel. Ensure the positive (+) terminal of the amplifier connects to the positive (+) terminal of the speaker, and the negative (-) terminal of the amplifier connects to the negative (-) terminal of the speaker. The amplifier supports speakers with an impedance of 4-8 Ohms.
- Connect Audio Source:
- For RCA input: Connect your audio source (e.g., CD player, TV, computer) to the RCA AUDIO INPUT jacks on the rear panel using an RCA cable.
- For 3.5mm input: Connect your portable audio device (e.g., smartphone, MP3 player) to the MP3 input jack on the front panel using a 3.5mm audio cable.
- Connect Power: Connect a compatible DC 12V/3A power adapter (not included) to the DC 12V/3A input jack on the rear panel. Plug the power adapter into a wall outlet.
Important: Ensure all connections are secure before powering on the amplifier.
4. Operating Instructions
- Power On: Flip the POWER switch on the front panel to the 'ON' position. The power indicator light will illuminate.
- Select Input: The amplifier automatically uses the active input. If both RCA and 3.5mm inputs are connected, the 3.5mm input may take precedence.
- Adjust Volume: Start with the VOLUME knob set to a low level. Begin playing audio from your source, then slowly increase the VOLUME knob to your desired listening level.
- Adjust Tone: Use the TREBLE and BASS knobs to fine-tune the high and low frequencies according to your preference. The BASS VOLUME knob provides additional control over the bass output.
- Power Off: When finished, turn the VOLUME knob down to its minimum setting, then flip the POWER switch to the 'OFF' position.
5. Maintenance
- Cleaning: Use a soft, dry cloth to clean the exterior of the amplifier. Do not use liquid cleaners or solvents.
- Ventilation: Ensure the amplifier is placed in a well-ventilated area to prevent overheating. Do not block the ventilation slots.
- Storage: When not in use for extended periods, disconnect the power adapter and store the amplifier in a cool, dry place.
6. Troubleshooting
| Problem | Possible Cause | Solution |
|---|---|---|
| No power | Power adapter not connected or faulty; power switch off. | Ensure power adapter is securely connected and functional. Flip power switch to ON. |
| No sound output | Incorrect audio input connection; speaker wires loose or incorrect polarity; volume too low; audio source issue. | Check audio input cables and connections. Verify speaker wire connections and polarity. Increase volume. Test audio source with another device. |
| Distorted sound | Volume too high; incorrect tone settings; faulty audio source or cable. | Reduce volume. Adjust Treble and Bass knobs. Test with a different audio source or cable. |
| Humming or buzzing noise | Ground loop issue; interference from other electronics; faulty cables. | Ensure all components are properly grounded. Move amplifier away from other electronic devices. Try different audio cables. |
7. Specifications
- Brand: Zerone
- Model Number: Zeroneq8ae3d902g-02 (LP-838)
- Voltage: 14.4 Volts (Operating)
- Number of Channels: 2
- Speaker Impedance: 4-8 Ohms
- Mounting Type: Surface Mount
- Item Weight: 7.8 ounces
- ASIN: B07DM4QJGX
- UPC: 763741184919
- Date First Available: July 4, 2019
8. Warranty Information
For specific warranty terms and conditions, please refer to the documentation provided at the time of purchase or contact your retailer. Warranty coverage typically includes defects in materials and workmanship under normal use.
9. Support
If you encounter issues that cannot be resolved using the troubleshooting guide, please contact the retailer or manufacturer for assistance. Provide your product model number (LP-838) and a detailed description of the problem when seeking support.


